The instructions in the tutorial are a general guide to painting the textures. As with the sculpting tutorials, once you feel comfortable working with those paint tools and paint layers, you are encouraged to experiment with brush and layer settings and to develop your own texture designs.
Getting Started
Go to the Sculpt Layers and merge as many sculpt layers as possible. Reducing the number of sculpt layers frees up memory for painting. Remember that you will be painting on a copy, so all the sculpt data is saved in the previous incremental files.
The textures in this tutorial will be 2048 pixels (2k) in size and 8 bits in depth because these settings work best on most computers and are usually sufficient for most applications. The 4096-pixel (4k) textures require considerable graphics memory, especially if there are several layers of large textures. With that said, if your computer hardware can handle 2048-pixel, 16-bit textures, we recommend that you use those settings instead because Mudbox’s paint brushes work better with 16-bit textures.
Creating a New Mudbox Material
At this point, the creature and the spheres that represent the creature’s eyes are all sharing the Default material. To avoid problems later, you will create a new Mudbox material and assign it to the eyes. Go to the Create menu in the menu bar, select Materials, and then choose Mudbox material. The new materials properties will display in a dialog box and in the Object list, you should see a new material object. You may close the material properties dialog box. Right-click on the new material, choose Rename Material and rename it as Eyes. To assign the new material to the eyes in the Object List, right-click on the l_eye object, select Assign Existing Material, and choose the Eye material. Repeat the process for the r_eye object.
Creating Basic Skin
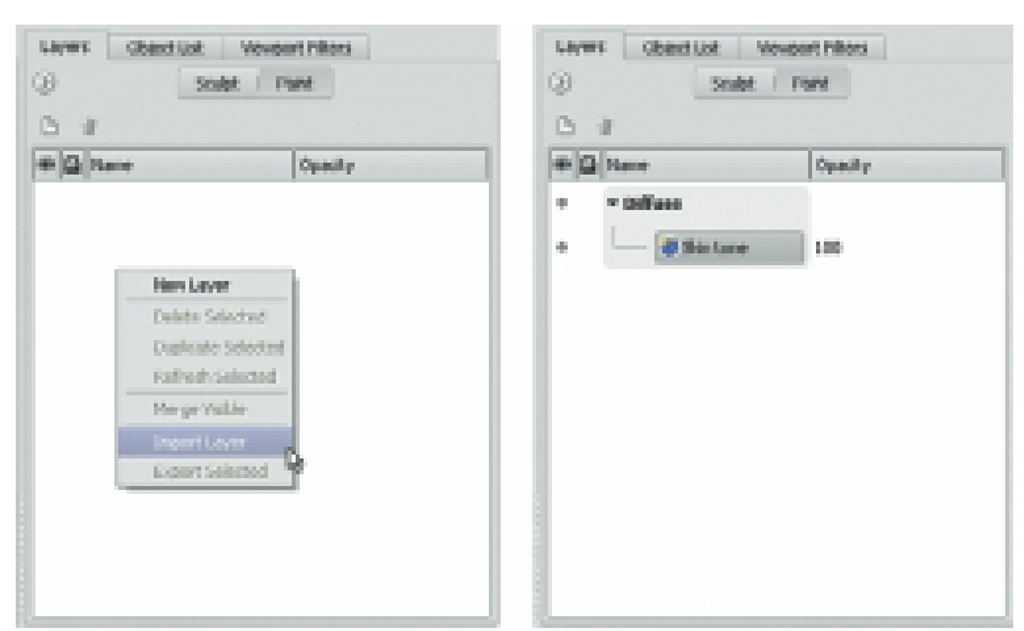
Although it is possible to paint all of the textures for the creature using only Mudbox’s paint tools, sometimes it is more efficient to take advantage of Mudbox’s ability to import standard image files as paint layers to establish a starting point. In this case, you will use the files skin_tone.tif and skin_bump.tga to quickly create a basic skin for the creature. If it is not already open.To import the file skin_tone.tif as a paint layer, click anywhere in the Paint Layers window, select Import Layer from the contextual menu, and browse to the file skin_tone.tif.
The file is automatically imported as a diffuse layer (Figure 5.6).
FIG 5.6 Importing an Image Document as a Diffuse Paint Layer.
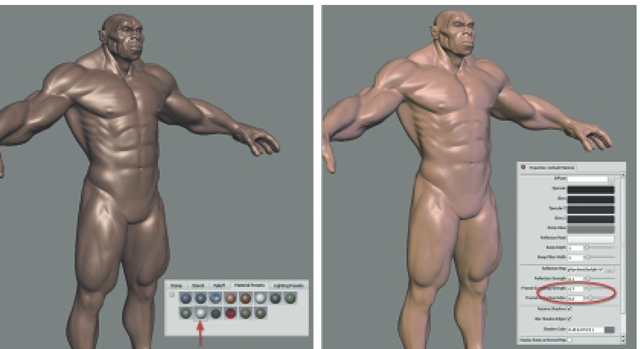
When the skin_tone.tif file is imported, the color of the model should have changed slightly, although not as much as you had probably expected. This happens because the brown color in the diffuse channel of Default material is being multiplied with the texture in the Diffuse layer. There are several ways to fix the problem, but the quickest is to click on the Material Presets tray and click on the Porcelain material preset (the white preset in the second row) to apply it to the model. At this point, the color of the model should be lighter. Now, go to the Object List and select the Default Material. In the Properties tray, adjust the Fresnel Scattering Strength to about 0.7, the Reflection Strength to about 0.17. The model should now have a skin tone similar to Figure 5.7.
In the next step, you will add a bump map to the entire figure to simulate fine skin wrinkles. Unlike sculpting or displacement mapping, bump mapping does not change the geometry of an object but only simulates perturbations on the surface. It is, often, more efficient to simulate details like wrinkles or skin pores than to actually sculpt them.
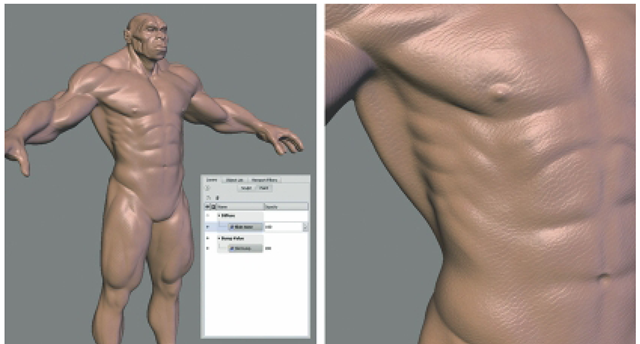
Click on the New Layer icon in the Layers window to create a new bump layer. In the Create New Paint Layer dialog, name the layer Skin Bump, choose 2048 for Size, TIFF 8 bit for the file type, and Bump Value for the Channel. A new Bump Value group should appear in the Layers window with one layer. Now, right-click on the Bump Value group and select the Import Layer. Browse to the file skin_bump.tga to import it. When the file skin_bump.tga is initially imported, the model will appear to have serious skin problems. To reduce the effect of the bump map, click on the Opacity field of the new bump layer, and set the value to about 15. If you zoom in on the model, you should see a base skin tone with a skin texture (Figure 5.8). The details on skin bump texture applied is larger or more coarse than normal human skin, but then again, the creature is only human-like, so there is room for artistic license. Select Paint Erase and erase the bump texture from the fingernails and the toenails. Reduce the Paint Erase strength and remove some of the bump texture from the lips and eyelids.
FIG 5.7 The Basic Skin Tone Is Quickly Created by Importing an Image Document as Paint Layer and Adjusting the Materials Properties.
FIG 5.8 The Combination of the Basic Skin Color and the Bump Map Create a Good Starting Point for the Creature’s Skin.
Adding Depth and Color to Skin
Human skin is never just one color. The optical properties of skin, arteries, veins, and oxygenated and deoxygenated blood near the skin surface absorb, reflect, and scatter light to create a myriad of colors that we see as subtle shades of red, blue, and even green. Human skin is complex in that its color and texture varies from ethnic group to ethnic group, varies between individuals in the same ethnic group, and even varies on one individual. So, to add depth and realism to the creature’s basic skin texture, you will paint red and blue hues on separate paint layers.
First, you will paint the red skin hues created by exposure to the sun or oxygenated blood vessels close to the skin surface. Specific places like the fingers, toes, shoulders, elbows, knees, areas on the chest and back, and the parts of the face like the nose and lips often have subtle reddish hues. Create a new Diffuse layer and name it as Red Hues. Select the Paint Brush and set the following properties: enable Mirroring across the x axis, set the Size to about 8 and Strength to about 5. Once you gain experience with painting in Mudbox, you may change the Size and Strength to suite your painting style. Click on the Color swatch in the Properties tray, and from the Color Picker, choose deep red color. The red used in the tutorial is R: 149, G: 42, B: 51. Once you have a red you like, save it in the Color Picker, so that you can use it again later. Finally, from the Stamp tray, select the bw_leafVein.tif. In the Paint Brush properties, check the Randomize option for the stamp and move the Randomize sliders a bit, so that the stamp is randomly applied. The stamp will break up the brush stroke to achieve a more organic feel.
The goal is to apply a subtle layer of paint that suggests a red hue. Press lightly on the pen as you apply the brush strokes and don’t linger too long in one place. If you press too hard or stay too long on one area, the color will be too saturated. If you apply too much color, select the Paint Erase brush, set its Strength to about 10, load the bw_leafVein.tif as a stamp, and check Randomize, so that the eraser will remove paint with the same pattern as the Paint Brush applied.
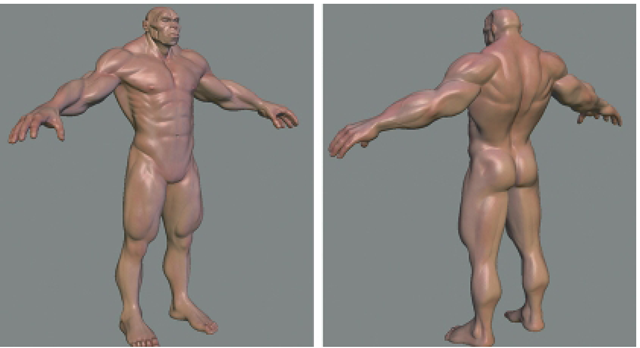
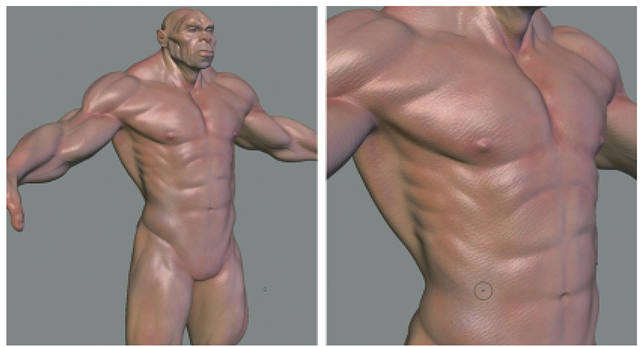
Take a look at Figure 5.9 to get an idea of where to apply the red hue. As mentioned earlier, important areas to apply red are the hands, specifically the finger tips. As you move up the arms, apply a light coat of red to the outside of the arms and give the elbow a healthy red glow. Apply a more saturated coat of the red to the shoulders and the upper back. As you move around to the front, apply red to the upper chest as seen in Figure 5.9. On the lower extremities, apply color to the thighs, knees, and bridge of the feet. On the face, apply red to the lips, tip of the nose, cheeks, and tips of the ears. Try not to make the creature look like it is wearing makeup but instead only suggest the red tones. The red hue may also be used to emphasize surface details by making natural depressions caused by muscles or skin folds a bit darker, much like an ambient occlusion map would do. Use Paint Erase to remove some of the red from the fingernails and toenails.
FIG 5.9 Skin Is Never Just One Color so to Make the Skin More Natural Red Hues Are Painted In Specific Areas of the Body.
Create another new diffuse layer and name it as Blue Hues. Blue skin hues are often created by veins and deoxygenated blood near the skin surface. Use the Paint Brush with the same properties including the stamp. Load a gray blue color (R: 100, B: 100, G: 140). Then mix in some of the blue hue into the red areas. If the paint application makes the skin appear bruised, you have gone too far. Use the Paint Erase tool to remove some color. As you did with the red hue, apply the blue hue into the depressions caused by muscles and skin folds. On the face, apply a bit of blue around the eyes especially where the dark circles usually appear.
You may also suggest stubble by painting the blue hue where the beard and mustache would grow. Finally, turn off the stamp, enable the Steady Stroke option, and apply the blue hue to the veins on the arms and legs (Figure 5.10).
The combination of the base skin tone texture, the bump map, and the red and blue hues should produce an organic and natural skin texture.
However, because you painted the red and blue hues with Mirroring enabled, both sides of the model have been painted symmetrically. To break up the symmetry, use the Paint Erase tool with Mirroring disable, and randomly remove some of the color in the red and blue hue layers. You may also use the Paint Brush with Mirroring disabled to asymmetrically reapply the color. You may experiment with the skin texture by adjusting the layer opacities, by adding more skin details like a layer of green hues or a layer with skin blemishes.
FIG 5.10 Blue Hues Mixed into the Red Areas Add Realism and Depth to the Skin Textures.
Adding Details Creating Dirt
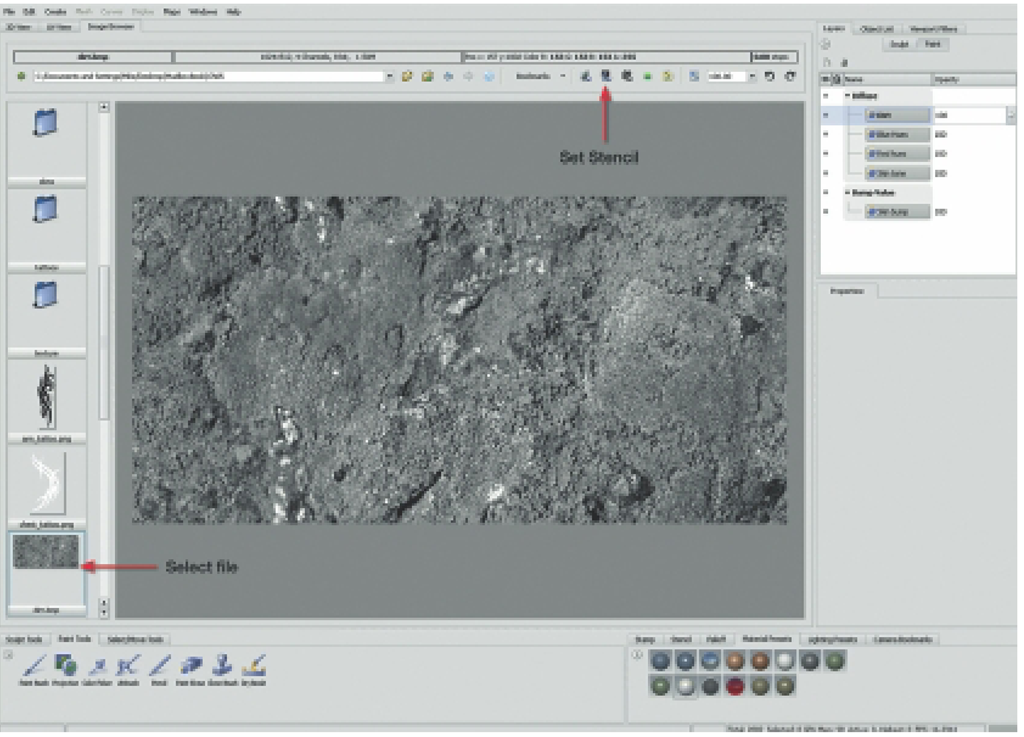
Most creatures probably don’t have a very good hygiene, so in the next few steps, you will add dirt to the creature’s skin. Create a new Diffuse layer and name it as Dirt. Switch to the Image Browser and navigate to the file dirt.bmp. Once you have located the file, click once on it to display it in the Image Browser. Next, click on the Set Stencil button to use the image as a stencil with the Paint Brush, and then switch back to the 3D view. In the 3D view, the image will appear as a stencil in the scene (see Figure 5.11). Make sure that the Paint Brush is selected and load a gray-green color (we used R: 90, G: 80, B: 100).
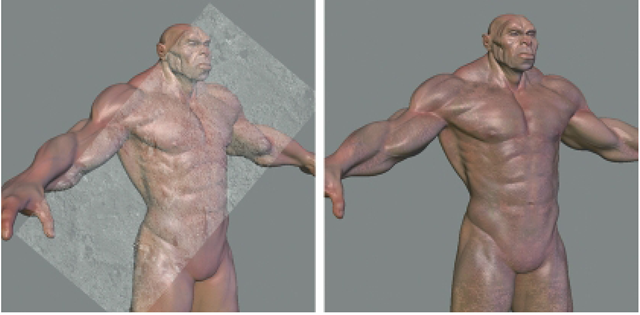
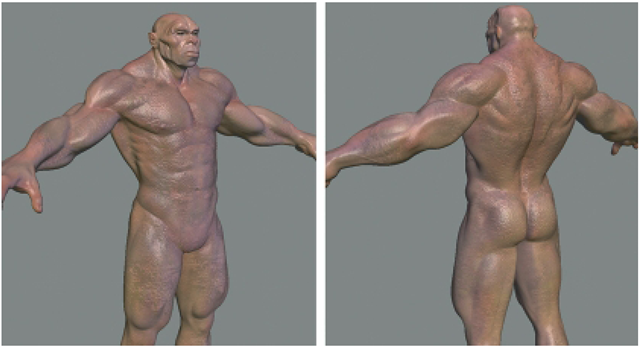
Stencils may be moved, scaled, and rotated by pressing the S key and then LMB to rotate, MMB to move, and RMB to scale. Position the stencil over the model similar to Figure 5.12 and begin to paint. The green color will be applied using the gray scale levels in the stencil to create an organic distribution of dirt (Figure 5.12). Once you have applied some dirt, disable mirroring to introduce some asymmetry. Although the painted dirt looks good, you can make it more realistic by simulating depth with a bump map. To do this, simply select the Dirt layer, right-click, and choose Duplicate Layer. Then move the copy to the Bump Value group (Figure 5.13). The data in the Diffuse layer will be used to create a quick and dirty bump map (no pun intended).
If you want to make a better dirt bump map, select the Dirt layer in the Diffuse group right-click, and choose Export Selected, and save the layer as a Photoshop file.
FIG 5.11 In the Image Browser, Navigate to the File dirt.bmp and Set It as a Stencil for the Paint Brush.
FIG 5.12 Position the Stencil over the Model, and with the Paint Brush, Paint Dirt Where You Want It on the Model.
FIG 5.13 Add Depth to the Dirt with a Bump Map.
If you don’t own a copy of Photoshop, all you need is an image editor that can open and edit Photoshop files like Painter or PaintShop Pro. Open the exported Mudbox layer in Photoshop, then desaturate and adjust the levels to increase the contrast, and save the file. Back in Mudbox, go to the Bump Value group and import the edited Dirt layer as a bump map. The edited version of the Dirt layer should produce better bump results.
Adding Tattoos
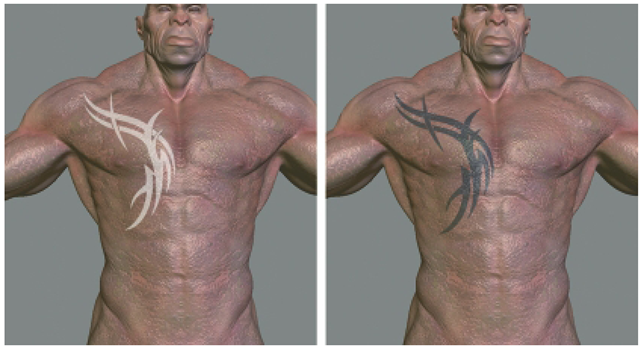
In the steps that follow, you will use a stencil and the Paint Brush to paint a tattoo on the creature’s chest, and once again, you will use Mudbox’s interoperability with Photoshop to add a tattoo armband on the left arm. Create a new diffuse layer and name it as Tattoos. Switch to the Image Browser and locate the file chest_tattoo.tif and select it by clicking once on it. Then click on the Set Stencil button to set the image as a Stencil. Now, switch back to the 3D View and position the stencil as seen in Figure 5.14. Select the Paint Brush and set its Strength to about 85, set its color to black (or any color you’d like for the tattoo), and turn off Mirroring. Start applying brush strokes over the stencil to transfer the tattoo to the creature’s chest (Figure 5.14).
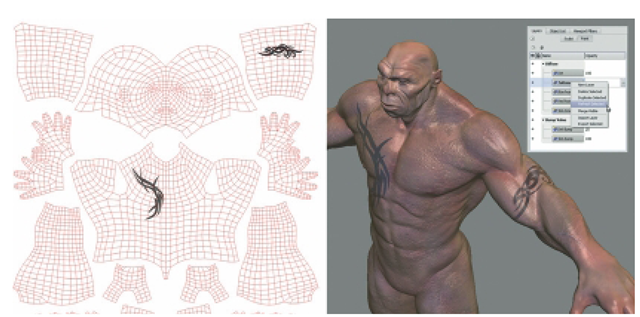
Accurately placing an armband tattoo using a stencil is difficult because the arm is cylindrical. However, this task can be easily accomplished by exporting the Tattoo layer as a Photoshop file and placing the tattoo in the correct place using the UV map. In Mudbox, select the Tattoo layer, right-click, select Export Selected, and name and save the layer as a Photoshop file. Open the file in Photoshop; notice that the there are two layers, one named UV mesh and the other named Mudbox layer. The UV mesh layer displays the models UV map and the other layer is the color data of the Mudbox Layer.
FIG 5.14 Use a Stencil and the Paint Brush to Apply the Chest Tattoo.
Next, open the file arm_tattoo.png in Photoshop. Then either copy and paste or drag the tattoo image into the Mudbox layer file. Scale and position the arm tattoo as seen in Figure 5.15. In this case, the tattoo is being placed on the left upper arm. Reduce the opacity of the tattoo layer to about 80 and merge the tattoo and Mudbox layers, so that there are only two layers once again and save the file. Back in Mudbox, select the Tattoo layer, right-click, and choose Refresh Selected. The armband should appear on left arm if you had placed as shown in Figure 5.15.
Texturing the Eyes
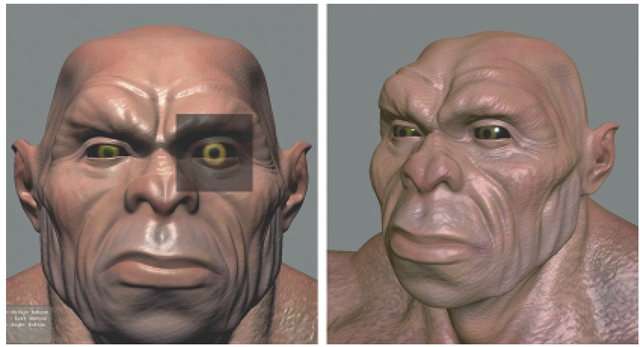
Although Mudbox materials do not support transparency, it is still possible to paint convincing eyes. Texturing the eyes requires positioning the pupils in the center of each eyeball. If the pupil is off by even a little bit the creature’s eyes will appear unnatural. To facilitate positioning and painting of the eye texture, switch to the Front Camera to remove any distortion caused by perspective. Next, select the Eye material you created earlier from the Object List. If you look at the Paint Layers window, you will notice that there is no paint layers associated with the Eye material. All of the layers painted so far have been associated with the Default material assigned to the creature. Create a new 1024 (1k) 8-bit diffuse layer. Then in the Image Browser, locate the file eye_texture.tif and set it as a stencil. Switch back to the 3D view and select the Projection brush; make sure its Strength is set to 100. Position the Stencil over one of eyes and begin painting. To make the eyes shinier and more reflective, try an alternate material presets like Porcelain, Chrome, or Shiny Red. The result should look something like Figure 5.16.
FIG 5.15 Copy and Paste or Drag the Tattoo Image into the Mudbox Layer Photoshop File and Position It over the UVs for the Left Arms. In Mudbox, Refresh the Tattoo Layer. The Tattoo Should Appear on the Upper Left Arm.
Adding Glossiness
The Default material assigned to the creature has some level of specularity and glossiness, and that’s why there is some sheen to the skin, but wet or oily skin may look shinier. However, because the creature is dirty, shininess is not going to be an important issue. Nevertheless, you can add realism to the face by making the lips and nostrils appear a bit wet. Open the Paint Layer menu, select Add New Paint layer, and for the Channel, choose Glossiness. Select the Paint Brush and set its color to white and Strength to about 35. Now brush along the lips and inner aspects of the nostrils. Sharp highlights should appear making those surfaces appear wet (see lips on Figure 5.17).
Adding a Scar
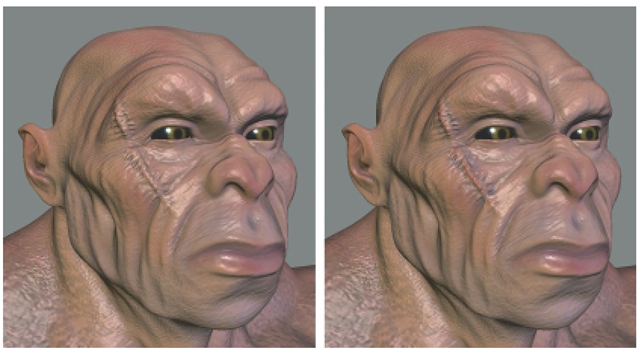
At any time while working in the Paint Layers, you may switch back to the Sculpt layers to continue sculpting. In these next few steps, you will add a scar to the battle hardened creature’s face. Click on the Sculpt button in the Layers window. Create a new Sculpt layer and name it as Scar. Use your favorite sculpting tool to add a scar similar to Figure 5.17, or you may place scars at any place you like on the creatures body. Make sure that the scar has lots of height differences like folds and wrinkles – it’s a nasty scar. Now, switch back to the Paint Layers and create a new Diffuse layer named as Scar.
FIG 5.16 The Creature’s Eyes Are Textured Using a Custom Stencil and the Projection Brush.
FIG 5.17 At Any Time While Painting, You May Switch Back to Sculpting. Sculpt a Scar on the Creature’s Face and Use the Dry Brush to Paint Only on the Raised or Depressed Areas of the Scar.
Select the Dry Brush, click on the color swatch in the Property window, and load the red color used earlier, and begin to paint over the scar. Notice that only the raised areas of the scar are painted. Now, load the blue color, press Ctrl while painting with the Dry Brush, and this time, only the depressed areas of the scar are painted (Figure 5.17).
