RADIUS and LDAP Authentication with Web Auth
If you want guest users to have to enter a valid username and password before gaining network access and do not want to use the local user database on the controller, you can set up a RADIUS server or connect directly to an LDAP server. This allows the guest user account to be managed by someone other than the wireless engineers. The domain administrator or other user with account management privileges on the network can manage the account and determine password changes, expiration dates, and so on.
It is important to remember that the controller checks the local user database first when authenticating users. Should you have the same username in the local database as that of the client on the RADIUS server and the password on the controller is incorrect, the user will never pass authentication because the controller will not forward the request to the RADIUS server after an access reject from the local database. You can configure the order of Local, RADIUS, and LDAP that the WLAN should use for web auth.
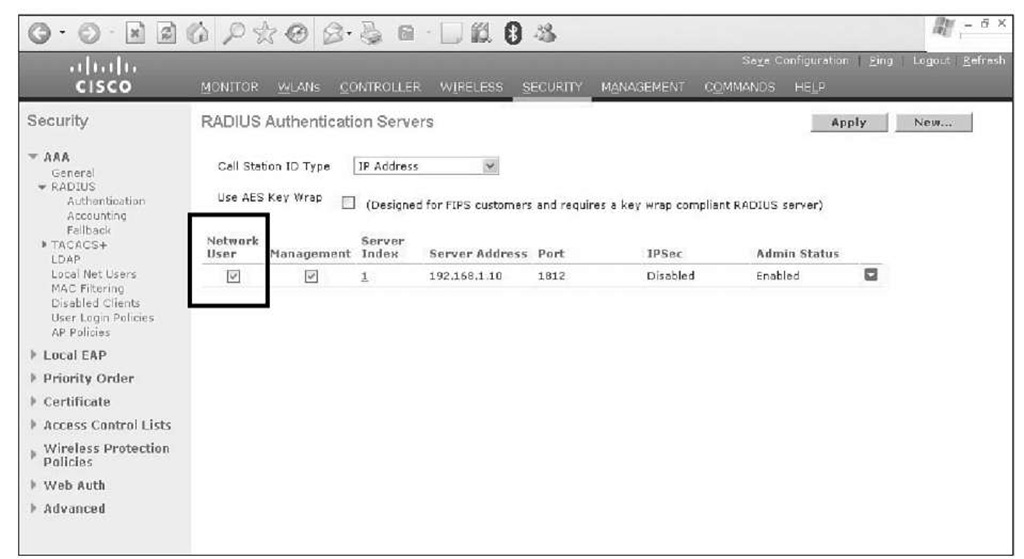
If you have global RADIUS servers defined, the Network User option is selected (see Figure 14-9) on the controller, and the guest name does not exist in the local database, the controller sends a RADIUS request to the global RADIUS servers.
Figure 14-9 RADIUS Configuration for Network User
If you never want the controller to send a RADIUS request to an external RADIUS server that is configured on the controller, you can use the following commands from the controller CLI:
With auto-anchoring,the Anchor controller needs to be configured as a RADIUS client on the RADIUS server. Add the Management address of the Anchor controller as a AAA-Client on the AAA server in use.
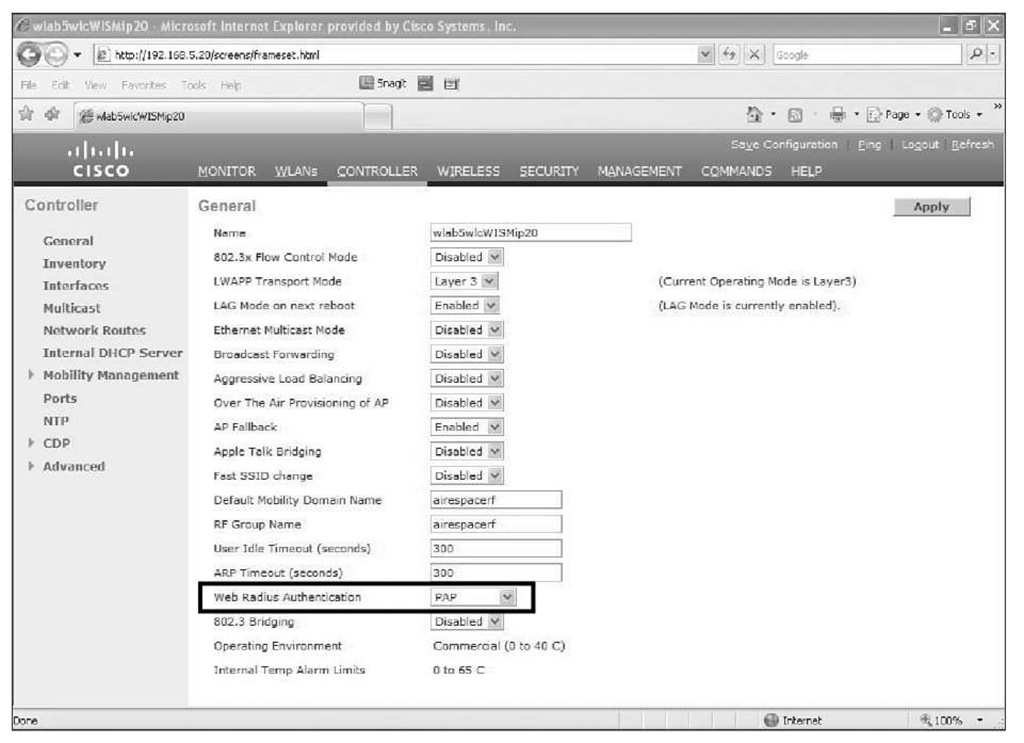
Make sure you configure the Web RADIUS Authentication setting under CONTROLLER > General to match the supported protocol of your RADIUS server (see Figure 14-10).
If the RADIUS server is behind a network firewall, you need to make sure that the proper User Datagram Protocol (UDP) ports are open between the RADIUS server and the management interface of the controller. RADIUS servers typically use UDP port 1812/1645 for authentication messages and UDP port 1813/1646 for accounting messages, but you can change those ports on the server if you like.
Hybrid Remote Edge Access Point (H-REAP)-enabled APs also support RADIUS authentication with web auth. In a configuration in which the guest WLAN is H-REAP enabled, this would be central authentication with local switching. If the WLAN was not H-REAP enabled, you would have a central authentication with central switching configuration. Keep in mind that web auth is not supported when an H-REAP access point (AP) goes into standalone mode. When an H-REAP AP enters standalone modes, it implies that the AP has lost network connectivity to the controller. In this situation, there is no way for the controller to authenticate the guest user.
Figure 14-10 Web RADIUS Authentication Protocol
In the debug output from debug aaa all enable, you will want to look for access-accepts, access-rejects, server timeouts, and failed messages when using RADIUS authentication.
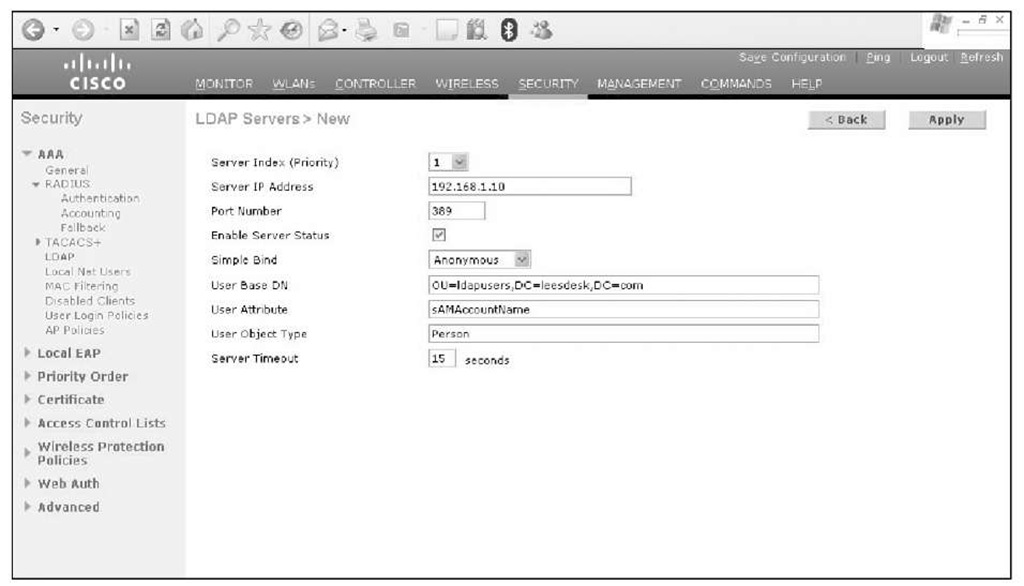
The 5.0 version of code introduced LDAP support for web authentication. The configuration of the controller for LDAP is quite simple. This is done by going to SECURITY > AAA > LDAP (see Figure 14-11), filling in the appropriate information for the LDAP server, and enabling it.
If you are unclear on the user base distinguished name, attribute, and object type, you can use an LDAP explorer program. You have numerous options, from high-end applications you can purchase to free programs on the Internet, that will show this information in the LDAP directory. Then on the AAA Servers tab for the guest WLAN, select the LDAP server you want you use.
The caveat with LDAP and web auth in earlier code is that the LDAP server must accept anonymous bind and pass the password in clear text. The controller cannot decrypt encrypted LDAP packets. In the 5.1 and higher code releases, authenticated binding is supported. A future code release will add support for LDAP using Secure Socket Layer (SSL), LDAP-S. For security and best practice purposes, you will want to set the base
Distinguished Name (DN) for searching for guest user accounts to a branch that is dedicated to guest users. By doing so, you prevent a corporate user from authenticating on the guest network and perhaps allowing them to circumvent company web use practices.
Figure 14-11 LDAP Configuration
You can verify your LDAP configuration using the following CLI commands on the controller:
■ show ldap summary: Displays a summary of the configured LDAP servers.
■ show ldap detailed index: Displays detailed LDAP server information.
■ show ldap statistics: Displays LDAP server statistics.
■ show wlan wlan_id: Displays the LDAP servers that are applied to a WLAN.
As with RADIUS authentication, you would be looking for success, rejects, timeouts, and failed messages in the web auth debugs if there is a problem with LDAP user authentications. Example 14-2 is a partial debug output showing a successful LDAP bind. You can also use wired sniffer captures to see the LDAP communication between the controller and the LDAP server if there is a problem.
Example 14-2 Successful LDAP Bind
Guest User Accounts
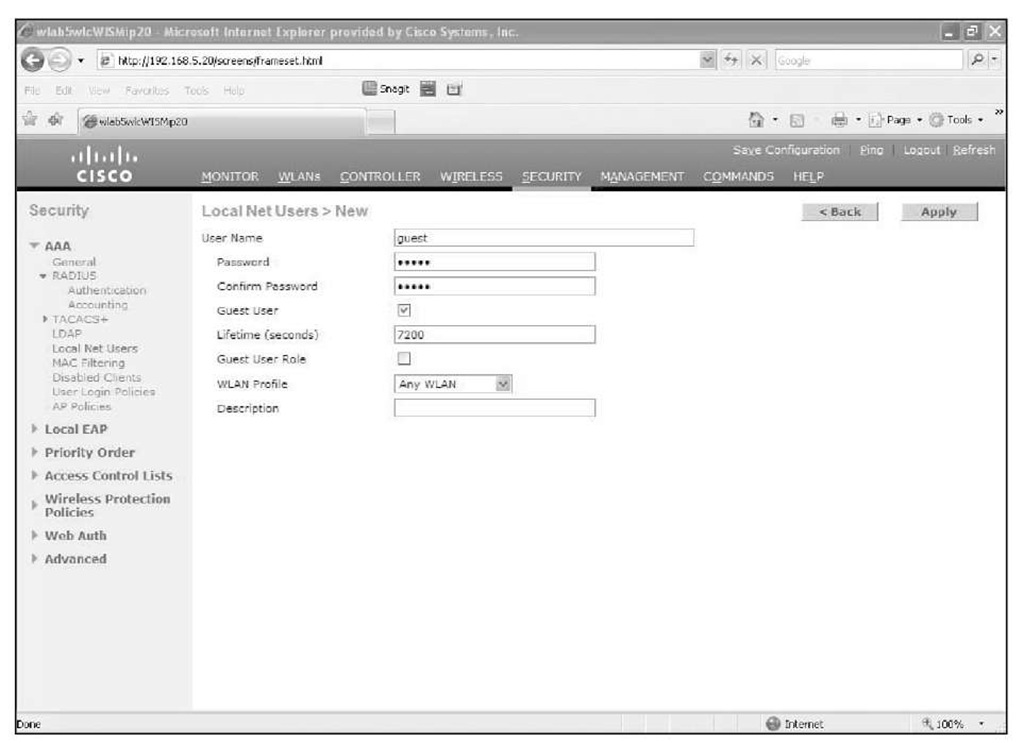
Guest user accounts can reside locally on the controller, on an Access Control Server (ACS), or on a network domain controller. You can create the account on the controller using a read-write account from the CLI, the GUI (see Figure 14-12), or WCS. With WCS you can create guest users and schedule start and end dates and times for the guest account to be valid on the network. A guest user account created directly on the controller, not through WCS, is limited to a lifespan of 30 days. With WCS, you can schedule a guest user account to be valid up to 90 days.
Figure 14-12 Guest User Creation
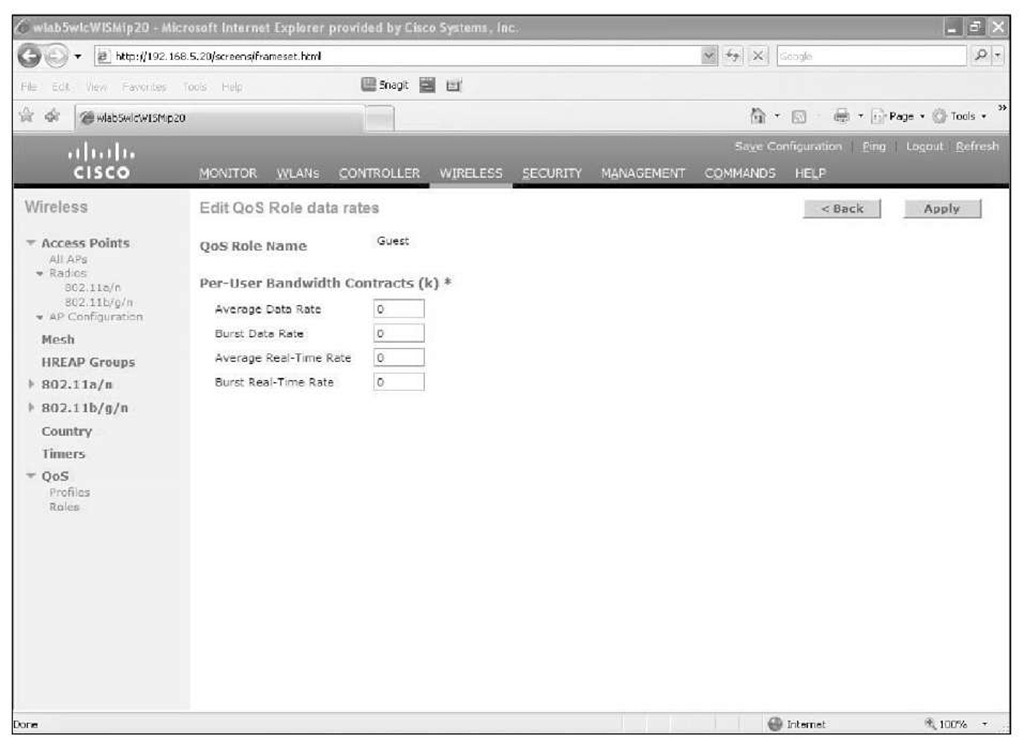
Using QoS roles, you can limit the download speeds based on the guest user account (see Figure 14-13). QoS roles have no impact on client upload speeds. Assigning a QoS role to a guest account prevents any user logged in with that account from using the same level of bandwidth as a regular user.
Figure 14-13 QoS Roles
QoS roles apply only to wireless guest user accounts and have no impact on a wired guest user (discussed later in this topic in the "Wired Guest Access" section) because wired guest user traffic never traverses an AP.
It is also important to note that if you are authenticating your guest users against a RADIUS server and want to apply QoS roles to those accounts, you must assign the QoS role on the RADIUS server. You need to add a "guest-role" Airespace attribute on the RADIUS server with a datatype of "string" and a return value of 11. The attribute is sent to the controller during authentication. If a role with the name returned from the RADIUS server is configured on the controller, the bandwidth associated to that role is enforced for the guest user after successful authentication.
Custom Web Auth Splash Pages
Custom web auth splash pages allow you to create elaborate web pages that include your corporate logo, backgrounds, fonts, cascading style sheets and more. After you have created your HTML pages, you tar them up in a GNU standard tar file with your image files into a web auth bundle.
The main file in the web auth bundle is the login.html file. This file contains the HTML code for the Submit button that returns the control codes to the controller so it can process the authentication. You can get this code by copying it from the controller configurations guide web authentication topic, downloading the login.tar file from WCS, or downloading sample custom web auth bundles from Cisco.com. Figure 14-2 shows a sample login.html page.
Tip Copying the web auth page HTML code directly from the configuration guide does not work very well. The formatting of the page seems to have jumbled the Java code strings. Furthermore, the Submit button might not work correctly, and the user will never get past the splash page. The best practice is to use the sample files in the login.html from WCS or custom bundles files found on the Cisco website to avoid that issue.
The important thing to remember when creating the custom login.html file is not to edit the coding for the Submit button. You can change the text of the button so it says "Accept" or "I agree," for example, but an HTML expert should create the page because Cisco Technical Assistance Center (TAC) does not support the coding of a custom web auth page. Should you edit the sample file and it not work correctly, it is up to you to figure out why.
Web auth bundle guidelines include the following:
■ Name the login page login.html. The controller prepares the web authentication URL based on this name. If it does not find this file after the web auth bundle has been un-tarred, the bundle is discarded, and an error message appears.
■ Include input fields for both a username and password if you are creating a page for a WLAN with authentication. Passthrough does not require these fields. If you are using email input, you need to include a username/email field.
■ Retain the redirect URL as a hidden input item after extracting from the original URL.
■ Extract and set the action URL in the page from the original URL.
■ Include scripts to decode the return status code.
■ Make sure that all paths used in the main page (to refer to images, for example) are of relative type.
■ The maximum allowed total size of the files in their uncompressed state is 1 MB.
Global Override
Before the 4.2 release of controller code, every web auth-enabled WLAN on the controller displayed the same redirect page. With the addition of the global override feature and the support for 512 WLANs starting with the 5.2 code release, you now can configure up to 517 (512 WLAN and 5 Guest LAN) different splash pages. You would place all the different HTML pages, logos, and so on in a single web auth bundle. At least one of the HTML pages must be named login.html. The controller will use this file for the default web auth page. You can use more meaningful filenames, such as lobby.html or westguest.html, for the others.
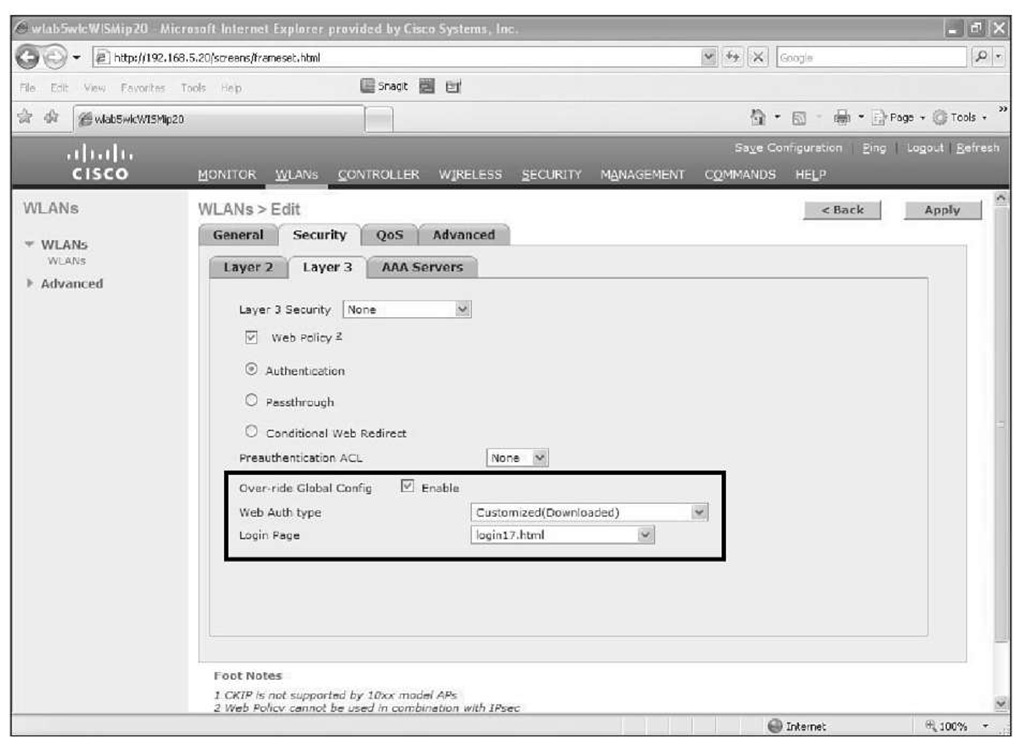
When configuring web auth security for the guest WLAN, you will see the Override Global Config feature check box as illustrated in Figure 14-14. Select this and then choose the web auth policy and the desired login file.
Figure 14-14 Configuring Global Override
Browser Security Warning
In a default configuration, the controller uses a self-signed certificate for the HTTPS redirect page. This causes the client browser to throw up a security alert about the validity of the website. To prevent your guest clients from receiving this warning, you have a couple of options.
The first option is one that most will not choose because it requires disabling SSL on the controller altogether. To do this, you would use the following commands from the controllers CLI:
Note There is a strong following within Cisco to uncouple web auth pages from administrative access to the controller to allow an administrator to disable SSL for web auth but keep it enabled for administrative logins. Hopefully a future code release will bring about this change. If you do not want guest users accessing your internal DNS servers, you could set up a small Linux-based DNS server in your guest VLAN or DMZ that contained the A record for the controller’s virtual interface for them to use instead.
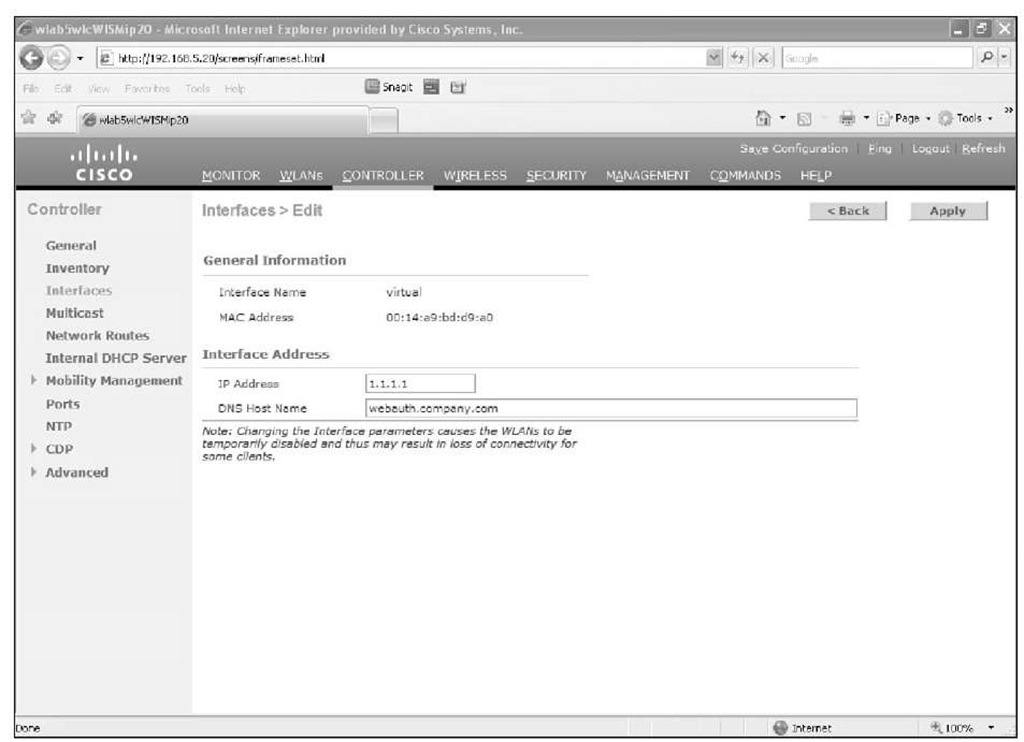
The second option is to install a certificate on the controller from a Certificate Authority like VeriSign or Entrust. You would have the certificate issued for whatever DNS name you want to give the virtual interface IP address of the controller. The certificate signing request (CSR) for the controller is outlined in Cisco document ID 70584. You also need to have an A record in the local DNS server for that same name that points to the address of the virtual interface of the controller. Under the virtual interface configuration on the controller, you would enter the DNS hostname you set up in local DNS. It needs to be the Fully Qualified Domain Name (FQDN), as illustrated in Figure 14-15. You must reboot the controller for that configuration change to take effect. The guest client must use your internal DNS server, or it will never be able to resolve the IP address of the controller’s virtual interface and the redirect will fail.
Figure 14-15 Virtual Interface FQDN
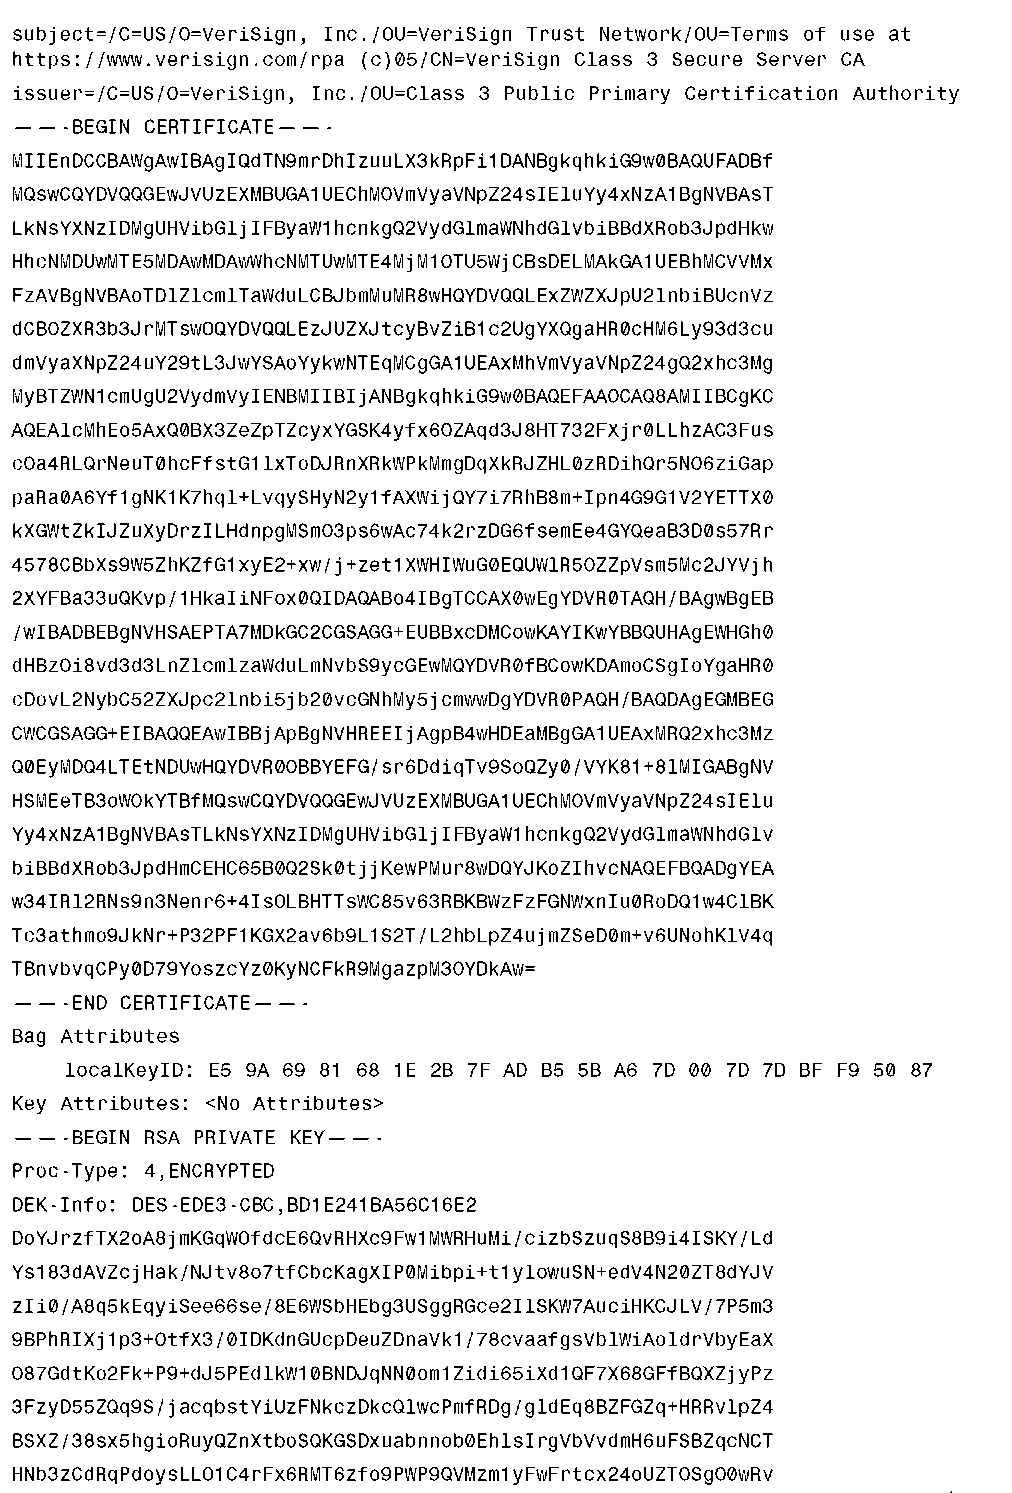
If you are able to obtain a root-level certificate as opposed to a chained or intermediate certificate, the process is easy. You need only follow the steps outlined in the CSR document. Because most certificate authorities are no longer issuing root-level certificates (VeriSign stopped the practice in 2008), the only other option is to use a chained or intermediate certificate. Web auth blocks all but DHCP and DNS traffic, so the client has no way of going up the certificate chain to validate an intermediate certificate, and you are back where you started. You could create a pre-auth ACL that allows the client to pass the traffic, but the preferred method is to build the final pem file that you will load on the controller so that it contains the certificate chain.
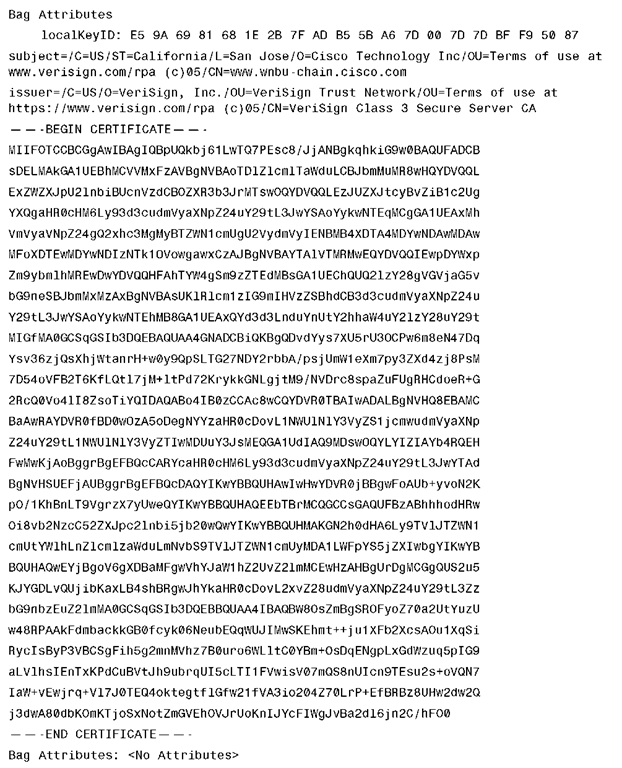
Example 14-3 shows what the PEM file content would be with multiple intermediate certificates.
Example 14-3 Chained Certifcate PEM File
Example 14-3 Chained Certifcate PEM File
Notice that the root-level certificate is at the top of the file with each successive intermediate certificate until you get to the end of the chain. Cisco document 109597 covers chained certificates for the controller.
Tip The CSR document states that chained certificates are not supported until the 5.1 code release. The method of creating a final pem file with all the necessary certificates is valid for all code versions. There is no code change regarding this in the 5.1 code and above that allows a web auth client to validate a chained certificate.
If you are using an external web server for the web auth splash page, you will still see the certificate security alert. Despite using an external web server, the client still passes through the controller. If the external server web address is an HTTPS address, you will need two certificates—one for the controller and one for the web server—to make the warning go away. The guest client would need to be able to correctly resolve DNS for both the controller virtual IP address and the external web server IP address.
![tmp195-86_thumb[2][2] tmp195-86_thumb[2][2]](http://what-when-how.com/wp-content/uploads/2011/09/tmp19586_thumb22_thumb.jpg)


![tmp195-94_thumb[2][2] tmp195-94_thumb[2][2]](http://what-when-how.com/wp-content/uploads/2011/09/tmp19594_thumb22_thumb.jpg)
![tmp195-98_thumb[2][2] tmp195-98_thumb[2][2]](http://what-when-how.com/wp-content/uploads/2011/09/tmp19598_thumb22_thumb.jpg)
