All about Properties
Each class of object has its own set of properties. These properties are initially set to default values when the object they belong to is first created. Properties define how an object appears on the screen, including things such as coloring, dimensions, and position—there is even a Visible property that can be set to False so that the object cannot be seen at all! Values can be assigned to properties at design time in the Properties window from the IDE. As well, properties can be assigned at run time by assigning values in code. For example, the Properties window for UserForms contains Height and Width entries, and the following statements show how these properties can also be assigned in code:
Design Time vs. Run Time
All the time you spend puttering around in the IDE developing a project is considered design time because you are still designing your project. Anything that happens while your code is actually executing is said to happen in run time. During design time, you will spend your time creating the GUI and developing the code to respond to a user’s actions. While creating the GUI you will set properties such as Name,Caption,and Text in the Properties window.
Other kinds of items will require your attention in run time. For example, you may need to change a property while your application is running, such as making a control visible or invisible; or you may need to give a control such as a text box the focus, so that the Entry cursor appears inside it ready for the user’s input.
Changing Properties with Preset Values
Many properties can only be set to one of a limited number of predefined values. These are the Enumerated types. Such properties can be set in the Properties window at design time, or by assigning them the values of predefined constants in code. When you select these properties from the Properties window, a down-arrow button appears in the settings column to indicate that a drop-down list of values is available for you to choose from.
The following steps show you how to change the StartUpPosition and BackColor properties of UserForml:
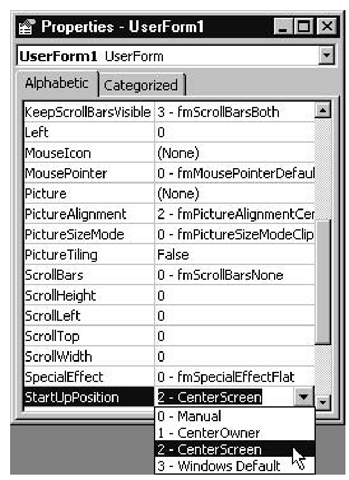
1. Select UserForml from the Object list at the top of the Properties window. Select the StartUpPosition property. A down-arrow button appears to the right of the settings column to let you know that this property can only be set to one of the predefined values in the drop-down list that appears, as shown in Figure 4.7.
Figure 4.7 The Drop-down list for the StartUpPosition property
2. Select the CenterScreen setting. The setting appears in the settings column for the StartUpPosition property.
The StartUpPosition property is unique to the UserForm class of object and determines the position of the UserForm on the screen.
3. Continuing with UserForml still active, click the BackColor property in either tab (Alphabetic or Categorized) of the Properties Window, and click the down-arrow button that appears.
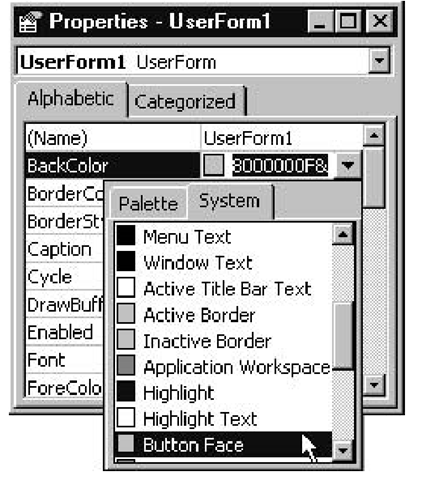
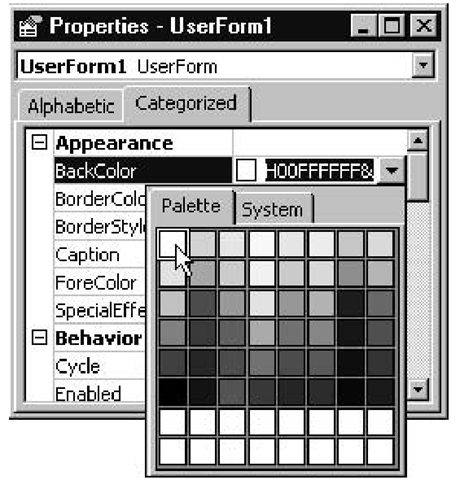
4. A drop-down list with two tabs appears. The System tab (Figure 4.8) contains all the color settings that have been assigned to Microsoft Windows components by the current Display Scheme in Control Panel. The Palette tab (Figure 4.9) contains the array of colors available in the default palette on your PC.
Figure 4.8 System tab, containing colors assigned to Windows components according to the Display Scheme in use
5. Open the Palette tab and click the top-left color square, which is white (Figure 4.9). The Palette disappears, and the background of the UserForm changes to the color selected.
Changing the background color of a UserForm does not automatically update the background color of any controls placed on that UserForm. These will need to have their background colors explicitly changed, too. For example, if the UserForm contains any Label controls, only their caption text should be visible now that you’ve changed the color in Step 4. If setting the background property has no effect, make sure the BackStyle property is set to fmBackStyleOpaque.
Figure 4.9 Palette tab, containing the palette of colors available on your PC
Changing Properties with Preset Values in Code
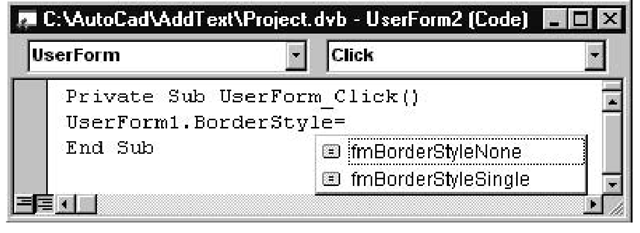
When assigning properties to the values of Enumerated types in code, a drop-down list containing all the constant names for these values will appear, as shown in Figure 4.10.
Figure 4.10 A drop-down list of Enumerated types
Changing Properties from Dialog Boxes
Some properties display an ellipsis button when selected. Clicking one of these buttons opens a dialog box that is often retrieved from the Microsoft Windows environment under which you’re currently running. For example, the following steps show you how to change the Font property for UserForml:
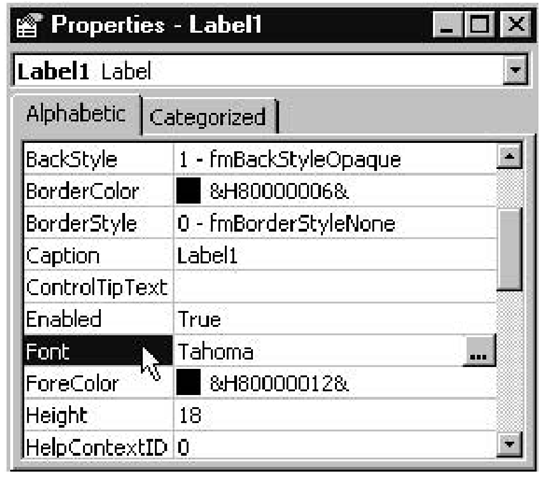
1. Start a new application, insert a UserForm, and add a Label control. From the Properties window, select Labell from the Objects list and click the Font property. An ellipsis button appears at the right of the settings column, as shown in Figure 4.11.
Figure 4.11 The ellipsis button beside the Font property indicates that a dialog box will be displayed when this is selected
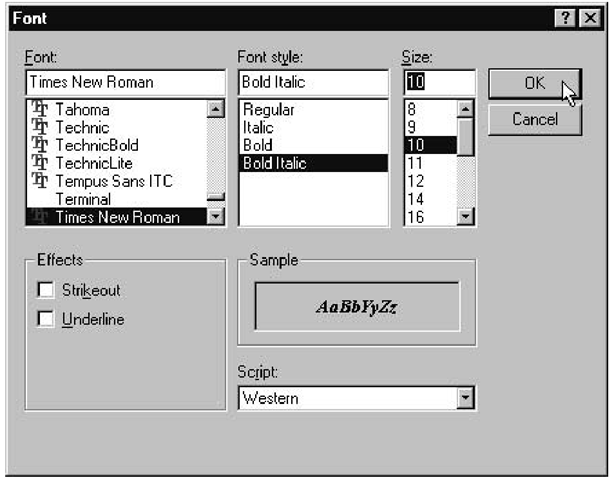
2. Click the ellipsis button. The Font dialog box appears (Figure 4.12).
Figure 4.12 The Font dialog box
3. Select Times New Roman from the Font list, Bold Italic from the Font Style list, and 10 from the Size list. Click OK. The Font dialog box closes, and the Labell text appears, written using the new Font property settings, as shown here:
Now that you’ve read through the steps for changing properties in the Properties window at design time, let’s see how to change them from code so that they are updated while your application is running.
Changing Properties from Dialog Boxes in Code
The following steps show you how to set the Font property in code so that the changes will occur at run time:
1. Double-click CommandButtonl. The Code window opens, displaying the Click event procedure for the CommandButtonl object.
2. Enter the following statement, finishing with a period character (.):
The pop-up list of properties belonging to the Font object appears. Compare this list with the items shown in the Font dialog box in Figure 4.12. You’ll notice that many of the same options are available, such as strikethrough, etc.
3. Type the remainder of the statement you started at Step 2 as follows:
Choose Run ^ Run Sub/UserForm to run your program, and click the Convert button. The caption on the command button changes to the new settings.
When a property setting is adjusted in code, the new setting is only available while the application is running—the value assigned in the code will not be associated with that property in the Properties window when you return to Design mode.
![tmp757e-178_thumb[2] tmp757e-178_thumb[2]](http://what-when-how.com/wp-content/uploads/2012/07/tmp757e178_thumb2_thumb.png)
![tmp757e-185_thumb[2] tmp757e-185_thumb[2]](http://what-when-how.com/wp-content/uploads/2012/07/tmp757e185_thumb2_thumb.png)
![tmp757e-187_thumb[2] tmp757e-187_thumb[2]](http://what-when-how.com/wp-content/uploads/2012/07/tmp757e187_thumb2_thumb.png)
