
Periodically, you need to fix electrical doodads and gizmos that are on the blink. Maybe your stereo quits working, your turn signals don’t blink, a headlight burns out, or something else goes wrong. When these small but inconvenient problems arise, you can usually fix them yourself, easily and with very little expense. This section shows you how.
Your battery should be checked and maintained regularly. You can find instructions in Chapter 3 for dealing with it as
part of your monthly under-the-hood check.
Changing fuses
A fuse box is easy to recognize (see Figure 12-51), and replacing burnt-out fuses is a fairly simple matter. If your stereo, clock, map light, turn signal, or other electrical appliances stop working, chances are that a fuse has blown. Changing a fuse is much cheaper than paying for a new clock or for repairs that you don’t need, even if you chicken out and have an automotive technician do it, so take a few minutes to find your fuse box. It’s usually located under the dashboard — often behind a panel — or in the engine compartment. Your owner’s manual can help you locate it.
Before you open or work on your fuse box, be sure the key in the ignition is turned to “Off.”
To fix a blown fuse, look for a fuse that’s black inside or no longer has its filaments intact (see Figure 12-52). Unless you have a blade-type fuse with prongs, take a bobby pin or paper clip, bend it, and use it to pull out the bad fuse. Then press a new fuse into place. When you’ve replaced all the burnt-out fuses, try your stereo or clock again. If it still doesn’t work, then worry about having it repaired or replaced.
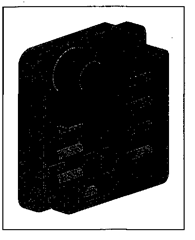
Figure 12-51:
Automotive fuse box and fuses.
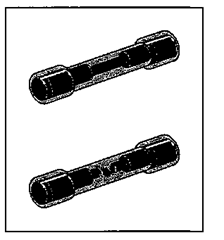
Figure 12-52:
A good fuse (top) and a burnt-out fuse.
Replacing and adjusting headlights
Today’s vehicles feature many kinds of illumination: headlights, taillights, directional signals, and fog lights make it easier for you to see and be seen; overhead lights, map lights, lit glove compartments, and illuminated mirrors on sun visors all require attention periodically. In this section, I deal primarily with headlights. If you experience problems with other lights, it’s usually just a matter of removing the face plate and changing the bulb, or changing the fuse associated with the light. If that doesn’t do the trick, seek professional help.
There’s one exception: If any of your directional signals stop flashing, or you can no longer hear clicking inside the car when they’re supposed to be on, the signals themselves may not be malfunctioning. Directional signals also serve as troubleshooting tools to alert you to other lights that may not be working properly. For this reason, you can find information about directional signals in Chapter 20.

It doesn’t hurt to wash the outside of your headlights and taillights occasionally; clean lights provide better visibility at night. If you still have trouble seeing at night (and you’ve been getting enough vitamin A), check to make sure that both of your headlights are shining straight ahead rather than at the side of the road or into the eyes of other drivers. If they appear to be out of alignment, check out the section called “Checking headlight alignment,” later in this chapter.
Here are some other headlight problems and how to deal with them:
If one of your headlights won’t work on low but does work on high,
you have to replace the bulb.
If a light doesn’t work on either high or low beam, you probably have a bad connection in the wiring.
Before attempting to replace or adjust your headlights, you need to know whether you have the old-style sealed-beam units or the newer halogen headlights.
Replacing halogen headlights
Since around 1980, most vehicles have come with halogen headlights. Although they are twice as powerful as sealed-beam units and enable a driver to see 20 percent farther, they require less power to operate.
To replace a bulb on a halogen headlight, use Figure 12-53 as a guide while you take the following steps:
1. Open the hood and unplug the electrical connector that plugs into the lock ring.
2. Unscrew the bulb-retaining ring (If your unit has one) or the bulb assembly to expose the socket.
3. Remove the old bulb and install the replacement.
Do not touch the glass bulb! Natural oils from the skin on your fingers will create a hotspot that will cause the bulb to burn out prematurely. Instead, handle the bulb by its plastic base, or the metallic tip if it has one.
4. Replace the unit and the retaining ring or bulb assembly and replug the connector.
If you need to adjust the alignment of a halogen headlight, it has two adjusting screws, as shown in Figure 12-54.
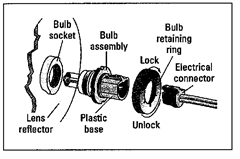
Figure 12-53:
Replacing a halogen bulb.
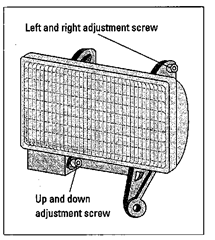
Figure 12-54:
Halogen headlight adjustment screws.
Replacing sealed-beam headlights
Older vehicles have sealed-beam units, which are relatively easy to deal with. If one of your headlights ceases to shine, first consult your owner’s manual to see whether it contains instructions for replacing the bulb. If it doesn’t, the
following should get you through the job with a minimum of hassle:
1. Make sure that the key in the ignition is turned to “Off before you open the unit.
2. Carefully turn the correct screws to loosen the plate that holds the unit in place.
The plate has six screws; three loosen the plate, and the other three align the headlights by adjusting the angle of the bulb. If you turn the wrong screws, your headlights go out of alignment, so check your owner’s manual for details.
3. Remove the bulb and insert the new one in its place.
Be sure to put the new bulb into its locking slots with the unit number at the top.
Checking headlight alignment
If you managed to goof up your headlight adjusting screws, or if you just aren’t sure whether your headlights are properly adjusted, there’s an easy check that you can do. When you’re driving on a fairly straight road at night, check to see whether your headlights appear to be shining straight ahead and are low enough to illuminate enough of the road in front of you to enable you to stop safely if an obstruction appears. Be sure to check your headlights on both high and low beams.
You can also have headlights checked out and adjusted professionally. Auto repair facilities often have headlight-aiming equipment to check and set your headlights in accordance with state laws. Some are certified Motor Vehicle Bureau inspection stations. Note, though, that if you go to a repair facility that does MVB inspections just to see whether your headlights are aimed properly, you’ll have to pay them for checking the lights and for an inspection certificate whether or not they have to adjust your lights.
A cheaper way to check out headlight adjustment is to look for a highway patrol station near your home. They either have the equipment to check your headlights for you, or they can tell you where their current highway checkpoints are, so you can check them yourself. Of course, if the highway patrol finds that your headlights aren’t in focus or find anything wrong with your car’s emissions, you have to get the trouble fixed within a stipulated period or face a fine. (Be positive about this; it’s to your benefit to correct a situation that can cause an accident or pollute the environment.)
If you can fix the problem yourself by turning the adjustment screws shown back in Figure 12-54, go back to the checkpoint afterward for an okay.
Be sure to get a certificate saying that the lights have been adjusted and meet the proper standards. This certificate is usually part of the price.
Checking other electronic devices
If you have trouble with your defroster, heater, anti-theft devices, or stereo system, get professional help. Later, if you turn into a confirmed do-it-yourselfer, you can find topics that deal with these repairs.
Do not attempt to work on your air conditioner under any circumstances. It contains refrigerant under pressure that can blind you if it escapes. For service or repairs, head to the dealership or to an air-conditioning specialist.

