For those cars with squishy-feeling brakes, the way to get the air out of the lines is to bleed the brakes. To do the job, you need either a brake bleeder wrench or a combination wrench that fits the bleeder nozzle on your vehicle, a can of the proper brake fluid, a clean glass jar, and a friend.
1. Behind each of your brakes is a little nozzle called a brake bleeder screw (see Figure 18-13).
Reaching this bleeder screw may be easier if you jack up the vehicle (see Chapter 1 for instructions and safety tips). If you’re going to crawl underneath, lay down an old blanket or a thick layer of newspapers first to keep from getting chilly on days when the ground is cold. If you really want to be comfortable, beg or borrow a creeper to lie on and slide around with easily. (I describe creepers in Chapter 2.)
2. Special wrenches called bleeder wrenches fit the bleeder screw and can prevent rounding the screw’s hex-head. Find the proper wrench or socket that fits the screw and loosen the screw.
Be careful not to break the screw off. If it’s stuck, try spraying some penetrant around the screw. After you loosen the screw, tighten it again (but not too tight).
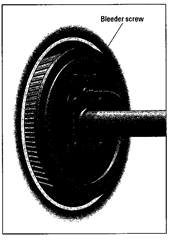
Figure 18-13:
A drum brake bleeder screw.
3. If you have a small piece of flexible hose that fits over the end of the bleeder screw, attach it and place the end of the hose in the jar. Then fill the jar with brake fluid to cover the end of the hose (see Figure 18-14).
If you don’t have anything that fits, just keep the jar near the nozzle so that any fluid that squirts out lands in the jar.
4. Have your friend pump your brake pedal a few times (see Figure 18-15).
If the car is jacked up, make sure that the wheels are blocked in the direction in which the car would roll, and that the car is not parked on a hill, before you let your friend get into the car with you underneath it. Leave your tires in place so the car will bounce and leave you some clearance if it falls.
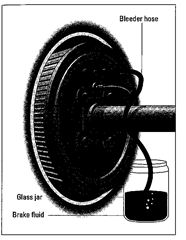
Figure 18-14:
Using a bleeder hose to bleed your brakes.
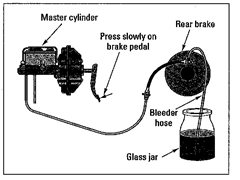
Figure 18-15:
How to bleed your brakes.
5. Have your friend say “Down” when pressing the brake pedal down and “Up” when releasing it.
All this “down-up” sounds like an exercise class, but what the heck!
6. When your friend has pumped the pedal a few times and is holding the pedal down, open the bleeder screw.
Brake fluid will squirt out. (Duck!) If there’s air in your brake lines, air bubbles will be in the fluid. Seeing these bubbles is easiest if you’re using the hose-in-the-jar method, but you can also see them without it.
7. Before your friend releases the brake pedal, tighten the bleeder screw.
If you don’t, air is sucked back into the brake lines when the pedal is released.
8. Tell your friend to release the pedal, and listen for “Up.” Then repeat the whole loosening and tightening sequence again and again until no more air bubbles come out with the fluid.
9. Open your master cylinder and add more brake fluid to the “Full” line.
If you neglect to do so, you run the risk of draining all the fluid out of the master cylinder and drawing air into the lines from the top. Now, that isn’t fatal — it simply means that you have to go back and bleed your master cylinder until you suck the air out of that end of the system — but who needs the extra work?
If you goof and have to bleed the master cylinder, it’s the same deal as bleeding your brakes (friend and all). Just bleed it at the point where the brake lines attach to the cylinder, or at the master cylinder bleeder nozzle, if you have one (see Figure 18-16).
10. Repeat these steps with each brake until the air is out of each brake line, remembering to add brake fluid to the master cylinder after you bleed each brake.
11. After you finish the job and bring the brake fluid level in the master cylinder back to “Full” for the last time, drive the vehicle around the block.
The brake pedal should no longer feel spongy when you depress it. If it does, check the master cylinder again to be sure that it’s full and try bleeding the brakes one more time (this situation isn’t unusual, and it doesn’t take as long as it sounds).
If you know that no air is left in the lines and the brakes still don’t feel right, you may need a new master cylinder. You should definitely consider installing it yourself — at an auto class. All it involves is disconnecting the old master cylinder (a bolt or two and the hoses leading to the brake lines), removing it without spilling brake fluid on anything painted, installing the new one, filling it with brake fluid, and bleeding it. If the job seems like too much of a hassle, have a professional do the work. You shouldn’t have to pay for much labor, and if you choose a brake shop wisely, the whole deal shouldn’t cost too much. Whatever you do, just be sure that, when the job is finished, they (or you) bleed the brakes and the master cylinder to get all the air out of the lines.

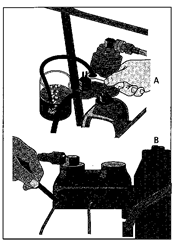
Figure 18-16:
Bleeding a master cylinder: If you have a bleeder nozzle, use the hose and jar method (A). If not, bleed the cylinder at the brake line connections (B).

Back in the 1970s, I had Tweety Bird’s master cylinder replaced for about $60. (It would cost much more now.) Later, I helped a friend replace a master cylinder with a rebuilt one. The rebuilt master cylinder cost about half of what I’d paid for a new one, and there were no labor charges (naturally). What are your time and trouble worth to you?
Bleeding Your Brakes (Auto Repair)
Next post: Adjusting Your Parking Brake (Auto Repair)
Previous post: flushing and Changing Brake Fluid (Auto Repair)
