This topic explains how to change the screen resolution in Windows 7 to the resolution used in this topic.
Changing Screen Resolution
Screen resolution indicates the number of pixels (dots) that the computer uses to display the letters, numbers, graphics, and background you see on the screen. When you increase the screen resolution, Windows displays more information on the screen, but the information decreases in size. The reverse also is true: as you decrease the screen resolution, Windows displays less information on the screen, but the information increases in size.
The screen resolution usually is stated as the product of two numbers, such as 1024 X 768 (pronounced “ten twenty-four by seven sixty-eight”). A 1024 X 768 screen resolution results in a display of 1,024 distinct pixels on each of 768 lines, or about 786,432 pixels. The figures in this topic were created using a screen resolution of 1024 X 768.
This is the screen resolution most commonly used today, although some Web designers set their computers at a much higher screen resolution, such as 2048 X 1536.
To Change the Screen Resolution
The following steps change the screen resolution to 1024 X 768 to match the figures in this topic.
1
• If necessary, minimize all programs so that the Windows 7 desktop appears.
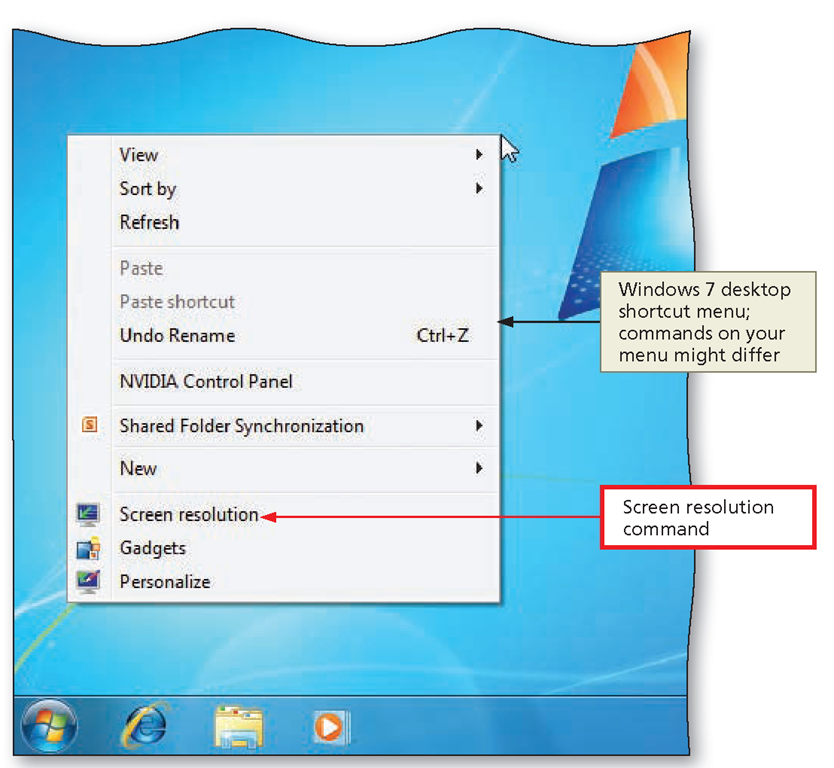
• Right-click the Windows 7 desktop to display the Windows 7 desktop shortcut menu (Figure D-1).
Figure D-1
2
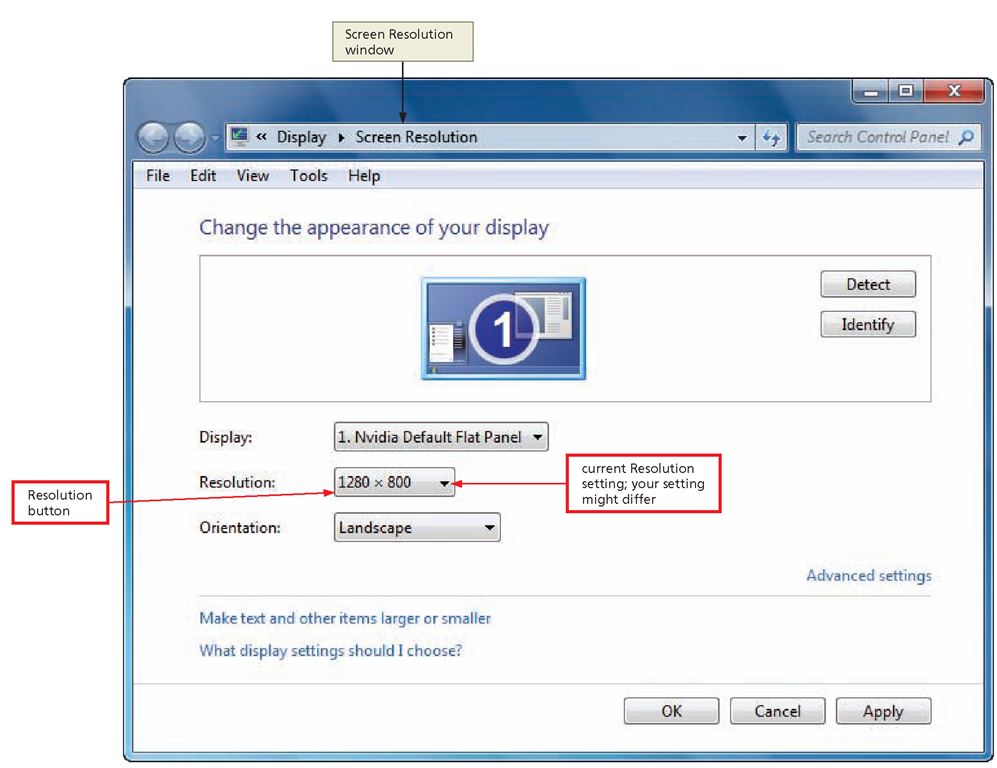
• Click Screen resolution on the shortcut menu to open the Screen Resolution window (Figure D-2).
Figure D-2
3
• Click the Resolution button to display a list of resolution settings for your monitor.
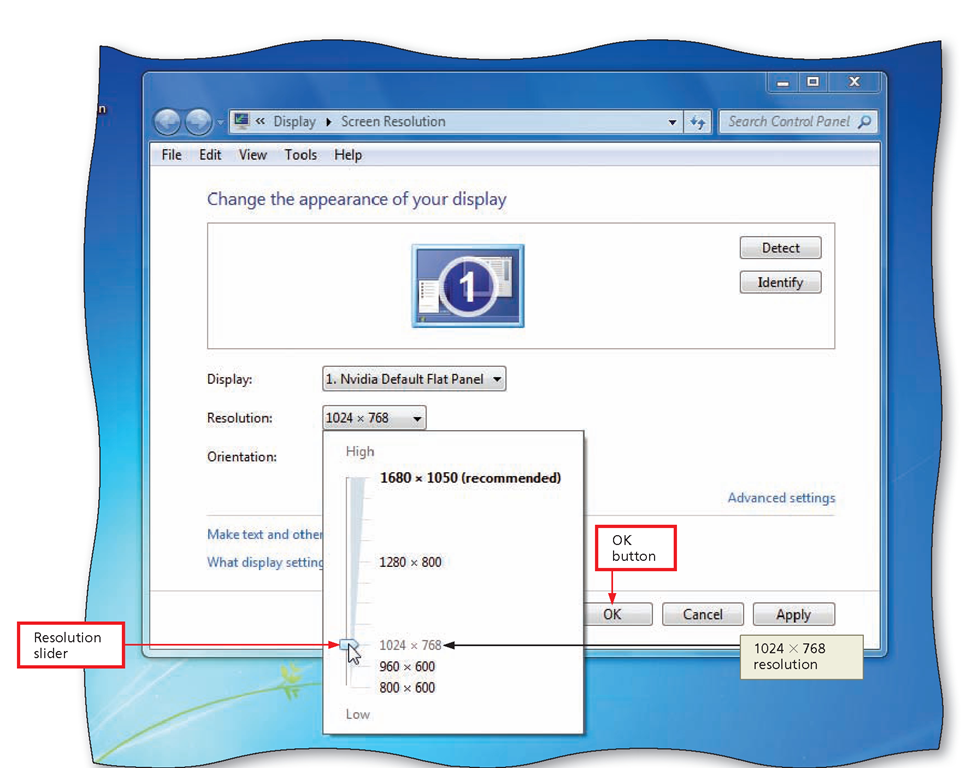
• If necessary, drag the Resolution slider so that the screen resolution is set to 1024 X 768 (Figure D-3).
Figure D-3
4
• Click the OK button to set the screen resolution to 1024 X 768.
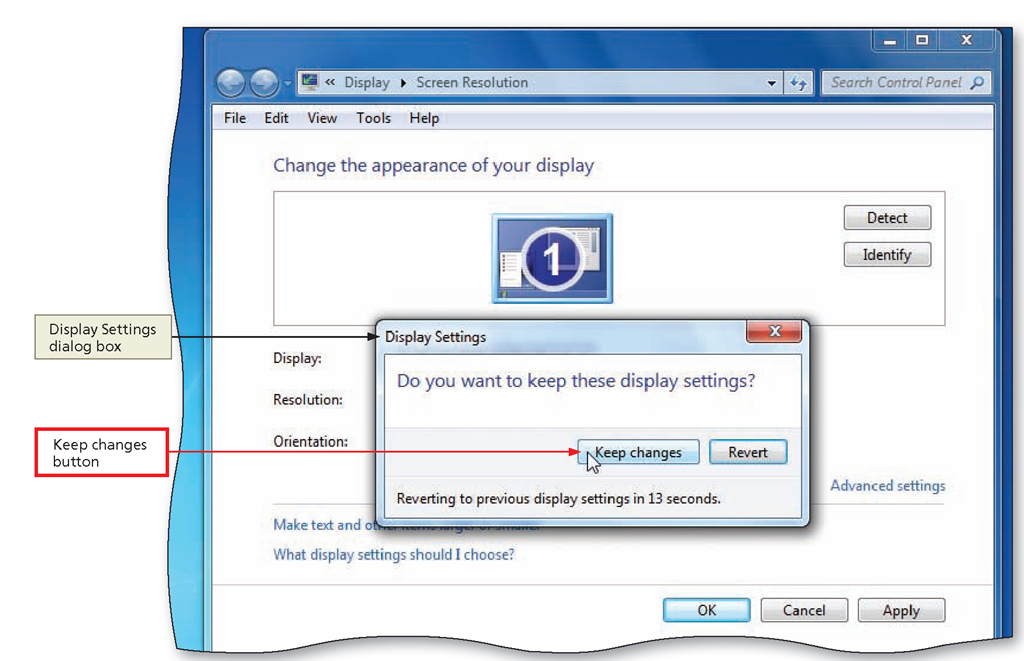
• Click the Keep changes button in the Display Settings dialog box to accept the new screen resolution (Figure D-4).
Figure D-4
Quick Reference Summary
In the Adobe Dreamweaver CS5 program, you can accomplish a task in a number of ways.The second column indicates the page number on which the task is discussed in the topic. The subsequent four columns list the different ways the task in column one can be carried out.
Adobe Dreamweaver CS5 Quick Reference Summary
|
Task |
Page Number |
Mouse |
Menu |
Context Menu |
Keyboard Shortcut |
|
Absolute link, create |
DW 155 |
Link text box in Property inspector |
Insert | Hyperlink |
Make Link |
|
|
Align image |
DW 128 |
Align button in Property inspector |
Align |
||
|
Align table |
DW 195 |
Align button in Property inspector |
Format | Align |
Align |
|
|
Alt text, specify for image |
DW 125 |
Alt text box in Property inspector or drag image to page, enter Alt text (Image Tag Accessibility Attributes dialog box) |
|||
|
Apply background image to page |
DW 60 |
Page Properties button on Properties |
Modify | Page Properties |
Page Properties |
CTRL+J |
|
Assets panel, display |
DW 124 |
Click Assets panel tab |
|||
|
Assets panel, open or close |
DW 124 |
Double-click Assets panel tab |
Window | Assets |
||
|
Background, add to page |
DW 60 |
Page Properties button on Properties |
Modify | Page Properties |
Page Properties |
CTRL+J |
|
Block quote, create |
DW 67 |
Blockquote (Text Indent) button in Property inspector |
Format | Indent |
List | Indent |
CTRL+ALT+] |
|
Block quote, remove |
DW 67 |
Remove Blockquote (Text Outdent) button in Property inspector |
Format | Outdent |
List | Outdent |
CTRL+ALT+[ |
|
Bold, apply to text |
DW 67, DW 73 |
Bold button in Property inspector |
Format | Style | Bold |
Style |
CTRL+B |
|
Border, add or change for table |
DW 235 |
Border text box in Property inspector |
Adobe Dreamweaver CS5 Quick Reference Summary
|
Task |
Page Number |
Mouse |
Menu |
Context Menu |
Keyboard Shortcut |
|
Border, add to image |
DW 235 |
Border text box in Property inspector |
|||
|
Brightness and contrast, adjust for image |
DW 144 |
Brightness and Contrast tool in Property inspector |
Modify | Image | Brightness/Contrast |
||
|
Browsers, select |
DW 81 |
Edit | Preferences | Preview in Browser |
|||
|
Bulleted list, create |
DW 67, DW 72 |
Unordered List button in Property inspector |
Format | List | Unordered List |
List | Unordered List |
|
|
Cell padding, set for table |
DW 194 |
CellPad text box in Property inspector |
|||
|
Cell spacing, set for table |
DW 194 |
CellSpace text box in Property inspector |
|||
|
Cell, change height in table |
DW 197 |
H text box in Property inspector or drag cell border |
|||
|
Cell, change horizontal alignment in table |
DW 209 |
Horz button in Property inspector |
Format | Align |
Align |
|
|
Cell, change vertical alignment in table |
DW 203 |
Vert button in Property inspector |
Format | Align |
Align |
|
|
Cell, change width in table |
DW 197 |
W text box in Property inspector or drag cell border |
|||
|
Center text |
DW 70 |
Format | Align | Center |
Align | Center |
CTRL+ALT+SHIFT+C |
|
|
Check spelling |
DW 79 |
Commands | Check Spelling |
SHIFT+F7 |
||
|
Classic workspace, switch to |
DW 37 |
Workspace switcher arrow on Application bar |
Window | Workspace Layout |
||
|
Clear column widths for table |
DW 204 |
Clear Column Widths button in Property inspector |
Modify | Table | Clear Cell Widths |
Clear All Widths |
|
|
Clear row heights for table |
DW 204 |
Clear Row Heights button in Property inspector |
Modify | Table | Clear Cell Heights |
Clear All Heights |
|
|
Collapse Property inspector |
DW 66 |
Double-click title bar |
Window | Properties |
Minimize |
CTRL+F3 |
|
Column, change horizontal alignment in table |
DW 209 |
Horz button in Property inspector |
Format | Align |
Align |
|
|
Column, change vertical alignment in table |
DW 203 |
Vert button in Property inspector |
Format | Align |
Align |
|
|
Column, delete in table |
DW 215 |
Modify | Table | Delete Column |
Table | Delete Column |
DEL |
|
|
Column, insert in table |
DW 215 |
Modify | Table | Insert Column |
Table | Insert Column |
TAB |
|
|
Columns, set for table |
DW 194 |
Table dialog box or Cols text box in Property inspector |
|||
|
Contrast, adjust for image |
DW 144 |
Brightness and Contrast tool in Property inspector |
Modify | Image | Brightness/Contrast |


