To Check Spelling
The following steps show how to use the Check Spelling command to spell check your entire document. Your Web page may contain different misspelled words depending on the accuracy of your typing.
Figure 1-60
1
• In the second bullet, select the word-92cultural, and then type cultral to insert a deliberately misspelled word in the document.
• Click at the beginning of the document to position the insertion point.
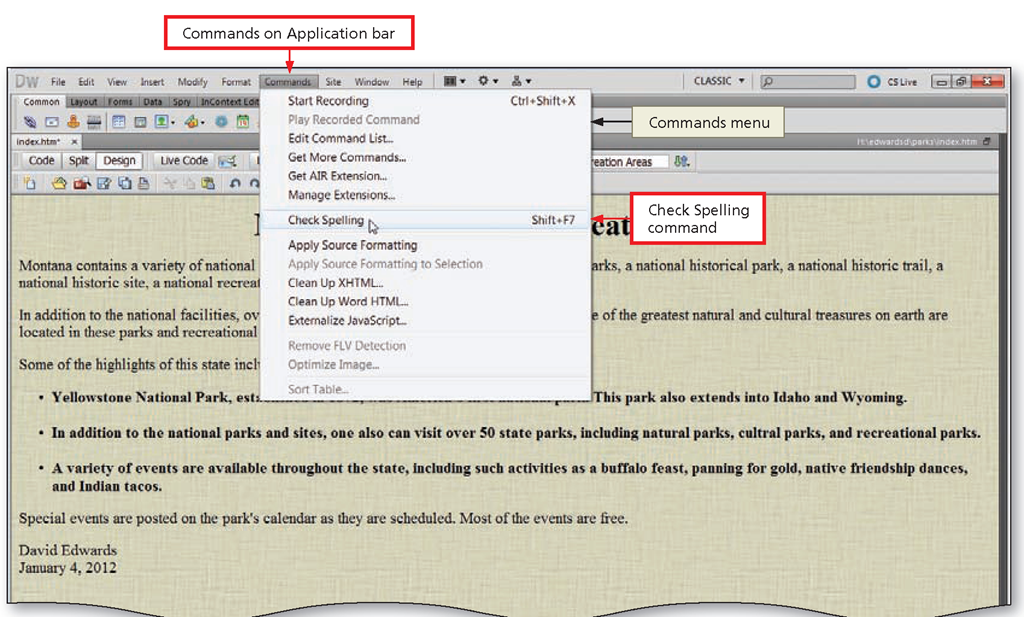
• Click Commands on the Application bar and then point to Check Spelling to highlight the command (Figure 1-60).
Figure 1-61
2
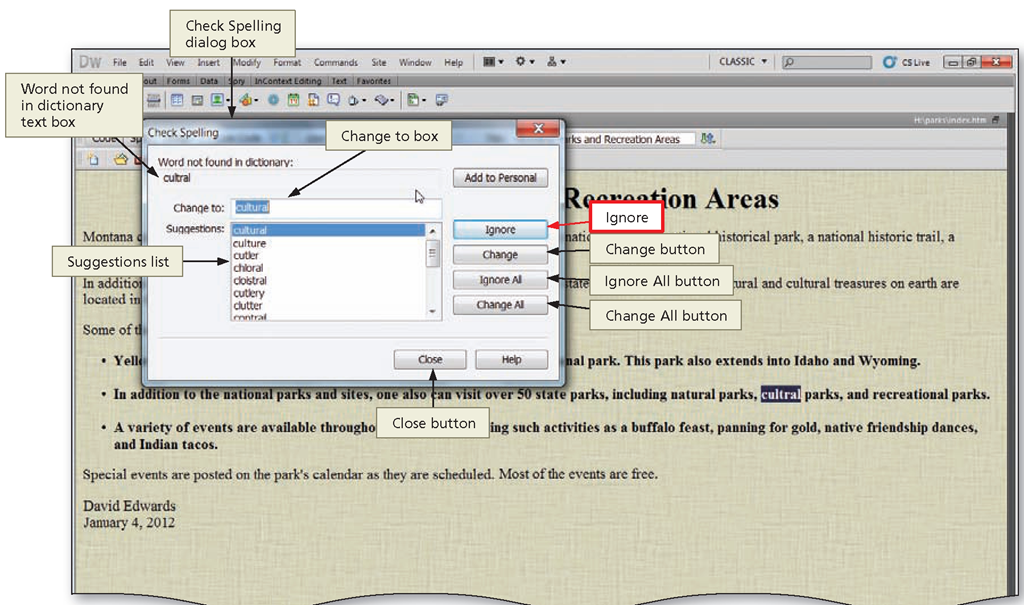
• Click Check Spelling to display the Check Spelling dialog box (Figure 1-61).
What does the information in the Check Spelling dialog box mean? The Dreamweaver Check Spelling dialog box displays the word cultral in the ‘Word not found in dictionary’ text box. Suggestions for the correct spelling are displayed in the Suggestions list.
Q&A
Does Dreamweaver contain a dictionary with American/British spelling options?
Yes. Dreamweaver contains 15 different spelling option dictionaries, including English (British) and English (Canadian). Access the dictionaries by clicking the Preferences command on the Edit menu, selecting the General category, and then clicking the Spelling dictionary pop-up menu arrow.
• The word displayed in the Change to text box shows the correct spelling of the word, so click the Change button to change cultral to cultural and continue with the spell checking.
• Continue to check the spelling and, as necessary, correct any misspelled word by accepting the suggested replacement, by clicking the Change or Change All buttons, or by typing the correct word in the Change to text box. Click Ignore if proper names are displayed as errors.
• Click the OK button to close the Check Spelling dialog box.
• Press the CTRL+S keys to save any changes.
Previewing a Web Page in a Browser
After you have created a Web page, it is a good practice to test your Web page by previewing it in Web browsers to ensure that it is displayed correctly. Using this strategy helps you catch errors so you will not copy or repeat them.
As you create your Web page, you should be aware of the variety of available Web browsers. More than 25 Web browsers are in use, most of which have been released in more than one version. Each browser might display text, images, and other Web page elements differently. For this reason, you want to preview your Web pages in more than one browser to make sure it displays your Web pages as you designed them. Most Web developers target recent versions of Microsoft Internet Explorer and Mozilla Firefox, which the majority of Web visitors use. You also should know that visitors viewing your Web page might have earlier versions of these browsers. Free browser compatibility checkers also are available online (http://browsershots.org and https://browserlab.adobe.com).
You can define up to 20 browsers for previewing, including Internet Explorer, Mozilla Firefox, Google Chrome, and Apple Safari. A browser must be installed on your system before you can preview it. You select one browser as the primary browser. When you press the F12 key to preview a Web page, Dreamweaver displays the page in the primary browser.
Selecting a Browser
You select browser preferences in the Preferences dialog box. This dialog box provides options to select and define the settings for a primary and a secondary browser. Additionally, a Preview using temporary file option is available. Select the check box for this option to preview a page without saving it. Although it is a good practice to save before previewing in a browser, you might want to view a page quickly before saving it.
To Select Primary and Secondary Target Browsers
The following steps show how to select your target browsers — Internet Explorer and Firefox. To complete these steps requires that you have both Internet Explorer and Firefox installed on your computer. Note, however, that it is not necessary to install a secondary browser. If your choice is to use just one browser, you can choose to install only the one you would like to use. Or, you can choose to install additional browsers as well.
Figure 1-62
1
• Click Edit on the Application bar and then click Preferences to open the Preferences dialog box.
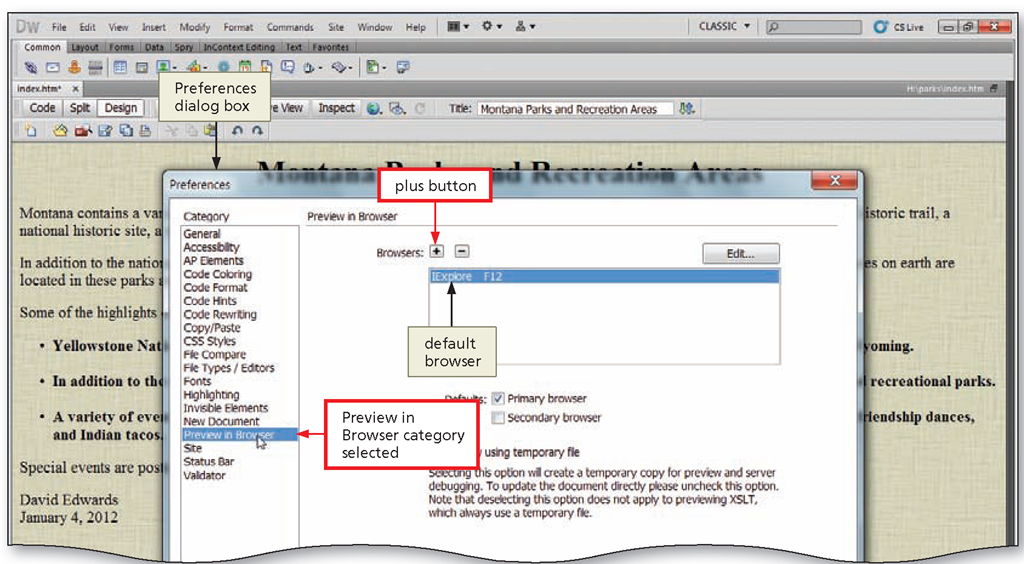
• If necessary, click the Preview in Browser category in the Preferences dialog box to select the Preview in Browser category (Figure 1-62).
Q&A
What is the primary Q browser?
The primary browser was selected when Dreamweaver was installed on your computer. In this topic, the primary browser is Internet Explorer. The browser name, IExplore, was selected automatically during the Dreamweaver installation. The browser name on your computer may be different.
Figure 1-63
2
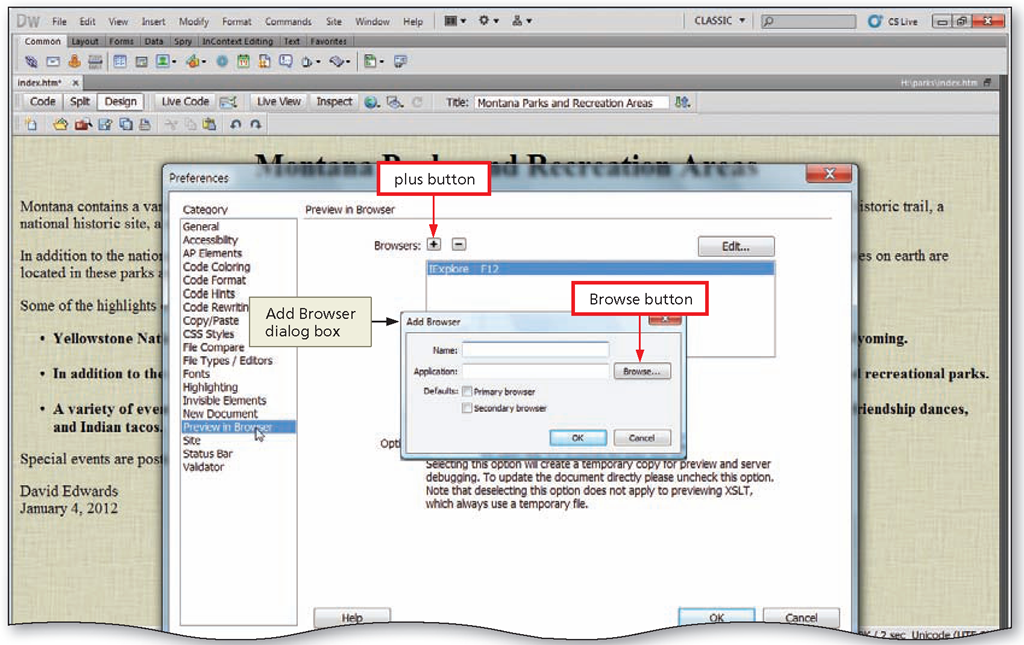
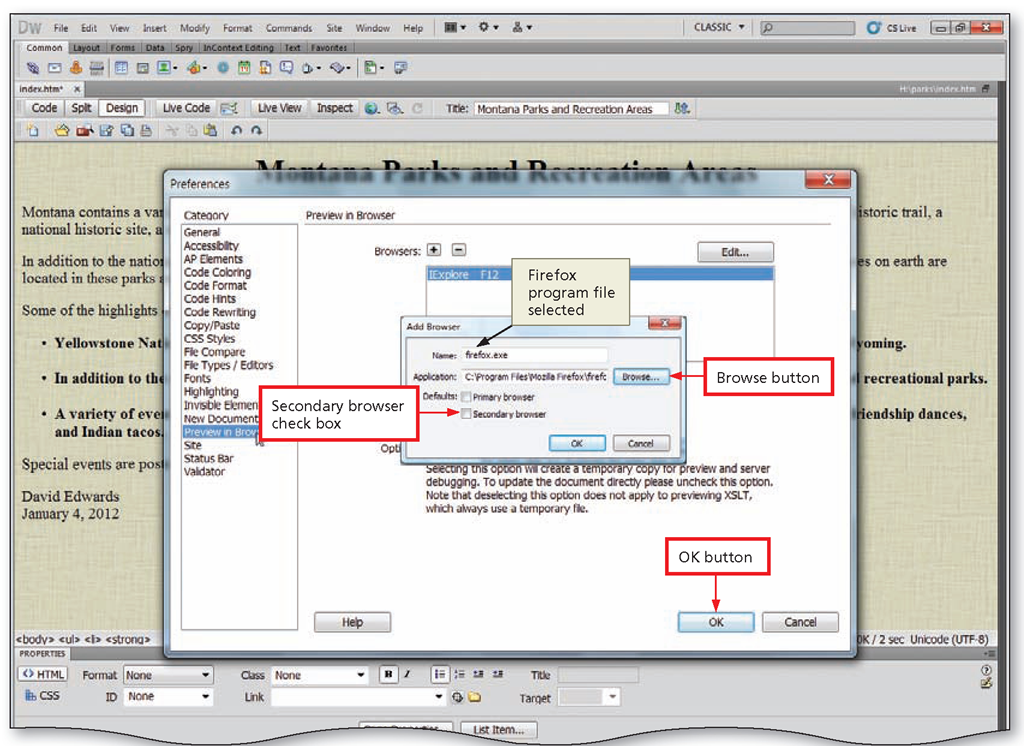
• Click the plus (+) button in the Preview in Browser area to display the Add Browser dialog box (Figure 1-63).
Q&A
What should I do if the Preview in Browser dialog box already lists Firefox and IExplore?
Skip Steps 2 through 5. Click Firefox in the Preview in Browser dialog box, and then click the Secondary browser check box. Click IExplore in the Preview in Browser dialog box, and then click the Primary browser check box. Then click the OK button.
Figure 1-64
3
• Click the Browse button and then locate and click the Firefox program file to select the file.
Q&A
Where can I find the Firefox program file?
Most likely this file is located on Local Drive (C:). Use the following path to locate the file: C:\Program Files\ Mozilla Firefox\ firefox. The path and file name on your computer may be different.
• Click the Open button to add the browser name and path to the Add Browser dialog box (Figure 1-64).
Figure 1-65
4
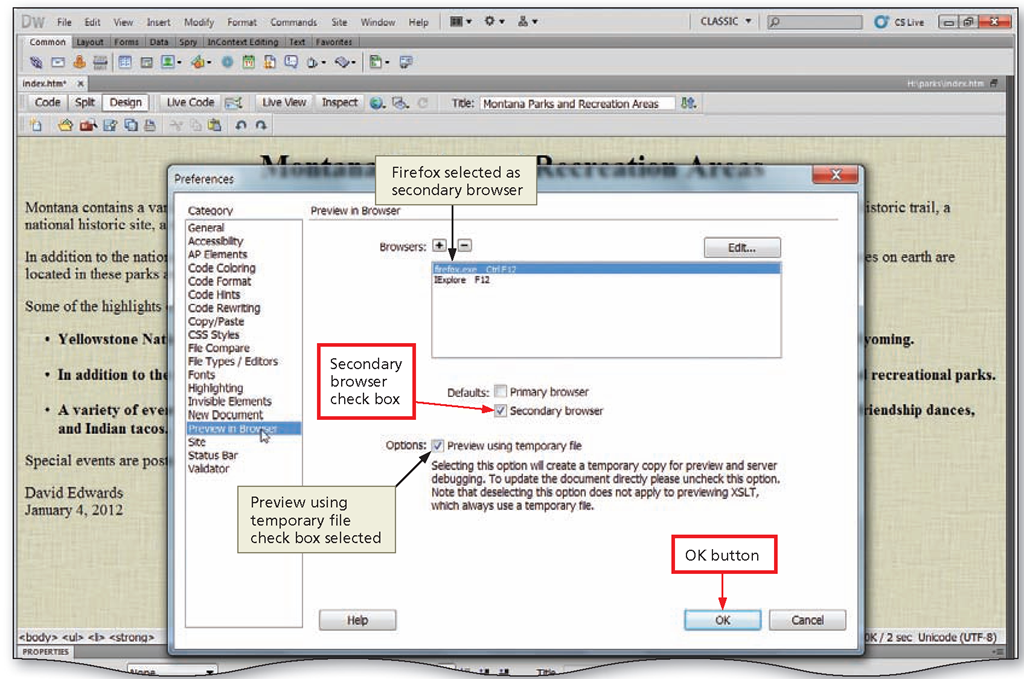
• If necessary, click the Secondary browser check box to select it.
Q&A
What does the Q information in the Add Browser dialog box mean?
The Name text box displays firefox. exe, the name of the Firefox program file. The Application text box displays the path and file name. The path and spelling of Firefox on your computer may be different from those shown in Figure 1-64.
5
• Click the OK button to add Firefox as the secondary browser.
• If necessary, click the ‘Preview using temporary file’ check box to select it (Figure 1-65).
• Click the OK button to select Internet Explorer and Firefox as the preview browsers.
• If a Dreamweaver CS5 dialog box appears, click the OK button to confirm your selections and close the dialog box.
• Click the Save button on the Standard toolbar to save your work.
To Preview the Web Page
With the target browsers set up, you are ready to preview a Web page. To select the browser you want to use for the preview, you use the Preview in Browser command on the File menu. The following steps illustrate how to preview the Montana Parks and Recreation Areas Web page using Internet Explorer and Firefox.
Figure 1-66
1
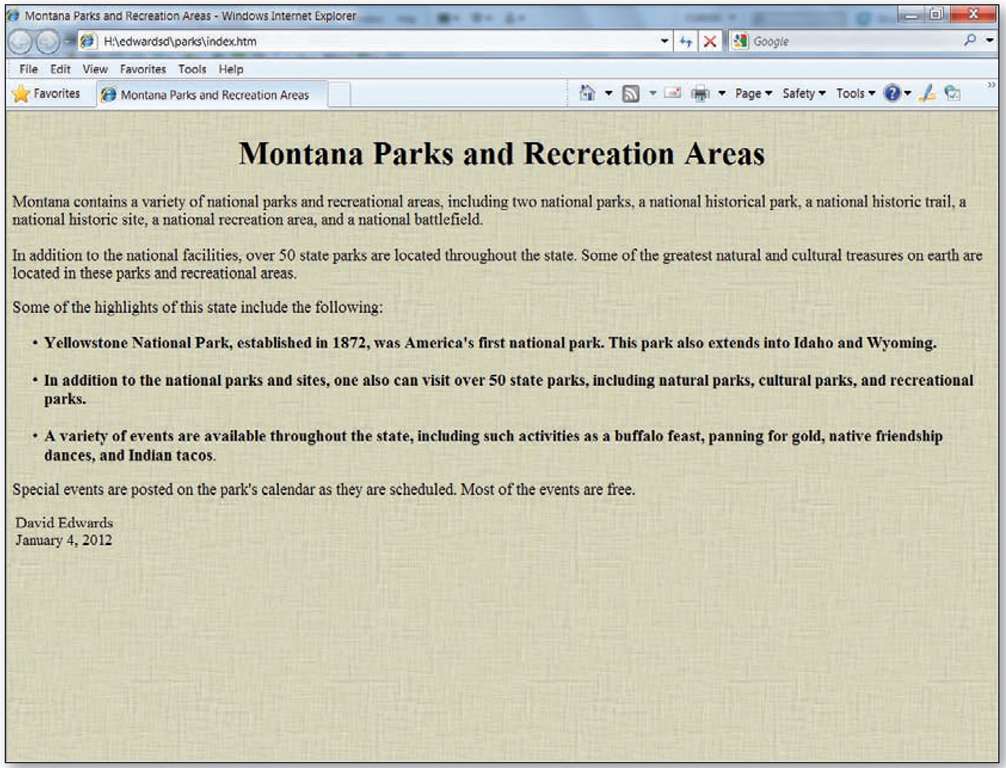
• Click File on the Application bar, point to Preview in Browser, and then click lExplore to display the Montana Parks and Recreation Areas Web page in the Internet Explorer browser.
• If necessary, maximize your browser window to display the entire Web page (Figure 1-66).
2
• Click the Internet Explorer Close button to close the browser.
• Click File on the Application bar and then point to Preview in Browser to prepare for changing browsers.
• Click Firefox.exe on the Preview in Browser submenu to display the Web page in the Firefox browser.
• Click the Firefox Close button to close the browser.
