Whether real or computer generated (CG), cameras play a fundamental role in the creation of title sequences. In this topic we explore the essential properties and applications of both real-world and CG cameras. By mastering their features, you will be able to swiftly achieve the look and feel you are seeking with greater precision.
First and foremost, real-world cameras fit into two basic categories: film cameras and video cameras:
• Film cameras record film frames on film stock—film strips of celluloid with a light-sensitive emulsion that is developed through a process similar to developing negatives from a roll of still-picture film. Film stock sizes include 8mm and Super 8mm, 16mm and Super 16mm, 35mm, and 70mm. If you or your client shoot footage for a title sequence using a film camera, you should take into account the time needed to manage film stocks and film-to-tape transfer.
• Video cameras record frames on a variety of recording media such as miniDV tapes, tapeless media such as P2 solid-state cards used with some Panasonic models, the XDCAM optical discs used by some Sony models, and Compact Flash cards used by RED cameras.
Computer-generated cameras allow you to animate your title sequence in virtual worlds by flying through and framing your elements, utilizing similar properties and parameters to real-world cameras. When you begin a project, both After Effects and Motion have a default invisible camera embedded in the project. This camera is invisible in the layers and it behaves almost like a fixed two-dimensional camera. You can move your graphical elements right and left to simulate a camera pan, but you can’t move the camera itself. If you create a custom camera, you can manipulate that camera like real-world cameras, changing its position, rotation, focus, and other properties.
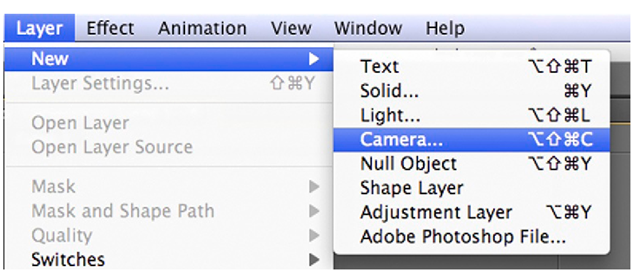
In After Effects you can create a camera by choosing from the menu Layer | New | Camera (or by pressing the shortcut keys Option+Command+Shift+C). Make sure that you have already created a composition; otherwise you won’t be able to create a camera!
Figure 6.1 in After Effects you can create a new camera by choosing from the menu Layer New Camera.
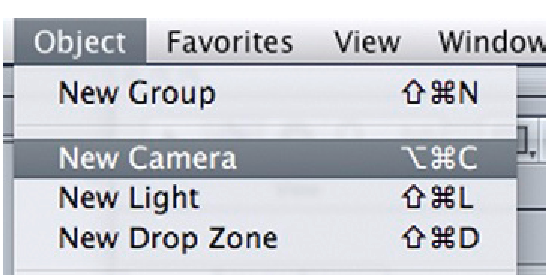
In Motion you can create a camera by selecting Object New Camera or by clicking the New Camera icon on the toolbar.
Figure 6.2 in Motion you can create a camera by selecting Object New Camera.
Figure 6.3 in motion you can also create a camera by clicking the New Camera icon on the toolbar.
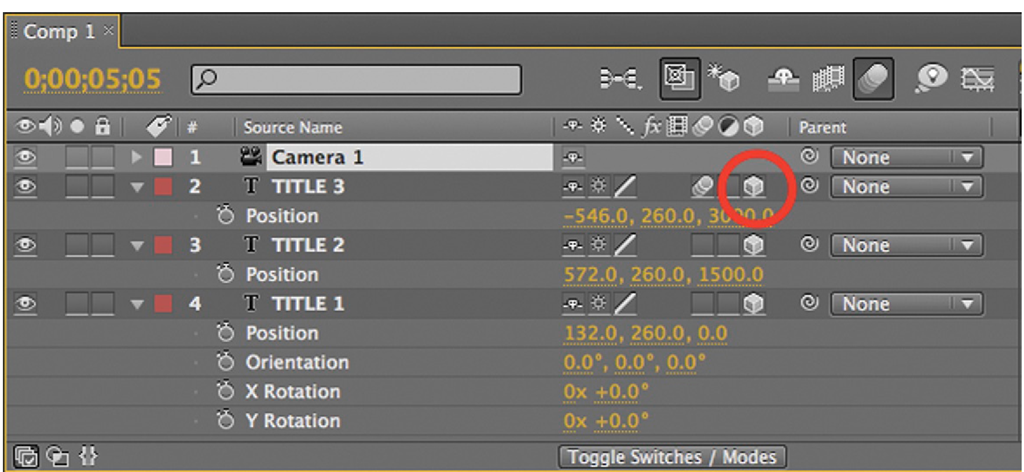
Although a camera has been added to the project, it has no effect on 2D groups (in Motion) or 2D layers (in After Effects). This is how you can fix this issue:
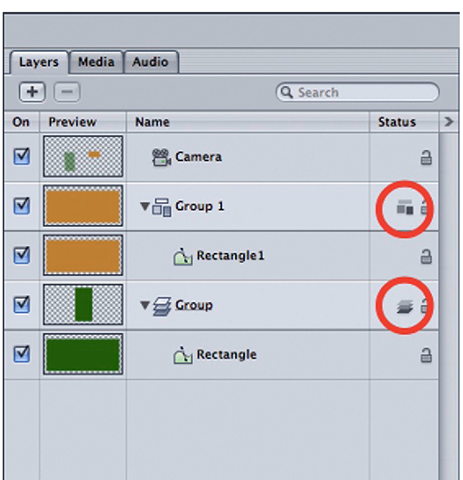
In Motion, after a camera is added to a project, you have the option to switch your groups to 3D mode or to remain in 2D mode. When you add a camera to a 2D project, a dialog box appears, asking if you want to convert your 2D groups to 3D groups. Regardless of your immediate answer, you can later toggle your groups from 2D to 3D (or vice versa) by clicking the icon on the status column in your layer tab (see Figure 6.4). The first icon (three flat boxes viewed from above) signifies a 2D group. The second icon (three boxes viewed with perspective) signifies a 3D group.
Figure 6.4 in motion you can toggle your groups from 2D to 3D (or vice versa) by clicking the icon on the status column in your layer tab.
Figure 6.5 in after effects you can toggle-switch your layers from 2D to 3D by clicking the corresponding 3D layer icon in your timeline.
Et voilà! Once you have converted your layers or groups into 3D elements, they will respond to your camera movement, focus, and other changes.
In the next sections we will take a close look at formats, speed, lenses, focus, f-stops, focal length, aperture, and shutter speed for both real and computer-generated cameras.
Figure 6.6
Formats and Aspect Ratios
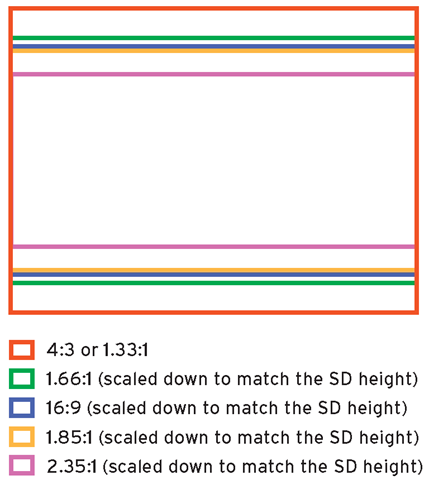
Before you start working on your project, you need to determine which format you are going to deliver your final video render in. If you are creating a title sequence for a client, the client will make the decision. But if you are creating a title sequence for a friend or for your own demo reel, you’ll need to choose the best format to suit your needs. This decision will not only affect the graphic elements you create, it will also affect the format you shoot in, your camera decisions, and the aspect ratio for your frame.
The aspect ratio is the relationship between the height and the width of your frame and is important to know before shooting footage or creating graphics for your title sequence.
In film cameras, each film format utilizes a dif-ferent aspect ratio. The aspect ratios for 8mm, Super 8mm, and 16mm film are 1.33:1 (or 4:3). Super 16mm aspect ratio is 1.66:1, and 35mm aspect ratios are 1.33:1, 1.85:1, or 2.35:1, depending on the lenses, camera mattes, and cinema projectors.
When you are working with video cameras or in digital postproduction, the horizontal and vertical pixel dimensions of your project and frame format determine your frame size and aspect ratio. For example, SD NTSC video is 720 pixels wide and 480 pixels tall and its aspect ratio is 4:3. HD video dimensions are either 1280 x 720 or 1920 x 1080 pixels, and the aspect ratio is 16:9. Common video frame sizes are shown in Table 6.1.
Table 6.1 Common Video Frame Sizes
|
Width |
Height |
Screen Aspect Ratio |
Description |
|
640 |
480 |
4:3 |
An early standard for analog-to-digital video editing |
|
720 |
480 |
4:3 |
NTSC DV and DVD image dimensions |
|
720 |
486 |
4:3 |
NTSC SD video dimensions used for professional digital formats such as Digital Betacam, D-1, and D-5 |
|
720 |
576 |
4:3 |
PAL SD video dimensions used for digital formats such as Digital Betacam, D-1, and D-5 as well as DVD and DV |
|
1280 |
720 |
16:9 |
HD video format |
|
1920 |
1080 |
16:9 |
Higher resolution HD video format |
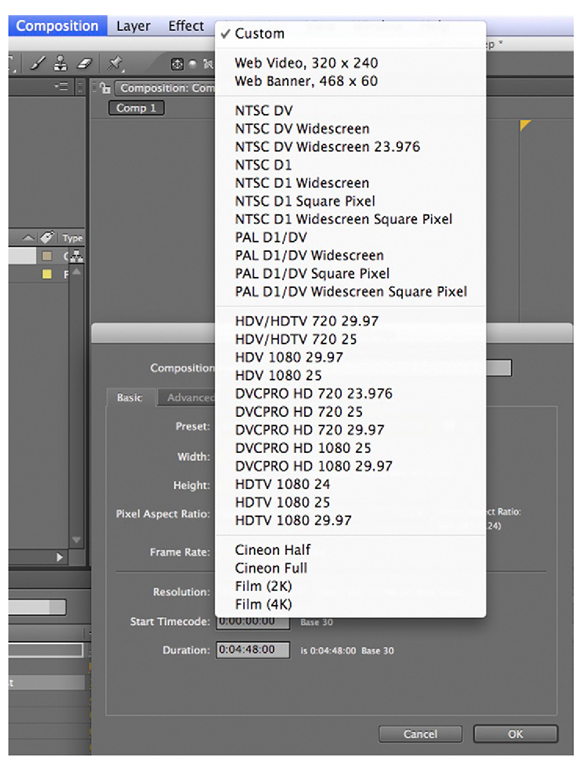
In After Effects you can create a new composition by choosing Composition | New Composition. Pick your composition settings from the Presets pull-down menu, and pick your custom frame size.
Figure 6.7 in after effects you can pick your custom frame size from the presets pull-down menu in your New composition window.
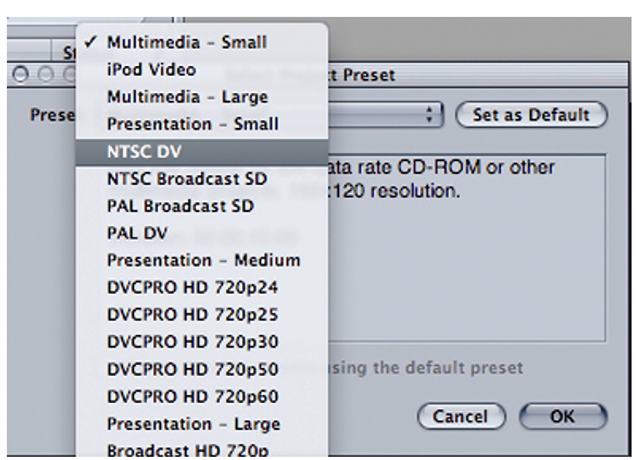
In Motion you can create a new project by choosing File | New and either picking one of the project Presets from the pull-down menu or setting your own custom frame size.
Figure 6.8 in Motion you can create a new project by choosing File | new and picking one of the project Presets from the pull-down menu.
