9.10.
(When one of the sides is at right angle to the reference surface.)
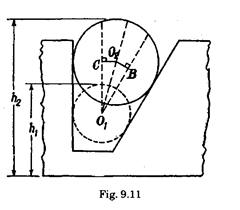
This method requires the use of two discs of different sizes and a Vernier height gauge. First a small disc of diameter di is placed in the slot and the height of disc above some reference surface is determined (Fig. 9.11). Let it be hv Then the bigger disc is placed in the slot after removing the smaller one and again height hi with reference to same plane is noted down. The difference of height (/12 – h{) could also be noted down by means of dial-indicator.
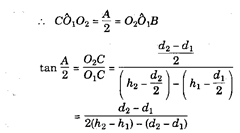
Let Oi and 02 De the centres of two discs. Through Ox draw a line OiC parallel to the vertical surface and OiB parallel to the sloping surface. Through O2 draw 02C 1 OxC and 02B±OiB. Let angle of taper be A.

By the same set-up, the angle of any inclined surface with vertical plane can be calculated by making the part to rest against angle plate.

