13.2.
![]()
(2) External thread. A thread formed on the outside of a workpiece is called external thread e.g., on bolts or studs etc.
(3) Internal thread. A thread formed on the inside of a workpiece is called internal thread e.g. on a nut or female screw gauge.
(4) Multiple-start screw thread. This is produced by forming two or more helical grooves, equally spaced and similarly formed in an axial section on a cylinder. This gives a ‘quick traverse’ without sacrificing core strength.
(5) Axis of a thread. This is imaginary line running longitudinally through the centre of the screw.
(6) Hand (Right or left hand threads). Suppose a screw is held such that the observer is looking along the axis. If a point moves along the thread in clockwise direction and thus moves away from the observer, the thread is right hand ; and if it moves towards the observer, the thread is left hand.
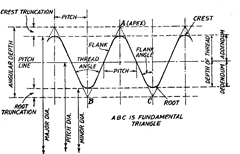
(7) Form of thread. This is the shape of the contour of one complete thread as seen in axial section.
(8) Crest of thread. This is denned as the prominent part of thread, whether it be external or internal.
(9) Root of thread. This is defined as the bottom of the groove between the two flanks of the thread, whether it be external or internal.
(10) Flanks of thread. These are straight edges which connect the crest with the root.
(11) Angle of thread (Included angle). This is the angle between the flanks or slope of the thread measured in an axial plane.
(12) Flank angle. The flank angles are the angles between individual flanks and the perpendicular to the axis of the thread which passes through the vertex of the fundamental triangle. The flank angle of a symmetrical thread is commonly termed as the half-angle of thread.
(13) Pitch. The pitch of a thread is the distance, measured parallel to the axis of the thread, between corresponding points on adjacent thread forms in the same axial plane and on the same side of axis. The basic pitch is equal to the lead divided by the number of thread starts. On drawings of thread sections, the pitch is shown as the distance from the centre of one thread crest to the centre of the next, and this representation is correct for single start as well as multi-start threads.
(14) Lead. Lead is the axial distance moved by the threaded part, when it is given one complete revolution about its axis with respect to a fixed mating thread. It is necessary to distinguish between measurement of lead from measurement of pitch, as uniformity of pitch measurement does not assure uniformity of lead. Variations in either lead or pitch cause the functional or virtual diameter of thread to differ from the pitch diameter.
(15) Thread per inch. This is the reciprocal of the pitch in inches.
(16) Lead angle. On a straight thread, lead angle is the angle made by the helix of the thread at the pitch line with plane perpendicular to the axis. The angle is measured in an axial plane.
(17) Helix angle. On straight thread, the helix angle is the angle made by the helix of the thread at the pitch line with the axis. The angle is measured in an axial plane.
(18) Depth of thread. This is the distance from the crest or tip of the thread to the root of the thread measured perpendicular to the longitudinal axis or this could be defined as the distance measured radially between the major and minor cylinders.
(19) Axial thickness. This is the distance between the opposite faces of the same thread measured on the pitch cylinder in a direction parallel to the axis of thread.
(20) Fundamental triangle. This is found by extending the flanks and joining the points B and C. Thus in Fig. 13.2, triangle ABC is referred to as fundamental triangle. Here BC = pitch and the vertical height of the triangle is called the angular or theoretical depth. The point A is the apex of the triangle ABC.
(21) Truncation. A thread is sometimes truncated at the crest or at the root or at both

Fig. 13.2. Screw-thread terms relating to external thread.
crest and root. The truncation at the crest is the radial distance from the crest to the nearest apex of the fundamental triangle. Similarly the truncation at the root is the radial distance from the root to the nearest apex.
(22) Addendum. For an external thread, this is defined as the radial distance between the major and pitch cylinders. For an internal thread this is the radial distance between the minor and pitch cylinders.
(23) Dedendum. This is the radial distance between the pitch and minor cylinder for external thread, and for internal thread, this is the radial distance between the major and pitch cylinders.
(24) Major diameter. In case of a straight thread, this is the diameter of the major cylinder (imaginary cylinder, co-axial with the screw, which just touches the crests of an external thread or the root of an internal thread). It is often referred to as the outside diameter, crest diameter or full diameter of external threads.
(25) Minor diameter. In case of straight thread, this is the diameter of the minor cylinder (an imaginary cylinder, co- axial with the screw which just touches the roots of an external thread or the crest of an internal thread). It is often referred to as root diameter or cone diameter of external threads.
(26) Effective diameter or pitch diameter. In case of straight thread, this is the diameter of the pitch cylinder (the imaginary cylinder which is co-axial with the axis of the screw, and intersects the flank of the threads in such a way as to make the width of threads and width of the spaces between the threads equal). If the pitch cylinder be imagined as generated by a straight line parallel to the axis of screw, that straight line is then referred to as the pitch line. Along the pitch line, the widths of the threads and the widths of the spaces are equal on a perfect thread. This is the most important dimension at it decides the quality of the fit between the screw and the nut.
(27) Functional (virtual) diameter. For an external or internal thread, this is the pitch diameter of the enveloping thread of perfect pitch, lead and flank angles having full depth of engagement but clear at crests and roots. This is defined over a specified length of thread. This may be greater than the simple effective diameter by an amount due to errors in pitch and
angle of thread. The virtual diameter being the modified effective diameter by pitch and angle errors, is the most important single dimension of a screw thread gauge.
In the case of taper screw thread, the cone angle of taper for measurement of effective diameter, and whether pitch is measured along the axis or along the pitch cone generator also need to be specified.
13.2.1.
Errors in Threads.
In the case of plain shafts and holes, there is only one dimension which has to be considered (i.e. diameter), and errors on this dimension if exceed the permissible tolerance, will justify the rejection of part. While in the case of screw threads there are at least five important elements which require consideration and error in any one of these can cause rejection of the thread. In routine production all of these five elements (major diameter, minor diameter, effective diameter, pitch and angle of the thread form) must be checked and method of gauging must be able to cover all these elements.
Errors on the major and minor diameters will cause interference with the mating thread. Due to errors in these elements, the root section and wall thickness will be less, also the flank contact will be reduced and ultimately the component will be weak in strength. Errors on the effective diameter will also result in weakening of the assembly due to interference between the flanks.
Similarly pitch and angle errors are also not desirable as they cause a progressive tightening and interference on assembly. These two errors have a special significance as they can be precisely related to the effective diameter.
Now we will consider come errors in detail and define some terms.
13.2.2.
Drunken Thread.
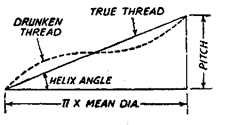
This is the one having erratic pitch, in which the advance of the helix is irregular in one complete revolution of the thread.
Thread drunkenness is a particular case of a periodic pitch error recurring at intervals of one pitch. In such a thread, the pitch measured parallel to the thread axis will always be correct, the only error being that the thread is not cut to a true helix. If the screw thread be regarded as an inclined plane wound around a cylinder and if the thread be unwound from the cylinder, (i.e. development of the thread be taken) then the drunkenness can be visualised. The helix will be a curve in the case of drunken thread and not a straight line as shown in Fig. 13.3.

Fig. 13.3. Drunken thread.
It is very difficult to determine such errors and moreover they do not have any great effect on the working unless the thread is of very large size.
13.2.3.
Pitch Errors in Screw Threads.
Generally the threads are generated by a point cutting tool. In this case, for pitch to be correct, the ratio of the linear velocity of tool and angular velocity of the work must be correct and this ratio must be maintained constant, otherwise pitch errors will occur. If there is some error in pitch, then the total length of thread engaged will be either too great or too small, the total pitch error in overall length of the thread being called the cumulative pitch error. Various pitch errors can be classified as :
13.2.3.1.
Progressive Pitch Error.
This error occurs when the tool work velocity ratio is incorrect though it may be constant. It can also be caused due to pitch errors in the lead screw of the lathe or other generating machine.
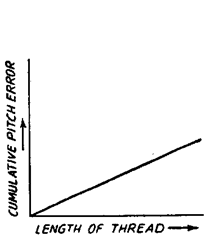
The other possibility is by using an incorrect gear or an approximate gear train between work and lead screw e.g., while metric threads are cut with an inch pitch lead screw and a translatory gear is not available. A graph between the cumulative pitch error and the length of thread is generally a straight line in case of progressive pitch error (Fig. 13.4).
13.2.3.2.
Periodic Pitch Error.
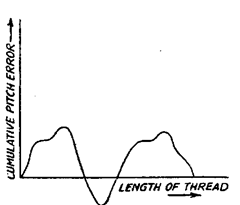
This repeats itself at regular intervals along the thread. In this case, successive portions of the thread are either longer or shorter than the mean. This type of error occurs when the tool work velocity ratio is not constant. This type of error also results when a thread is cut from a lead screw which lacks squareness in

Fig. 13.4. Progressive Error.

Fig. 13.5. Periodic Error.
the abutment causing the leadscrew to move backward and forward once in each revolution. Thus the errors due to these cases are cyclic and pitch increases to a maximum, then reduces through normal value to a minimum and so on. The graph between the cumulative pitch error and length of threads for this error will, therefore, be of sinusoidal form.
13.2.3.3.
Irregular Errors.
These arise from disturbances in the machining set-up, variations in the cutting properties of material etc. Thus they have no specific causes and correspondingly no specific characteristics also. These errors could be summarised as follows :
Erratic Pitch. This is the irregular error in pitch and varies irregularly in magnitude over different lengths of thread.
Progressive Error. When the pitch of a screw is uniform, but is shorter or longer than its nominal value, it is said to have progressive error.
Periodic Error. If the errors vary in magnitude and recur at regular intervals, when measured from thread to thread along the screw are referred to as periodic errors.
