2.29.
Advantages. Center distances can be measured without complicated calculations and
mathematical errors. Double spaced divisions provide high accuracy and easy 0.02 mm readings.
Readings are not influenced by personal feel of the operator as measuring pressure acts in opposite
directions when minimum and maximum distances are measured.

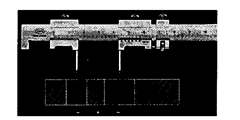
Fig. 2.99. Distance gauge.
Design Features. Stainless steel beam hardened throughout with 2 slides each with one
carbide tipped measuring jaw. Satin chrome finished vernier and main scale with jet black
graduations. Raised sliding surfaces to eliminate wear and marring of scales. Non-removeable
locknut for positive clamping of slide. Fine adjustment.
Measuring Principle. Maximum and
minimum distance from bore to bore are added
mechanically. The double spaced scale divides this
sum into half and the center distance between both
bores can be read directly on the vernier.
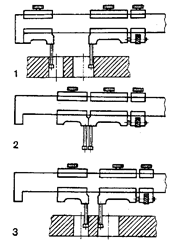
Measuring Procedure (Refer Fig. 2.100)
1. Move left slide against stop and lock. Set
right slide to maximum dimension between bores
and lock.
2. Release left slide, move against right
slide and lock.
3. Release right slide, set to minimum dis-
tance between bores.
4. Read center distance of bores on vernier.
This instrument also measures distances
from bore center to workpiece edge. Here measure
maximum and minimum dimensions between bore
and edge and subtract the radius of one measuring
point (2.5 or 0.75 mm) from reading. Fig.:

Fig. 2.100. Measuring principle for distance gauge.
Distance Gauge (Refer Fig. 2.99) (Metrology)
Next post: Vernier Height Gauge (Metrology)
Previous post: Vernier Instruments (Metrology)
