Hands-on Example
The following exercise will allow us to go through a story creation process using the bull’s-eye method, thus solidifying our use of these new glossary terms. Because we are working on a 2D/3D project as well, you might find the process slightly different from what you have read in other topics. I have found breaking things down this way allows me to move students away from the very first way of setting up a shot that comes into their heads. It pushes them to look a little at their shots and how they relate to the story to dictate the setup. Basically, I’m throwing logic at the problem.
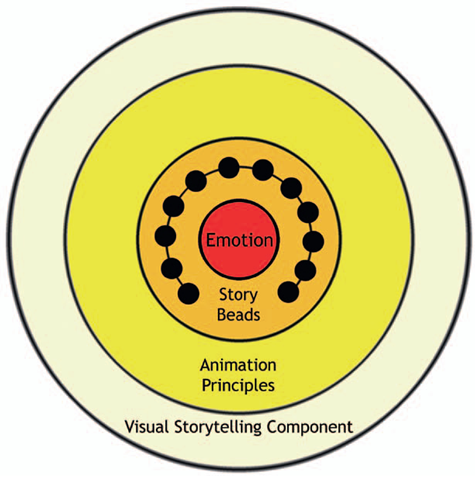
We’ll actually start with the second ring of our bull’s-eye first. The storybeads for your exercise are as follows:
1. It is a lovely night.
2. There are two people, in the city, in love.
3. Character A thinks that now is the right time.
4. On bended knee, character A asks the big question by presenting the ring.
5. Character B thinks over the question.
6. Character A waits for the answer.
7. Character B rejects the offer.
8. Character A is rejected in the city as the rain begins to fall.
Now let’s look at the center of our bull’s-eye: the emotion. We will start the story out by making the audience think this couple is in love, get their hopes up, then show the loneliness of the dejected lover at the end of our story.
FIGURE 1.20 Exercise bull’s-eye with central emotion and storybeads.
We know about the third ring in the bull’s-eye, so let’s move onto the fourth ring. To make the audience feel our story, we will use a visual storytelling component: space. We will use the contrast of flat and deep space for our story. If you haven’t read Block’s topic, follow along with the imagery and you’ll be able to deduce some of the ideas of showing off space as an actor. You may miss the finer points, so make sure to read his text. The visual rule for our small story will be as follows:
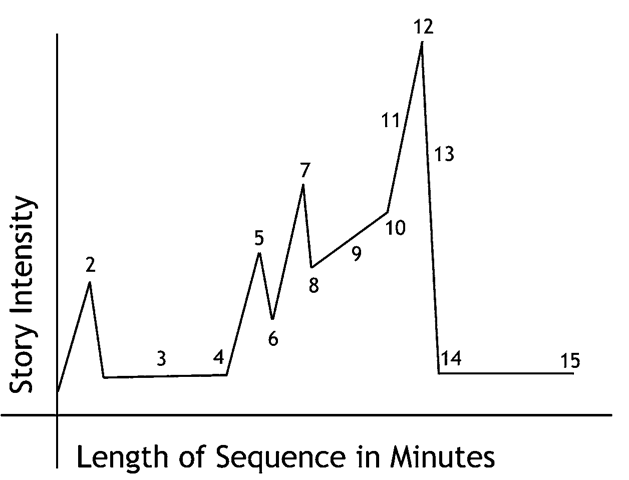
FIGURE 1.21 Story and visual intensity chart with visual storytelling components.
1. Deep space = in love (shots 1, 2, 3, 4, 5, and 6)
2. Flat space = rejected (shots 7 and 8)
In Figure 1.21, you can see that the visual intensity holds the audience in a deep space when the couple is seen to be in love. The moment character A rejects the offer, the film switches to flat space. This creates a change in the visual language of the story and thus plusses the emotion the story is already telling. Did it have to be deep space for love and flat space for rejected? No. You can set up any type of rule that you want, as long as you stay true to that rule during the telling of your story. Now, if my students are reading this, they are holding their breath thinking I’m going to start talking about neurons, the hippocampus, inhibitors, synapses, and other parts of the brain to prove how exactly this works. I’ll just leave it at this: Pavlov knew what he was doing with those dogs. “Ding. Ding."
Random Note
Let out your pent-up breath, students. I won’t discuss synaptic connections here. You can attend my three-hour lecture on the topic at your leisure.
Of course, that is not the only way to tell the story. What if our emotional intent was to show that the marriage proposal was doomed from the beginning, and the story is about two lovers who can never marry?
Flat space = single/rejected (shots 1, 2, 5, 7, and 8)
Deep space = hope for marriage (clueless character A’s shots: 3, 4, and 6)
We keep the story in flat space and the only time we break into deep space is when we are showing poor, clueless character A as he or she hopes for a marriage acceptance.
If we put all of these elements together—the emotional center, storybeads, and visual storytelling components—we get a bull’s-eye chart something like the one shown in Figure 1.22.
FIGURE 1.22 Our story’s intensity chart with visual storytelling components and bull’s-eye with storybeads and central emotion.
You will note the animation principles ring of the bull’s-eye. I remind my students that were they an actor on a stage, they would not give the Academy Award-winning crying speech in every scene. They would save those tears and all-out acting for the climax of the film. This ring reminds the animator where to pause, where to hold back, and where to let every trick out to hit that emotional center.
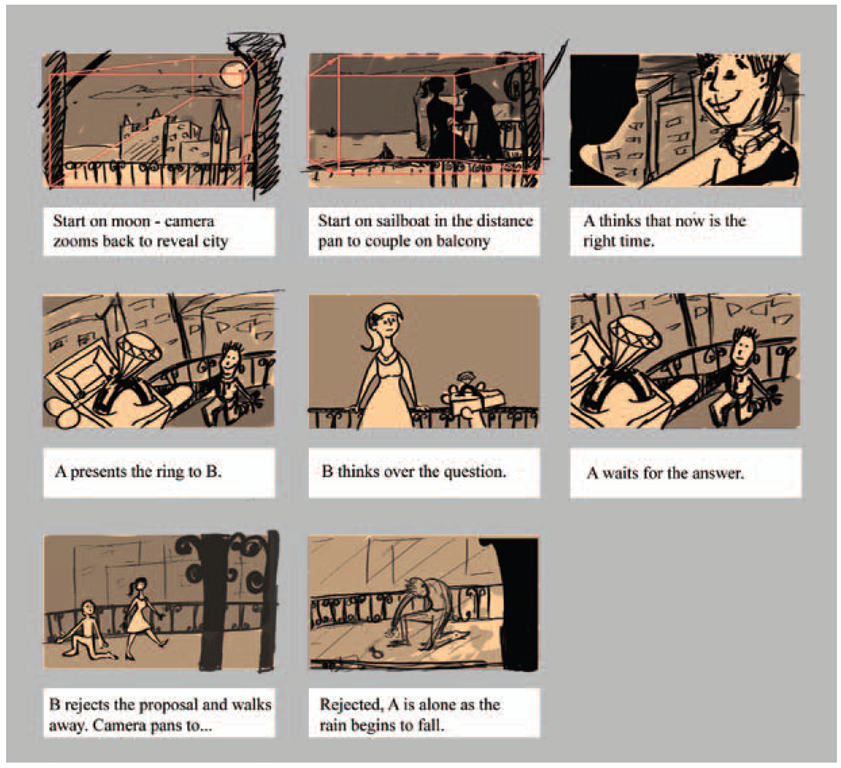
Here is an example of a thumb-nailed storyboard and the final storyboard for the first version of our story where everybody is in love until the final rejection. Note that all shots are in deep space with only the last two panels in flat space. This reflects what we set up as our visual storytelling component:
Deep space = in love (shots 1, 2, 3, 4, 5, and 6)
Flat space = rejected (shots 7 and 8)
FIGURE 1.23 Thumbnail storyboard for version 1.
To following shows an example of using the visual storytelling components to change the emotion of the story to show the cluelessness of character A. Note that shots 3, 4, and 6 have stayed the same, as they were in deep space already. The camera movement changed in the beginning two shots to make them into flat space. Shot 5 was changed the most, and I reframed the final shot to make the character feel a bit more trapped near the center:
Flat space = single/rejected (shots 1, 2, 5, 7, and 8)
Deep space = hope for marriage (clueless character A’s shots: 3, 4, and 6)
FIGURE 1.24 Thumbnail storyboard for version 2.
What have we done so far? We worked on our storybeats/sto-rybeads first and focused on what emotion they are trying to portray.


