3D Leads 2D: Maya Render Layers and Photoshop
We are ready to export our levels of animation. One level will be the Robot Robby and the second level will be our stand-in character. To render out separate levels in Maya, you can use Render Layers. Setting them up is much like setting up Display Layers. In fact, be careful to note when you are in the Display Layer mode versus the Render Layer mode. The following is how to use Render Layers in Maya 2008 or older versions. We’ll look at Maya 2009 as well.
1. Render layers:
a. At the bottom of the Channels box in the layers area, click Render Layer.
b. In the outliner, select RobbyRobot, then click Layers > Create Layer from Selected.
c. Double-click on the new layer (layer1) and name it Robby_ Anim. Click on Save. Note: Only the Robby is visible.
FIGURE 3.23 The Robby_Anim render layer only has the robot in it. Everything else hides (will not render).
d. Click back on the Master layer, and you will see everything again.
e. The toon lines more than likely were not added to your Robby Layer. Select Rob Robot’s toon lines, then right-click on the Robby_Anim and choose Add Selected Objects. Repeat b through c for Roy, the stand-in.
f. You should have the following render layers:
i. Master layer—shows everything when clicked.
ii. Robby_Anim—shows only the robot when clicked.
iii. Roy_Ref—shows only the stand-in character when clicked.
2. Rendering the images. The next thing to do is to render out these images. You can set the background color to be something other than black. The renders shown in Figure 3.26 have a white background color. Background colors can be set in the camera attributes. This does not affect the alpha channel.
FIGURE 3.24 Roy_Ref layer with stand-in character.
a. In the Render Layer window, choose Options > option box for Render All Layers.
FIGURE 3.25 Render all layers.
b. In the options box choose Keep Layers. Click Apply and Close.
c. Double-check that the Render All Layers is actually checked on.
d. Open your Render Settings window.
i. We will use the following settings:
(1) Set the name.
(2) Naming convention is name.#.ext.
(3) Number padding.
(4) We’ll use .tifs.
(5) Choose the appropriate frame length; ours is 1-18.
(6) Choose the RENDER_CAM as the Renderable Camera.
(7) Watch out! Make sure Alpha channels is turned on!
(8) Resolution should be your final resolution.
e. Now you can click Render > Batch Render. The renders for each layer will be placed in named folders. Look at the Script Editor to see the progress.
FIGURE 3.26 Completed render of layers.
Why did we go through the trouble of setting up render layers? Now we have a sequence of images for both characters. Each has its own alpha channel so that it can be composited overtop of a background or other levels as needed. Now we can take our robot’s 3D render and use Roy’s 3D reference render to draw the 2D animation and make sure that the registration is correct.
3D Leads 2D: Animating 2D on Top of 3D
What software do you use to draw your 2D animation on top of the 3D animation? In class we have been using many different software packages and find that each one lends itself toward different final looks. You’ll want to experiment with any software programs you think might work to see how well you can animate in them. We will cover the technical aspects of a few of them here in this topic.
Maya and Photoshop
A new feature that was put into Photoshop CS3 is the ability to edit and work on sequences of images.
Random Note
Why, I remember working on Photoshop version 1 and trying to make it animate. Here you have the ability built in. Ah, the good old days. Mac Ci, 100-MB hard drive. The patience we had to have to do anything. You young folk nowadays.
Open Our Renders
To open the rendered file sequence into Photoshop, click File> Open, select the first image of the Robot level. Ours is in the folder Robby_Anim and is named rb.00001.tif, click on the Image Sequence option.
FIGURE 3.27 Remember to set the correct frame rate!
Notice the video layer in the layer palette. This is no longer a normal image layer.
FIGURE 3.28 Video layer.
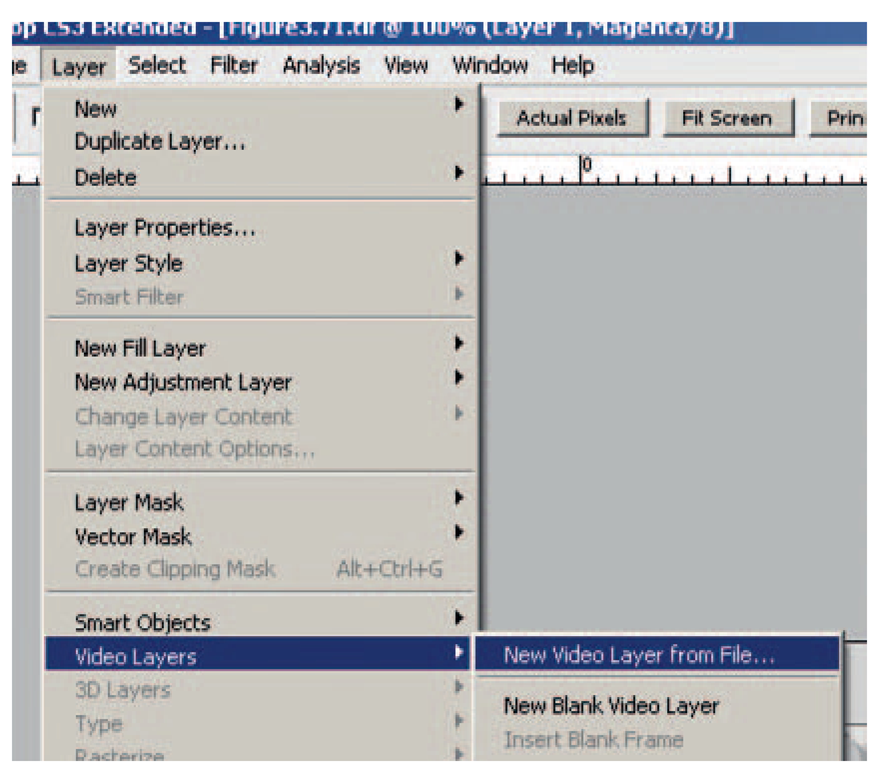
If you repeated the steps presented earlier for the Roy images, you would have a separate Photoshop file. To import more video layers, we will have to do the following: select Layer > Video Layers> New Video Layer from File, select the first image of Roy, and make sure to choose Image Sequence.
You can’t see both layers now can you? There is a difficulty here. Photoshop doesn’t know what alpha channel to use, so it does not use any. We can get around this. Double-click on Roy’s layer. In the option box window, change the blend mode to be multiply, and click OK. Now you can see both layers.
Later on in another topic, we will learn how to work around Photoshop’s video layers not seeing individual image alphas. For now, we are only using the layers as reference, so their alpha channel is not absolutely needed right now.
FIGURE 3.29 New Video Layer from File.
FIGURE 3.30 Multiply blend node allows you to see both layers.


