The largest section of this topic is dedicated to covering the techniques of putting together 2D and 3D animation media. I’ve abstracted the combination of media down into common patterns of combination. We’ll look at industry examples in each topic, but mostly we want to push buttons, master software programs, and make some nice images, right? So the bulk of each topic will consist of a tutorial that walks you through the techniques. Oh boy, put on your magic thinking hat. We’re going to have some fearless fun with software.
2D/3D compositing example.
Lecture Notes
This topic explores having a 2D character and a 3D character interacting with one another. We examine the most important method of eliciting an emotional response from the audience, which is by including touch in our characters. The characters must touch both each other and themselves. The issues that need to be resolved are registration, timing, and line look. How do we make characters drawn in different media look like they are touching and make the line quality of the characters look like they match?
Industry Examples
Let’s take a look at some memorable scenes that have shown the interaction between two characters who happened to be of different media.
Warner Brothers’ Iron Giant is one of my favorites. It is one of the first films in my memory to successfully present two characters interacting together who happened to be of different media. The giant was a natural for 3D given its rigid nature and complexity. The giant has a high amount of line mileage that would have been difficult to animate in 2D and keep the rigid nature as well.
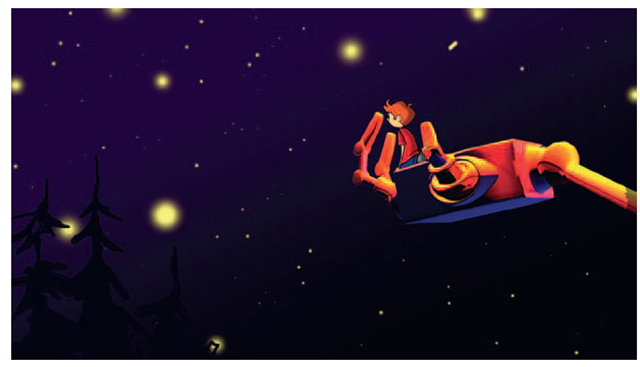
Another example of many 2D/3D accomplishments is Disney’s Treasure Planet. We will look at Treasure Planet more in this topic, because so much was accomplished technically in that film. Figure 3.2 shows the main 2D character being picked up by B.E.N, a 3D character. “Hazaa!"
I’ve been accused of only looking at “old" films. That really makes me laugh. Okay, “old" is a relative term. Animation is a pretty young medium. The industry films we look at in these topics had large budgets, lots of artists, and pulled off the combining of the media. We can learn a lot from the techniques that the animators had the time and money to come up with. However, you can look anywhere and come up with examples of 2D and 3D characters interacting, even modern examples that are not “old."
Emotion
I spend a lot of time driving and keep a portable DVD player in my truck. While driving, I listen to movie commentary and lectures I have recorded at work. (I can stand no time being wasted— even driving.) One day I found myself listening to a lecture by Bob Nicoll (director of Electronic Arts University). His lecture was on “Emotions in Animation." He would play for the audience a clip from Dumbo, where Dumbo goes to see his jailed mother. It is a bittersweet meeting between mother and son, underscored by a mournful song. When the clip ended, Nicoll asked the audience what they remembered most from the clip. Most often someone would comment on the touching between the two characters. To see two characters touch strongly stirs emotions in us.
I’ll take it even one step further. Just by listening to the clip, I was not even watching it (I was driving; I keep the DVD player nearly closed to avoid temptation), yet I could mentally visualize the sequence. While listening to the clip, I found myself thinking about my kids and wondering if I had been too harsh or too distracted with them the night before. I caught myself and wondered why was I thinking about the kids? I realized, of course, Bob Nicoll was right. The clip of Dumbo and his mom, punctuated by the touch, had connected in my brain to the strongest of emotions, which centers around my kids. Sure enough, I started thinking of them, which in turn stirred more emotions.
Bingo. That is the way we get audiences to feel emotions—we must connect to a memory they have in their heads. (My students are cringing. They think I’m going to talk about neuroscience. I promise, I’ll hold myself back.) You might have heard that a large memory trigger is smell. Well, that one is out for now. With smell-o-vision aside, we’ll have to look to another large sense that we use—touch. We touch our faces, wring our hands, hug our bodies; we do all sorts of self-touch to convey to others how we feel [1]. We also, based on culture, touch others to convey friendship, intimidation, love, and a host of other emotions.
This is our first task to undertake when combining 2D and 3D animation. We have to master how to have our characters touch.
Dig Deeper
For those who made it to this footnote, you can indeed dig deeper into why and how emotions connect in our brains. My favorite topic on this subject is Joseph LeDoux’s Synaptic Self.
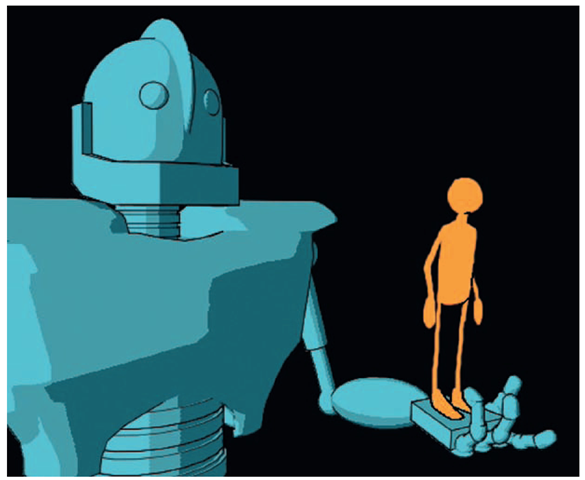
FIGURE 3.1 Touch between characters.
Hands-on Examples
The following section will finally let us get into putting together a scene. While going through this hands-on portion, we will cover some of the pipeline issues: registration, timing, and line look. We will also look at various ways to combine 2D animation on top of 3D images. From these methods you can find what fits your pipeline best or come up with one of your own. Remember to post your findings on the forum at www.hybridanimation.com. You can read more information in the last topic about the forum.
Who Leads?
In the first scene we will do, a small character climbs into the hand of a larger character and is lifted. You can use Iron Giant as your reference. The first question to ask then is, “Who leads?" In other words, whose movement is moving the other? In this case, the larger character will be lifting the smaller character; therefore, the larger character leads. Which one is which medium? The boy character will be 2D and the robot character will be 3D. So in this case, 3D will lead 2D.
This pipeline has 2D animation being done digitally. This means using Photoshop, Corel Painter Draw, Toon Boom, and so on: software. You can draw with a Wacom tablet or use a Cintiq tablet. It isn’t advisable to think about 2D animating with a mouse. I’m sure it can be done, but I wouldn’t want to do it.
What if you do not have a fancy Wacom tablet and needed to draw the 2D on paper? Then you would need to print the 3D animation, peg it up, and use it as reference for your 2D animation. It is a cheap pipeline, but it instantly causes registration issues at the printing stage. The 3D character is printed onto paper. That paper is hand-pegged, meaning someone sits at a light table, lines up crosshairs that were printed on the animation, and tapes a peg strip at the bottom of the page. One by one each page is pegged up. A pencil test is shot to see if the pegging process was acceptable. Then the animator can begin to animate using the 3D images as reference. Once completed, the 2D animation needs to be scanned back in to composite with the 3D animation.
Take Note
Beware. The printing and scanning process adds more time to your pipeline and most likely introduces bad registration between your 2D and 3D characters unless absolute care is given to the pegging process.
You might ask, “What if the order were reversed? What if the boy character was 3D and the robot character was 2D?" Then we would need to use a pipeline where 2D leads 3D. I’ve added the option of the 2D being traditional paper or digital. When traditional paper 2D leads, it isn’t as problematic unless the last stage of tweaking 2D to 3D is needed. In that case, there would be a printing and pegging of the 3D assets and possible registration issues.
In scenes where one character is definitively leading the other one, it is an easy pipeline. However, what if this scene was a dance or a fight between characters? What if they had to tango? That would take more coordination between animators. More than likely one animator would lead and rough in where he or she expected the other character to be. The second animator would then take over and match where the first animator indicated the character to be. If there were any discrepancies, there would have to be a back and forth between the animators.
Anytime the animation goes from one animator back to the other for tweaking, it can be considered a redo. It costs extra time and usually worries the art production manager. It is the first part of the pipeline to be avoided. That does mean that usually each animator has only one shot to get the acting, registration, and timing correct and hope it matches to the character’s animation. However, if it is an “A" scene (a scene that is very important, like a moment scene with high emotion and story importance) or a scene where no discernable character leads the other, then the redos/tweaking should be allowed (within reason) to make sure the animation is acceptable.
Take Note
Remember, any tweaking between media means much more time will be needed to finish the scene. Factor that in when you are budgeting time for your personal films.
3D Leads 2D: Animating A 3D Character With A 3D Stand-in Using Maya
This hands-on tutorial will walk you through the technical steps of animating our robot rig, creating a stand-in 3D object for our 2D character, and constraining it to follow the robot’s hand. Then, you will bring the levels into Photoshop as reference and animate in Photoshop.
1. Create a project. Start Maya and create a new project for this lesson. Select File > Project > New …. Save the project in a place where you will have plenty of disk space. Give it a name, click Use Defaults folder settings, and then click Accept. (Students, do not save directly to your flash drives. Use the local drive and back up to your FTP sites and flash drives at the end of your day.)
FIGURE 3.2 Our goal for this exercise.
Trench Note
You never want to think about losing data, and it happens to the best of us. A good rule that I use for important projects is to keep things local. Back up to a flash drive daily. Keep the flash drive away from your computer. Back up weekly to an FTP site in another state/ weather pattern.
For instance, when I lived in Florida my FTP site was out of reach of hurricanes. I’m ultra paranoid. I also keep an external hard drive and back it up bimonthly. During my thesis, I most ungracefully poured a glass of water onto my laptop. Luckily, I was able to revive the old friend once it had dried out and only had to reformat the drive. I lost very little work because I had backups. I hope you have the same self-made luck.
Take Note
Maya will happily save your file even if your computer or home directory has run out of disk space. It will not even complain. You won’t know you have run out of disk space (and have corrupted files) until the next time you open your scene. No amount of backups will save you from that!
2. Open the file. Open our robot rig. File > Open Scene …, locate the rig Robby_3DLeads2D_1.ma, and click Open.
3. Select the character set mode. In the bottom right-hand corner, select the character set for this rig: Robby. This allows you to set keyframes and not worry about having the controls selected. If you are familiar with animating without character sets, feel free to do so. We will use character sets in this topic. When the red arrow is on, you are using character sets to animate.
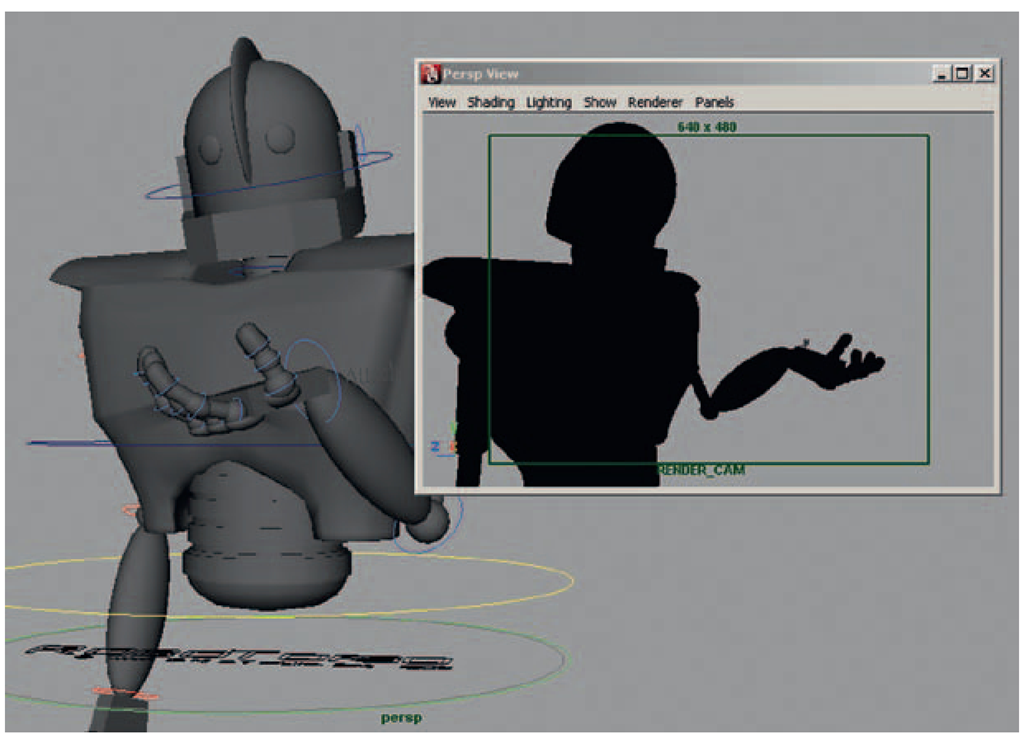
4. Animating to the camera. Because we have a camera set for this scene, we will use it to check our silhouettes. In the perspective window, click Panels > Perspective > Render_Cam. Do not move this camera. It is important to keep the rendering camera still during the animation process. Instead, we will set it aside so that we can animate to the camera. Animating to the camera means animating in the perspective, top, front, and side window with the ability to orbit around and looking at the Render_Cam to make sure the poses read well. Choose Panels > Tear Off Copy .. Now you have a free-floating panel of your render camera. Resize it and place it so that it is out of the way but still visible. (For those fortunate animators, place the panel on your second monitor.) In the Render_Cam panel, choose the following items so that you can get a clean silhouette view:
a. Under Show, hide everything but the geometry. Make sure to check off Manipulators.
b. Press the 7 key on the keyboard. That puts you in lighting mode. Because we have no lights, your scene character should be in complete silhouette.
FIGURE 3.3 A torn-off Render_Cam Panel, which we will use to check our silhouettes as we animate in the Perspective view.
5. Animate. Now you are ready to animate the hand so that it starts at the bottom of the frame and lifts up to midchest level. Our animation lasts 18 frames. You can open Robby_ 3DLeads2D_2.mb for an already animated version of Robby.
6. Set frame rate. What frame rate will you animate in? You need to make sure the time is correct and stays constant throughout the production. In other words, right here is where you can mess things up! Take a moment and set the frame rate in the Animation Preferences window, under Settings > Timeline > Playback speed. Ours is set to Real-Time [24 fps]. At each step of the pipeline, we will need to make sure this is our frame per second.
FIGURE 3.4 Keyframes of animated Robby hand.
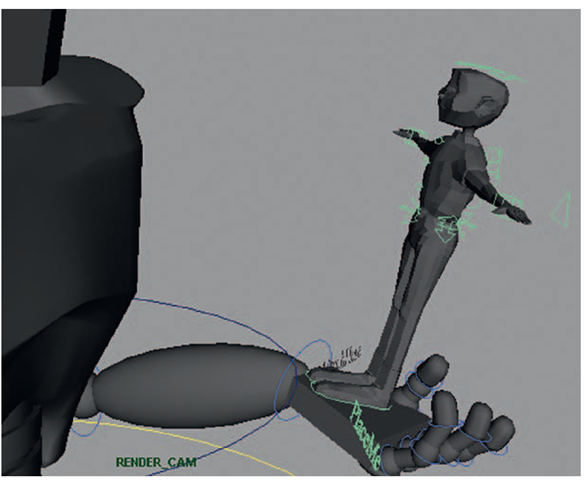
7. Import 2D’s 3D stand-in. Now, import in the 2D character’s 3D stand-in. Click File > Import. and find the file Roy_3DLeads2D_Standin.ma. Click Import. Roy appears at the origin, beneath the robot. In the Perspective view, orbit around to see him.
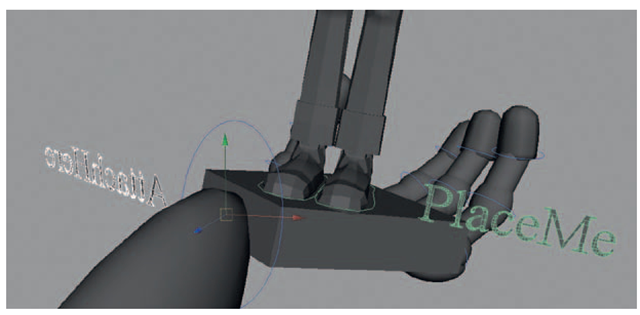
8. Constrain stand-in to follow the hand. The stand-in character is a small rig itself, able to be animated in a limited fashion as reference for the 2D animator. You’ll notice Roy has a few controls to move his arms, legs, head, hips, and chest. There is also a small ring at his bottom titled PLACE_ME.
a. Go to frame one. Select Roy’s “Place_Me" controller. Translate and rotate Roy into place in Rob Robot’s open hand.
FIGURE 3.5 Roy stand-in put in Rob Robot’s hand for frame 1.
b. To make Roy follow Rob Robot’s animated hand, select Rob Robot’s “Attach_Here" control (on the animated hand), hold shift, then select Roy’s “Place_Me" control. Both controllers should be selected. “Attach_Here" will be white, and “Place_Me" should be green. This indicates that “Place_Me" was selected last.
Take Note
When you constrain objects, which order you select things is very important. You select them as Driver—Driven. You can select objects to be constrained to other objects. In this case, we had rigs with attaching controls that we used.
c. In the Animation menu, select Constrain > Parent (option box).
d. The default settings are just fine (you can click edit > rest settings to get default settings). It is important that Maintain Offset is on.
e. Click Add.
FIGURE 3.6 Select “Attach_Here" and “Place_Me" (Driver—Driven), then parent constrain the objects together.
Take Note
If you selected everything correctly and the pivot point of Roy’s "Place Me" control is matched to Rob Robot’s "Attach Here" control, then Roy should sit in the palm of Rob Robot’s hand and animate with him.
9. See Roy move in Rob Robot’s hand. Scrub through or play the animation to see that Roy’s 3D stand-in does indeed sit in Rob Robot’s hand throughout the animation.
FIGURE 3.7a Roy now moves in Rob Robot’s hand.
10. To aid the 2D animator, add a few keyframes for Roy. Remember to not overlap the robot overtop of Roy in this animation. That would complicate our composite. We’ll get to that technique later.
11. Save your file. If you wish to see our completed file from this tutorial, view Robby_3DLeads2D_3.mb.
