RIM Light
Something to consider when you have a 2D object and a 3D object together in the same scene is do you want them to look very flat or do you want them to have some dimension? Usually this
boils down to the question, do you have time, money, and human resources to make rim lights, tones, and shadows for all of your characters? These types of elements are usually produced by the Special Effects EFX department. I’ll talk more about this odd brand of artists later on in the EFX topic. (I mean odd in a great way.) For our solo project, we will include rim lights (or highlights) on our 3D arm, as it is made of metal.
We will make the rim light as a separate pass from the rendered arm. This way we can adjust it at composite time to match everything else. Our goal is to create a rim matte: a black-and-white image representing the area that will be a highlight.
This is a different way to think. As you create this image, you are not thinking of anything but a black-and-white image that represents where the highlight will be. So do not worry about the main color of the arm. I’m starting with my last saved Maya file: 2D_Leads_3D_v5.mb.
1. To start, I have to hide my image plane. The bright white gets in my way. I’ll toggle off cameras by clicking in the Render_ Cam window: Show > Cameras. In my sample file, I have deleted the image plane.
2. Now, let’s assign a special toon shader to the arm:
a. Unlock the GEO_Layer by clicking the R.
b. Select any part of the arm and hit the up arrow key or select the GEO group node in the outliner.
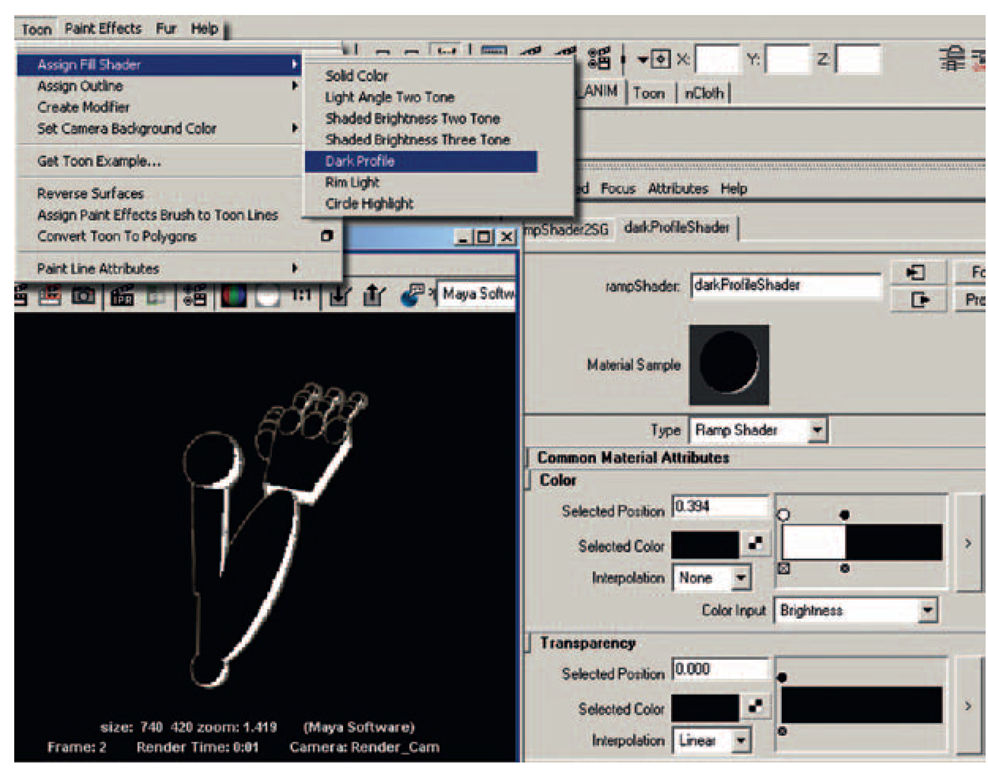
c. Assign a Dark Profile Toon shader to the arm under Animation: Toon > Assign Fill Shader > Dark Profile.
d. Create the color ramp so that its first chip is white and the second is black as shown in Figure 4.24. This will create a white area where we want to have a highlight and all else is black. Perfect.
e. In the outliner, delete the Toon Line Shader. We do not need it for this pass.
3. Render the rim light pass.
a. Go to your Render Settings and prepare your render. See Settings in Figure 4.25 and then Batch Render.
Take Note
Even though we have set up the rim light as an RGB image that will be used as a mask, we still need the alpha channel for the arm. Make sure to use .tif or some format that keeps alpha channels.
Our Rim Light file names are arm_RL.#.tif.tif.
FIGURE 4.24 Dark profile added to the robot arm. This will be used as a rim/highlight matte.
FIGURE 4.25 Render Settings and an example of final renders.
Cleanup in Photoshop
To do proper cleanup in Photoshop, you will want to use a brush that gives the best line quality. Well, how do you accomplish that? For those of us who grew up with Photoshop, we have seen it change from a tool that you would never dream of drawing with to a tool that has lots of potential. In fact, it has too much poten-tial—it can be a thick forest to traverse through to get a brush that you like and fits what you need. (Those are two separate requirements. You can like a brush but it isn’t what you need.)
The choices seem to boil down to these:
1. Use a built-in brush in Photoshop.
2. Create a custom brush.
3. Download one.
You might jump to the third option automatically. It sounds like the easy choice. Not any of the choices are easy, actually. You are forced to pick out one piece of candy in a nearly infinitely sized candy store. How can you do that? There could be a better-looking piece of candy in the next parameter that you tweak or in the next brush that you download!
I have watched various students go through this process as they work on the senior projects or on a group project. I have also gone through this same process myself. Just when I think I get a brush that I like, I try to draw very tightly and find that the brush doesn’t work well enough for my purposes or does not draw smooth enough for me. Once I get a brush that I like, however, I can draw my heart out. It is the process of getting that brush that I imagine is enough; when an artist finds a brush, she or he might not try any others.
BUILT-IN PHOTOSHOP BRUSH
Let’s start with built-in Photoshop brushes. Can you do cleanup with those basic brushes? Yes. For those who love a thick-thin cleanup line, you might not be satisfied with the results if you do not dig deeper.
I interviewed a student who had spent weeks doing cleanup on a senior project piece. A note to the concept of cleanup: we don’t have an actual class on cleanup in the curriculum. We tend to focus on animation, acting, storyboarding, and the like. So students who take on the task of cleaning up, inking and painting, or otherwise completing a 2D film are learning as they go.
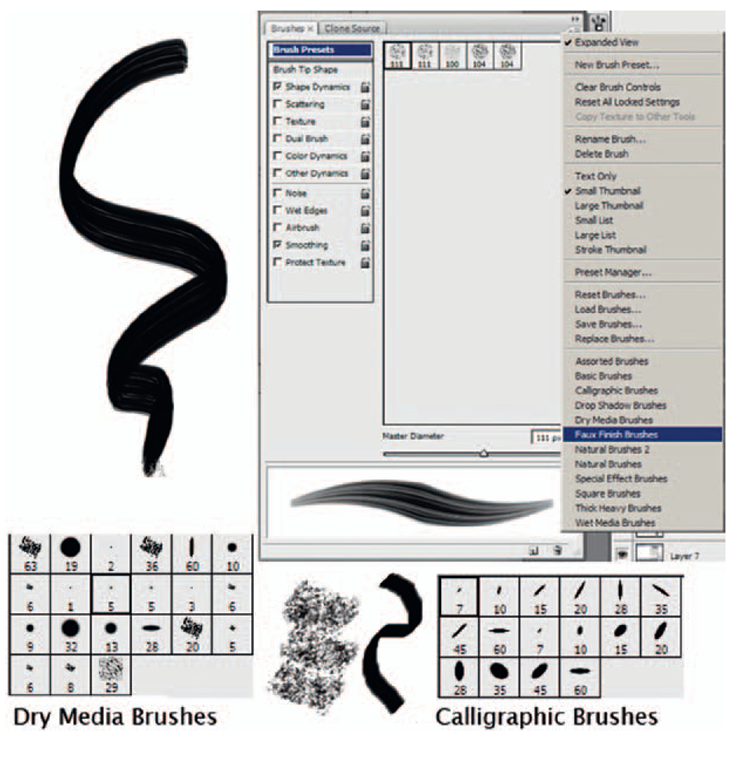
You might have taken a look at the basic brushes in Photoshop and scrolled through the presets. But did you ever load the other presets? I’ll admit I hadn’t for quite a while, until one day I went poking around to see what else was there. If you open the options for the brushes palette, you will see at the bottom various brush sets that you can load in. Figure 4.27a shows a few brushes that come with Photoshop.
When your cleanup and painting are done, you will export a raw movie file, like we did in the previous topic. Remember to include alpha channels! That catches some students—and professors.
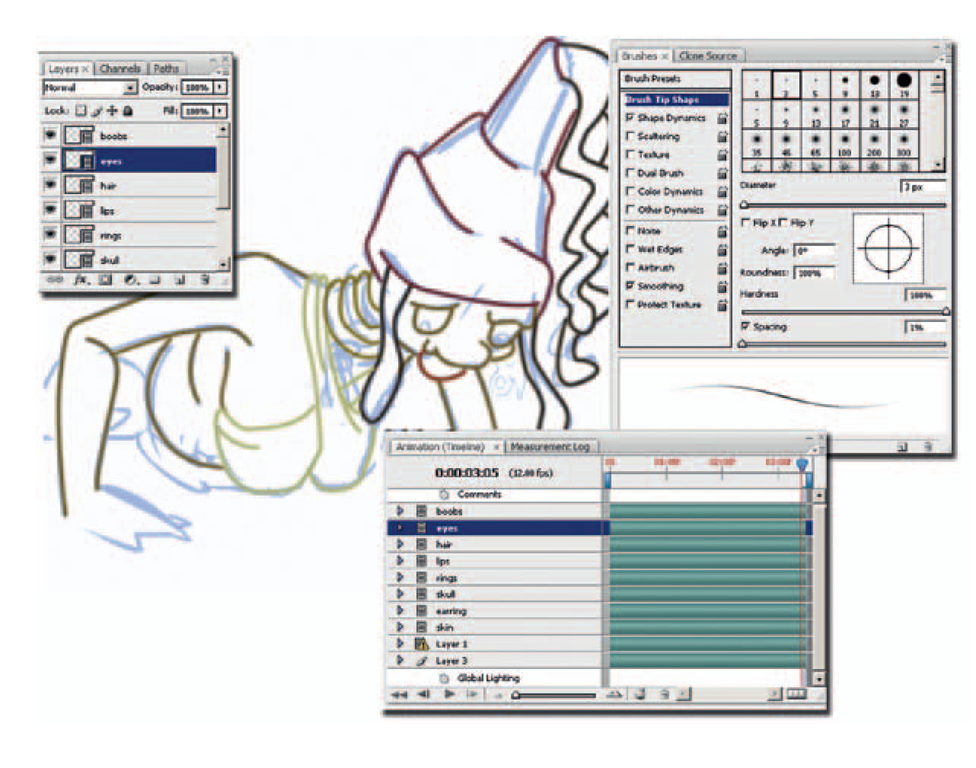
FIGURE 4.26 Cleanup using Photoshop’s standard brush.
FIGURE 4.27a Preset brushes in Photoshop.
FIGURE 4.27b Exporting the final level of Jam, saving as raw QuickTime in order to have alpha channels.
The cleanup file name in the companion data is Jam_Lvl_12fps. mov. This is a raw QuickTime movie. There is no compression.


