Debug Toolbar Buttons
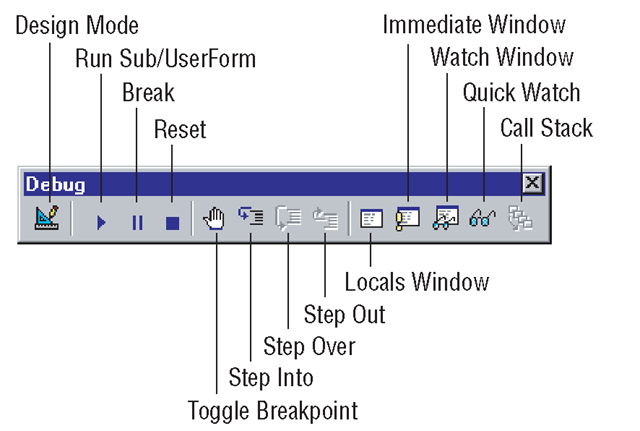
The Debug toolbar (Figure 3.8) provides fast access to the commands available from the Debug menu, as well as a few other commands. You’ll find this toolbar extremely useful when your code doesn’t work as you expected it to.
Notice that the Toggle Breakpoint button exists in both the Edit and Debug toolbars, giving you two points of quick access to this handy command.
Figure 3.8 The Debug toolbar
UserForm Toolbar Buttons
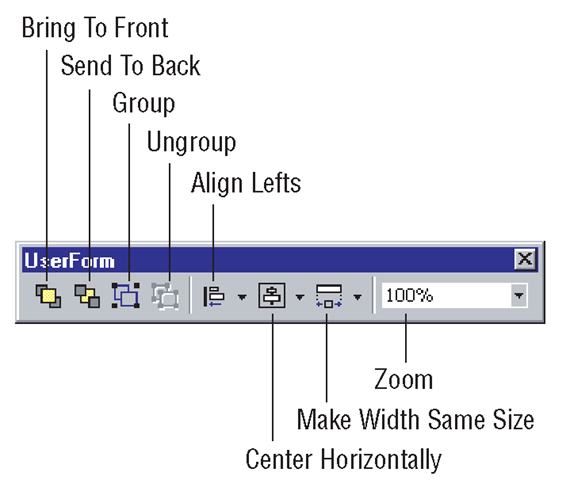
Here on the UserForm toolbar (Figure 3.9) are buttons that give you an alternate means of accessing some of the commands available on the Format menu. These commands allow you to align, position, and size controls placed on UserForms.
Figure 3.9 The UserForm toolbar
The following steps show you how to adjust the size and position of text boxes added to a UserForm:
1. Start a new project, add a UserForm, and place three text boxes on it.
2. Click the topmost text box; then hold down the Shift key while you click the other two text boxes. The handles of all the text boxes appear, indicating they are selected and active, as shown here:
When several controls are active at the same time, the handles of the first control selected are filled with white to give the control a special status as the dominant control. The handles of the other selected controls are filled with black. The Format menu commands treat the dominant control as a guide for positioning or setting the dimensions of the others.
3. Choose Format ^ Make Same Size ^ Both. The size of the selected (black-handled) text boxes are adjusted to match the size of the dominant (white-handled) text box, as shown here:
4. With all three text boxes still selected, choose Format ^ Vertical Spacing ^ Increase, and then choose this command again. The selected text boxes move down, to increase the space between adjacent pairs by one grid position each time you click the Increase command.
5. Choose Format ^ Vertical Spacing ^ Make Equal. The distance between the second and third text boxes is adjusted to be equal to the distance between the first and second boxes, as shown here:
6. With all three text boxes still selected, choose Format + Align + Lefts, or click the Align Lefts toolbar button. The selected text boxes move horizontally so that their left borders line up with the left border of the dominant text box.
7. Position the cursor over the handle at the bottom-right corner of the top text box so that the cursor turns into a double-headed arrow. Hold down the mouse button and move the cursor until the dashed rectangle is the size required for the text box. Don’t release the mouse button yet; notice that the dashed rectangle outline that follows the cursor is displayed at the same relative positions in all three text boxes, as shown here:
8. Now, release the mouse button. All the text boxes are resized to fit inside the dashed rectangles:


![tmp757e-96_thumb[2][2] tmp757e-96_thumb[2][2]](http://what-when-how.com/wp-content/uploads/2012/07/tmp757e96_thumb22_thumb.png)
![tmp757e-97_thumb[2][2] tmp757e-97_thumb[2][2]](http://what-when-how.com/wp-content/uploads/2012/07/tmp757e97_thumb22_thumb.png)
![tmp757e-98_thumb[2][2] tmp757e-98_thumb[2][2]](http://what-when-how.com/wp-content/uploads/2012/07/tmp757e98_thumb22_thumb.png)
![tmp757e-99_thumb[2][2] tmp757e-99_thumb[2][2]](http://what-when-how.com/wp-content/uploads/2012/07/tmp757e99_thumb22_thumb.png)
![tmp757e-100_thumb[2][2] tmp757e-100_thumb[2][2]](http://what-when-how.com/wp-content/uploads/2012/07/tmp757e100_thumb22_thumb.png)
