Displaying the Code Window
When double-clicked in the Project Explorer window, all the modules except UserForms will immediately display the Code window. When a UserForm is double-clicked, its graphical representation is displayed in the UserForm window. You must then doubleclick anywhere inside this UserForm window to display its Code window.
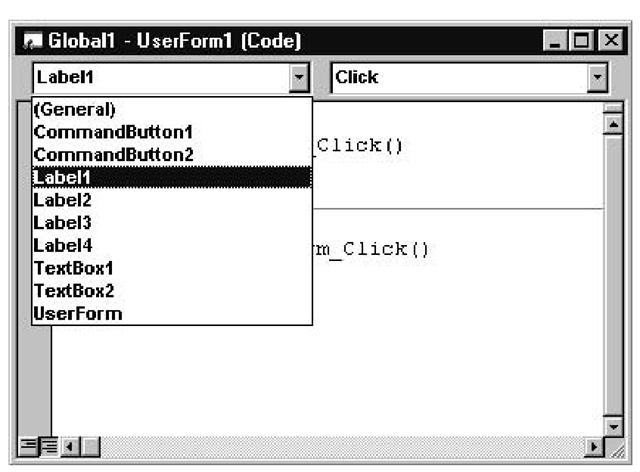
Every Code window has a drop-down list box of objects on the left, and a dropdown list box of procedures on the right. The Object list contains all the objects and controls attached to that module. In the example shown here, all the controls placed on UserForm1 are displayed.
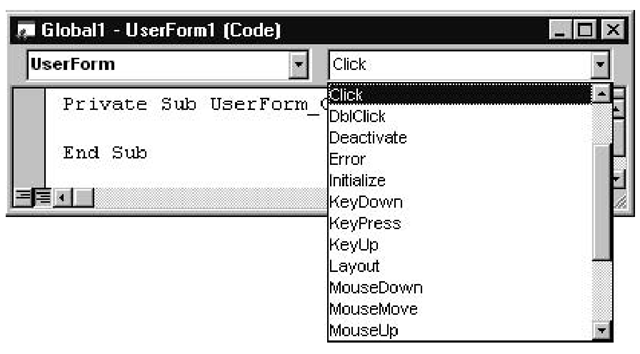
You can tell which UserForm the Code window belongs to by looking at the Caption on the title bar. Notice in the preceding example that there’s an object named UserForm in the drop-down list. Because a UserForm has its own Code window, there is no need to append a distinguishing number after UserForm when you’re referring to it in code in its own Code window. The Procedure list box on the right contains a list of all the procedures (including event procedures) associated with the object named in the Object box, as shown here:
Coding Event Procedures
The following tutorial shows how to write the code to stop an application in response to the user’s clicking the Close button:
1. If the Code window is displayed, choose View + Object to display the graphical representation of UserForm1. Double-click CommandButton2. The Code window appears, containing the skeleton code for the CommandButton2_Click event procedure, with the I-beam cursor blinking in the blank line.
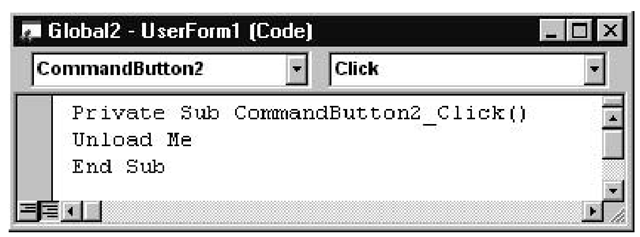
2. As shown in Figure 1.7, type
Unload Me
Figure 1.7 The Code Window showing the CommandButton2_Click event procedure
Now you’re ready to start coding the response you want given to the user who’s entering data into one of the text boxes. When the Metric-Imperial Converter application is run for the first time, both text boxes will be empty. The user enters a measurement into one text box and clicks CommandButton1 to convert the measurement and display the result in the other text box. When CommandButton1 is clicked, the application checks which text box contains the measurement so that it knows which conversion is required. If the user requires another, subsequent conversion and enters another measurement into a text box, the application must clear the other text box of data so that the correct conversion is used. The following steps show you how these actions are coded:
1. Open the Code window and select TextBox1 from the Object list.
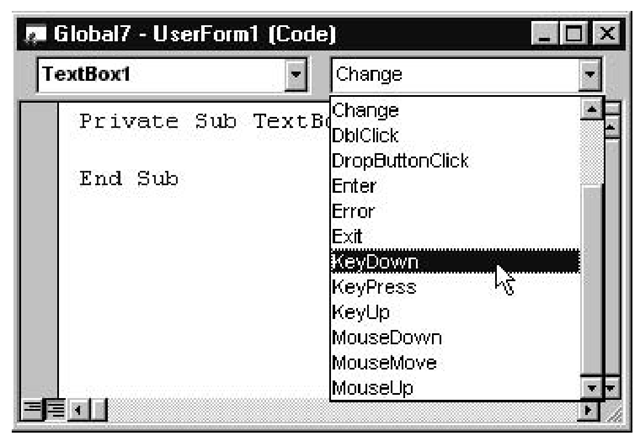
2. Select KeyDown from the Procedure list, as shown in Figure 1.8.
Figure 1.8 Drop-down list of procedures (events) available for the TextBox class of object
3. In the skeleton TextBox1_KeyDown event procedure, where the Entry cursor is blinking, type
4. Select TextBox2 from the Object list, and select KeyDown from the Procedure list.
5. In the skeleton TextBox2_KeyDown event procedure, type
6. Select CommandButton1 from the Object list, and the skeleton (first and last lines) of its Click event procedure will appear.
7. Type the following code inside the skeleton:
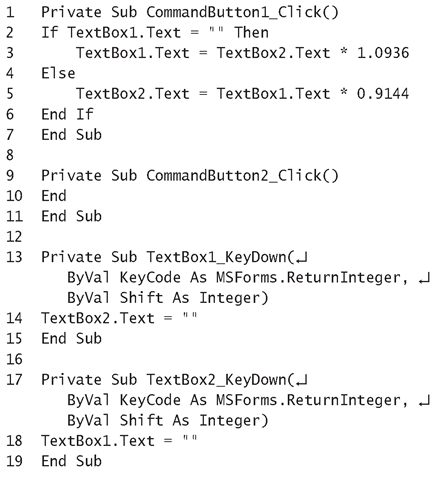
That’s all the coding necessary for this conversion application! Listing 1.1 provides a numbered listing of all the code, followed by an Analysis section that describes what each statement actually does. This application is available for use on the CD-ROM as Listing 1.1.
In the listings throughout the topic, the numbers preceding each line of code are not part of the actual code. They are provided to help you follow the discussions in the Analysis sections.
Listing 1.1: Metric-Imperial Conversion Macro
Analysis
You’ll find the code shown in Listing 1.1 quite straightforward. This Analysis section has been included to take you through it line by line.
• Line 1 is the opening statement and declares the CommandButton1_C!ick event procedure. The code in this event procedure will be executed when the user clicks the Convert command button. This statement, along with the End Sub statement in Line 7, is provided as a skeleton procedure by the IDE.
• Line 2 checks to see if the Text property of TextBoxl is empty, meaning that the user has entered meters into TextBox2; if so, the program executes the statement at Line 3. If TextBoxl isn’t empty, it contains yards, and the statement in Line 5 is executed.
• Line 3 converts the meters entered into TextBox2 to yards and assigns the results to the Text property of TextBox1. The value of the Text property is displayed in the text box.
If conditions and Then…Else…End If… conditional structures can be thought of as two separate parts—the If code block and the Else code block.
• Line 4 starts the Else part of the If statement. Execution jumps to this point if the condition in the If statement (Line 2) is False. Line 4 also serves as an end marker for the statements in the If code block when the condition is True, in which case execution jumps to the End If statement at Line 6.
• Line 5 converts the yards entered into TextBoxl into meters and displays the results in TextBox2.
• Line 6 signifies the end of the If statement. Execution jumps to this point from the Else statement (Line 4) if the condition in Line 2 is True.
• Line 7 is the End Sub statement, which marks the end of the Command-Button1_Click event procedure.
• Line 8 is a blank line inserted to make it easier to see where one event procedure ends and another starts.
• Line 9 starts the CommandButton2_Click event procedure. This is the command button that has its Caption property set to Close (see step 6 of “Setting Captions in the Properties Window”).
• Line 10 contains the End statement that stops executing your application by closing any open files and freeing any memory used by your application during run time.
• Line 13 is the opening statement for the TextBox1_KeyDown event procedure. Unlike the Click event procedures found in lines 1 and 9, the KeyDown event procedure gets passed the integer value representing the ASCII code for the character just entered. This is useful if you want to validate the character input.
• Line 14 assigns an empty string to the Text property of TextBox2. The empty string is denoted by two double quote characters ( "" ). If a new conversion is starting, it doesn’t make sense to have any values from the last conversion still displayed in the other text box.
• Line 18 clears the Text property of TextBoxl inside the TextBox2_KeyDown event procedure.
Running Your Application
To run your Metric-Imperial Converter application:
1. Ensure that UserForm1’s window is open and selected.
2. Choose the Run + Sub/UserForm menu command.
3. Test that your application is working by entering a value into one of the text boxes and clicking the Convert button. Verify that the results are what you expect. Repeat this verification for the other text box.
4. You may want to line up the controls on your UserForm to improve its appearance, as in Figure 1.9.
Figure 1.9 The finished version of the Metric-Imperial Converter application’s GUI with the captions set
Saving Your Application
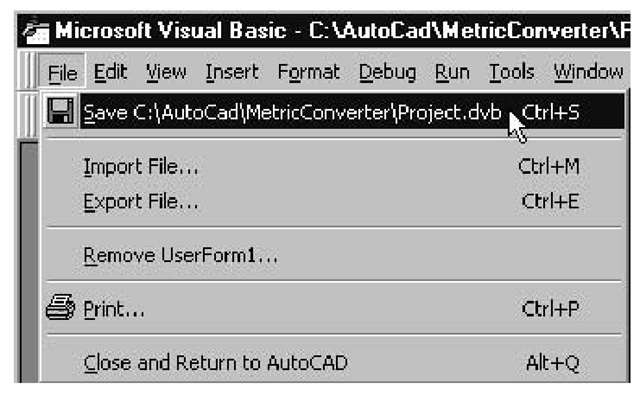
The IDE has one Save command on the File menu. The exact wording of this command depends on whether you have previously saved your project. Figure 1.10 shows the Save option on the File menu before the project has been saved to a file. Figure 1.11 shows how it appears afterward—with the full pathname of the project file.
Figure 1.10 The File menu option for saving a VBA project that has never before been saved
Figure 1.11 The File menu option for saving a VBA project that’s been saved previously
To save your Metric-Imperial Converter project for the first time:
1. Choose File – Save Global1. The Save As dialog box shown in Figure 1.12 appears. The controls in this dialog box will be familiar to you; they are much the same as those found in the Save As dialog boxes of other applications, including AutoCAD itself.
Figure 1.12 The Save As dialog box, ready to save your project to the .DVB file of your choice
2. Use the controls to create a new directory and click Save. Everything associated with the current Project will be saved in a single file with the extension .dvb.
3. Open the File menu. The Save command will now be followed by the full path of the .DVB file in which you’ve just saved your project.
Returning to AutoCAD
There are two menu commands that you can use to display the AutoCAD window, but they serve different purposes:
• Choose File ^ Close and Return to AutoCAD, or use the shortcut Alt+Q. This command unloads the IDE completely before returning to AutoCAD.
• Click the View AutoCAD button.
at the left of the Toolbar. This hides but does not close the IDE window and makes it accessible from the Taskbar. As you know from other Windows applications, you can much more quickly display a window that’s already open by clicking its icon on the Taskbar rather than loading it in again from scratch.
Summary
After working through this topic, you’ll know how to
• Develop a simple VBA application.
• Open the VBA IDE.
• Drag and drop controls from the Toolbox onto a UserForm.
• Assign new values to Caption properties in the Properties window.
• Code event procedures to respond to the user’s actions.
• Run your application.
• Save your application.
• Return to the AutoCAD window from the IDE.
![tmp757e-23_thumb[2] tmp757e-23_thumb[2]](http://what-when-how.com/wp-content/uploads/2012/07/tmp757e23_thumb2_thumb.png)



![tmp757e-29_thumb[2] tmp757e-29_thumb[2]](http://what-when-how.com/wp-content/uploads/2012/07/tmp757e29_thumb2_thumb.png)
