Carburetors on 1970s and later vehicles require very few adjustments because of tighter emissions regulations. If you have a carburetor that’s older than that (see Figure 13-9), you can do several things to keep it in tune:
Adjust the idle speed screw to keep the vehicle idling at the proper number of revolutions per minute (rpm).
Readjust the automatic choke if your vehicle doesn’t start properly in the morning.
Adjust the idle stop solenoid to prevent dieseling when you shut the engine off.
Check and clean your PCV valve or, if necessary, replace it. (See the instructions earlier in this chapter.)
Determine whether more radical surgery is in order.
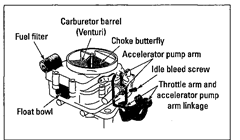
Figure 13-9:
A typical carburetor.
You can find out how to do all these things in the following pages.
If your carburetor doesn’t respond to any of the adjustments in this chapter and is still causing your vehicle to stall, accelerate improperly, burn enormous quantities of gasoline, and so on; and if the inside of your carburetor looks foul and gunky, you may want to have it rebuilt. I’d leave the job to a professional because the darn things have so many nuts, screws, washers, and gizmos that remembering where everything goes when it’s time to reassemble the carburetor can be very difficult.
An easier — and probably cheaper — way to deal with the problem yourself is to replace the carburetor with a new or rebuilt model, following the instructions later in this chapter.
Checking your accelerator pump
If your vehicle hesitates when you step on the gas pedal, your accelerator pump may not be working properly. Here’s how the accelerator pump causes your car to speed up when you step on the gas pedal: When you step on the pedal, a rod connecting the pedal to a little lever, called the accelerator pump arm, which is located on the outside of the carburetor, pushes on a little piston
inside the carburetor, which squirts a little extra fuel into the carburetor ven-turi. (See Figure 13-10.) That extra fuel creates a richer fuel/air mixture, which provides the extra power for acceleration. If your accelerator pump isn’t working properly, your carburetor probably needs to be rebuilt or replaced.
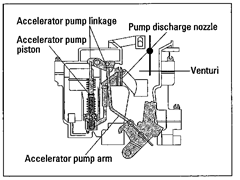
Figure 13-10:
Accelerator pump system.
To check your accelerator pump, with the engine off, remove the air cleaner (following the instructions earlier in this chapter) so that you can see the carburetor. Then have someone step on the gas pedal while you watch the accelerator pump arm to see how freely it moves. (The arm is the little lever, not the big one; that’s the throttle.) If the lever doesn’t move, try pushing it with your finger. If it still doesn’t move, it may be caught on something. Try bending it a little to clear the obstruction.
If the accelerator pump arm moves freely when someone steps on the gas pedal, take a look down the carburetor barrel to see whether fuel is squirting in when the accelerator pump arm moves. If there’s no fuel action, the carburetor probably needs to be rebuilt (which involves taking it apart, cleaning it, and replacing various parts) or replaced. If you need a new carburetor, you may be just as well off getting a cheaper, rebuilt one. The sections “Installing a New or Rebuilt Carburetor” and “What to Do When All Else Fails,” later in this chapter, provide your alternatives.
Adjusting your accelerator pump arm
Some accelerator pumps have more than one hole where the arm hooks up, to enable you to adjust the arm. Adjusting for a shorter stroke (so that the arm moves a shorter distance) gives you a leaner mixture of fuel and air; a longer stroke gives you a richer one. If your accelerator pump arm is moving
when the gas pedal is stepped on, and fuel is squirting into the venturi when the arm is pushed, but you’re still having acceleration problems, try adjusting the arm for a longer stroke.
Checking your idle speed
Follow these steps to check the speed at which your engine idles. If it’s idling too fast or too slow, the next section has instructions for adjusting the mechanisms that control it:
1. Hook a tach/dwell meter to the distributor.
See the section “Checking your distributor with a dwell meter” in Chapter 12 for details. (A plain tachometer will do, but a dwell meter without a tachometer is useless here.)
2. Remove the air cleaner, following the instructions given earlier in this chapter.
3. With the emergency brake on and the car in Park or Neutral, start the car and let it run until the engine is hot and the butterfly valve on the choke is fully open.
4. When the engine is hot enough, turn the knob on the tach/dwell meter to “tach” and look on the rpm line of the meter to see at how many rpm your car is idling.
5. Check that rpm reading against the specifications in your owner’s manual or a service manual for your vehicle’s make, model, and year to see whether the car is idling at the proper rpm.
If your car isn’t idling at the proper speed, you have to adjust your idle. Adjusting the idle is a simple matter, as explained in the following section.
Adjusting idle speed
Before you adjust your idle speed, you need to determine whether your vehicle has an idle speed screw or an idle air bleed screw, and whether it has an idle stop solenoid. If the figures in this section don’t help you determine this (Figure 13-11 shows common idle speed screws, and Figure 13-12 shows an idle stop solenoid), either call and ask the service department at your dealership or consult a service manual for your vehicle’s make, model, and year.
Adjusting idle speed screw’s
If your vehicle has an idle speed screw, follow these steps to adjust it:
1. Check your owner’s manual to see whether the idle speed should be adjusted with the air cleaner off or on the carburetor.
Most cars are adjusted with the air cleaner off. If there’s a hose that goes from the carburetor to the air cleaner, plug the hose with a clean, lint-free rag after you remove the air cleaner.
2. Adjust the idle.
If you have an idle speed screw (see Figure 13-11): Use a screwdriver to turn the screw until the needle on the tach/dwell meter rests on the proper number of rpm. Turning the screw inward (clockwise) increases idle speed; turning it outward (counterclockwise) decreases it.
If you have an idle air bleed screw instead of an idle speed screw: Do
exactly the same thing to adjust it. However, in this case, you turn the screw clockwise to decrease idle speed, and turn it counterclockwise to increase idle speed.
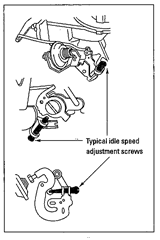
Figure 13-11:
Typical idle speed adjustment screws.
Adjusting an idle stop solenoid
If you have an idle stop solenoid (sometimes located on the outside of the carburetor, as shown on Figure 13-12), you’ll probably find a tag somewhere under the hood of your vehicle that gives you special instructions for adjusting it.
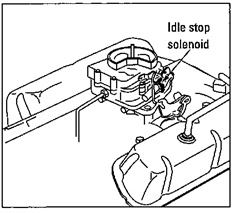
Figure 13-12:
The idle stop solenoid.
If you can’t find your instructions, and your owner’s manual either isn’t helpful or is too difficult to follow, and you’ve already hooked up your tach/dwell meter, then do the following:
1. Adjust the nut on the end of the solenoid until your car is idling at the proper number of rpm (at least 700 rpm is usual).
2. Disconnect the little wire that runs from the end of the solenoid to whatever it leads to.
This causes your idle speed to drop.
3. Adjust your idle speed screw or idle air bleed screw, following the instructions in the preceding section.
Your owner’s manual usually indicates that this last adjustment is at a lower number of rpm. This is called shutdown idle speed, and it is the reduced speed that allows your engine to stop running when you shut off the ignition.
4. Reconnect the little wire.
Checking and adjusting the fuel/air mixture
The easy way to check whether the fuel/air mixture is too rich or too lean is to run your finger around the end of the inside of your tailpipe (when the engine is cold, please). If a black, sooty deposit comes off on your finger, your fuel/air mixture is too rich. If the deposit is greasy or shiny, you’re burning oil. A vehicle that’s running too lean runs poorly only when it’s cold. In either case, you’ll find instructions for adjusting the idle mixture screw(s) and the choke in the following sections. If the adjustments you make don’t help, you’ll have to seek professional service.
Adjusting the idle mixture screw (s)
If checking your fuel/air mixture shows that it needs to be adjusted or your engine isn’t idling smoothly now that you’ve corrected its idle speed, the idle mixture screw (or screws) on your carburetor can do just that. (Figure 13-13 shows common locations for idle mixture screws.)
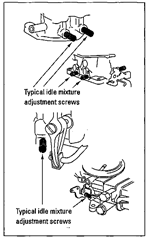
Figure 13-13:
Typical idle mixture adjustment screws.

Because of federal and state smog standards, on vehicles built since 1981 idle mixture screws have been covered by metal plugs or by plastic limiter caps, which either don’t allow you to adjust the screws or limit adjustments to around a quarter of a turn. These limitations were added to keep you from adjusting for a too-rich mixture that would result in an increase in the exhaust emissions that pollute the air.
If your carburetor has limiter caps, leave them alone. The idle mixture screws were preset at the factory and are probably set properly. If you have problems that nothing else seems to cure, have a mechanic take a look.
If your engine has a single-barrel carburetor with no cap on the idle mixture screw, use your owner’s manual or service manual to locate the screw, and then follow these steps to adjust the idle mixture screws.
![]()
Some engines are adjusted according to special instructions provided on a tag or decal under the hood. These tags can be almost anywhere, usually on the cylinder head cover or on the air cleaner lid or up front on the frame. If you have such a tag, follow the instructions on it instead of the following steps:
1. With the car at idle speed, turn the idle mixture screw inward until the engine starts to falter. Then turn it back the other way, about half a turn.
2. If the engine is idling roughly, continue to turn the screw outward until the engine smoothes out.
If you turn the screw too far outward, the too-rich fuel/air mixture will cause the engine to run roughly again.
If you use a tach/dwell meter, you’ll know that the engine is properly set when it returns to the highest idle speed after its initial drop when you turned the screw inward.
Two- and four-barrel carburetors have more than one screw. Adjust these screws one at a time.
On Tweety Bird, my 1967 Mustang, I adjusted the screws to make the mixture as lean as possible, to see how far I could cut down on fuel without affecting the smoothness of the idle. If you have an older model with adjustable screws, you may want to try the same thing. However, write down exactly how many times you turned the screw so that you can set it back the way it was if leaning the fuel/air mixture affects performance.
Checking your choke
If you have trouble getting your vehicle to start in the morning, the choke may not be working properly. If you want to see whether the choke on your vehicle is working, read the section about the choke in Chapter 6 to see where it’s located and what it does, and then do the following:
1. Take the air cleaner off some morning, before you start your engine.
See the earlier section “Removing Your Air Cleaner” for instructions.
2. Look down the carburetor barrel at the choke, as shown in Figure 13-14.
Does the butterfly valve seem to be closed?
3. If the butterfly valve isn’t closed, step on the gas pedal a couple of times before you start the car, the valve should close.
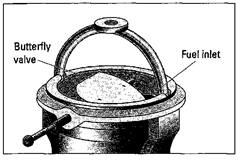
Figure 13-14:
When you look down the carburetor barrel, you can see the butterfly valve.

If your car has a manual choke (as opposed to an automatic choke), see whether the butterfly valve opens and closes when someone pushes the choke knob on the dashboard in and out.
Don’t let anyone start or accelerate the car while you’re looking down the carburetor. It could backfire.
4. With the emergency brake on and the gearshift in Park or Neutral, start the engine and let it run for a few minutes.
By the time the car has warmed up, the butterfly should open so that you can see past it, down the barrel of the carburetor.
5. If the butterfly valve refuses to open or close, try wiggling it with your finger.
The valve may simply be stuck because of dirt or poor lubrication. If wiggling it with your finger doesn’t work, squirt a little carburetor cleaner or automatic choke cleaner on the moving parts. Then wipe them dry and put a drop of oil on them. If this doesn’t work, the next sections tell you how to adjust your choke properly.
Adjusting an automatic choke
Before you can adjust your choke, you need to know what type it is. Figure 13-15 shows a thermostatic spring choke, and Figure 13-17 shows a thermostatic coil choke. Check which one more closely resembles the one on your vehicle. If you’re not sure, consult the choke specifications in your owner’s manual. If the information isn’t there, try a service manual for your vehicle’s make, model, and year, or call the service department at the dealership and ask them what type of choke your vehicle has, and what the proper setting is. Then follow the instructions that pertain to your type of choke.
Adjusting a thermostatic spring choke
Many cars have a thermostatic spring choke (see Figure 13-15). Some are riveted in place and can only be overhauled by a mechanic, but if you have an older car and have trouble starting it in the morning, you may be able to adjust yours.
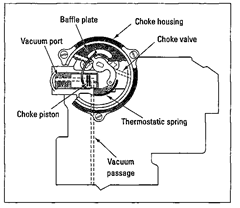
Figure 13-15:
Thermostatic spring choke.
Before you fiddle with the choke, check the specifications for your automatic choke and see whether it’s properly set (if the proper notch on the carburetor housing is opposite the indicator on the plastic cap shown in Figure 13-16).
If the choke is properly set and the valve doesn’t close, try adjusting the thermostatic spring choke to a richer setting. If the choke is not properly set, adjust it to the proper setting. To accomplish either of these tasks, follow these steps:
1. Loosen the three screws that keep the plastic cap in place (see Figure 13-16).
2. Turn the cap until the notch on it lines up with the proper mark on the carburetor housing.
On the back of the cap are the words Lean and Rich with arrows to indicate direction (refer again to Figure 13-16). Your specifications may read “one notch Lean,” in which case you turn the cap until the indicator lines up with the first mark on the Lean side of the carburetor housing.
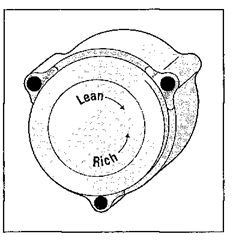
Figure 13-16:
The three screws you need to loosen when you adjust a thermostatic spring choke.
If your cap was already set at the specified mark, just turn the cap one notch to the richer side and see how that works the next morning.
3. If you car still doesn’t start properly, try setting the cap one more notch richer.
These chokes are generally set on the lean side, so they often run better cold when set a notch richer. Never adjust more than one notch at a time.
4. When you’re done, tighten down the three screws.
Adjusting a thermostatic coil choke
If you have a thermostatic coil choke (shown in Figure 13-17), it has a rod leading from the top of the carburetor near the butterfly valve to a small box mounted not far away, usually on top of the exhaust manifold.
Unless it’s been tinkered with since the vehicle came from the factory, an automatic choke of this type stays set properly until it breaks down. If you think that your choke isn’t working properly — either because the butterfly won’t close when the car is cold or won’t open when it warms up, or because you can’t get the car started properly in the morning — get a new one for a couple of dollars. You can install it yourself if you want to.
Other types of automatic chokes exist, but these should be adjusted by a professional. If you have one of these and your choke doesn’t seem to be working properly, ask your technician to look at it.
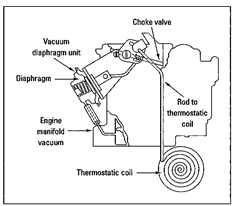
Figure 13-17:
The thermostatic coil choke.
