The Files Panel
Organization is one of the keys to a successful Web site. Creating documents without considering where they belong in the folder hierarchy generally creates a difficult-to-manage Web site. The Dreamweaver Files panel provides a view of the devices and folders on your computer and shows how these devices and folders are organized. You can create new folders and files for your site through the Files panel, which is similar to organizing files in Windows. You also can use the Files panel to drag or copy and paste files from one folder to another on your computer or from one Web site to another.
You cannot, however, copy a file from a Windows folder and paste it into a site in the Dreamweaver Files panel.
In Windows, the main directory of a disk is called the root directory or the top-level directory. A small device icon or folder icon is displayed next to each object in the list. The device icon represents a device such as the desktop or a disk drive, and the folder icon represents a folder. Many of these icons have an expand or collapse icon next to them, which indicates whether the device or folder contains additional folders or files. Windows arranges all of these objects — root directory, folders, subfolders, and files — in a hierarchy. The expand and collapse icons are controls that you can click to expand or collapse the view of the file hierarchy. In the Files panel, Dreamweaver uses the same hierarchy arrangement, but site folders and other file icons appear in a different color than non-site folders and files so that you easily can distinguish between the two.
The Home Page
Most Web sites have a starting point, called a home page. In a personal home page within a Web site, for example, you probably would list your name, your e-mail address, some personal information, and links to other information on your Web site.
Adding Pages to a Web Site
You copied the data files necessary and pasted them in the parks local root folder in the Files panel. It is time to start building and enhancing your site. You will create two additional pages for the Web site: the Montana National Parks and Preserves page and the Lewis and Clark National Historical Trail page. You will add links and Web page images to the index (or home) page and add links, a background image, and Web page images to the two new pages.
To Open a New Document Window
The first task is to open a new Document window. This will become the Montana National Parks and Preserves Web page. The following steps illustrate how to open a new Document window and save the page as preserves.htm.
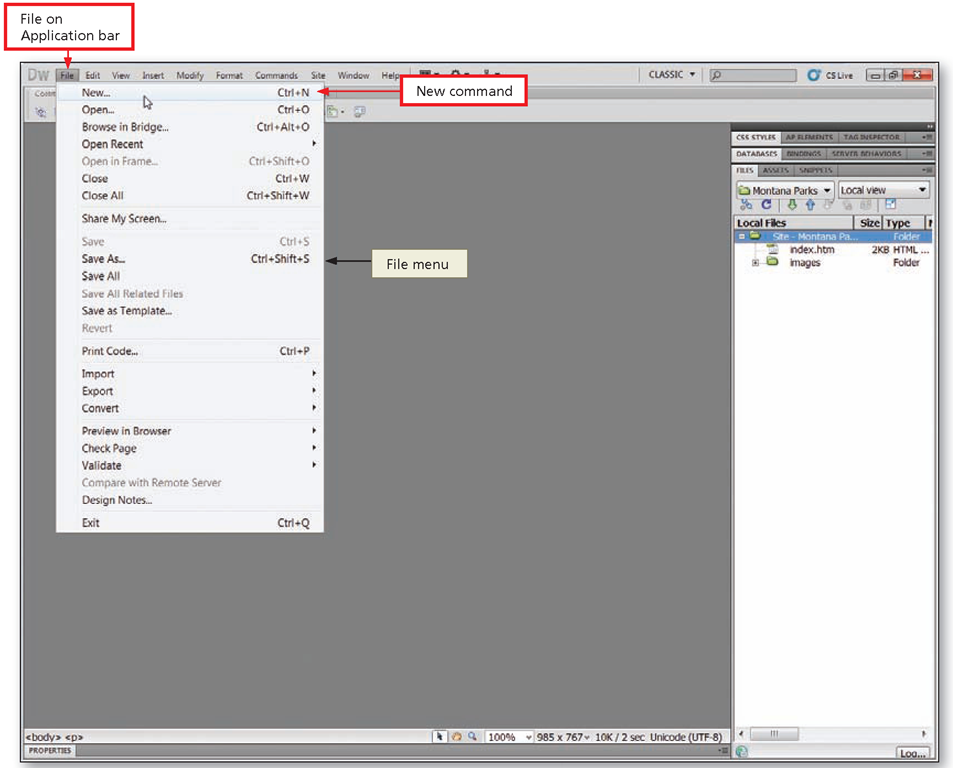
Figure 2-5
1
• Click File on the Application bar and then point to New (Figure 2-5).
Q&A
What are other ways to add a Web page to a site?
If you have already created a document that you can use as a Web page, store it in the root folder for your site, and then use the Open command on the File menu (or the Open button on the Standard toolbar). You can then edit the page in Dreamweaver.
You also can insert the contents of a document such as a Microsoft Word or Excel file into a new or existing Web page. To do this, use the Import command on the File menu.
Figure 2-6
2
• Click New to display the New Document dialog box. If necessary, click Blank Page.
• If necessary, click HTML in the Page Type column to specify the type of Web page you are creating.
• If necessary, click <none> in the Layout column to specify no layout. Verify that XHTML 1.0 Transitional is selected on the DocType pop-up menu button (Figure 2-6).
Q&A
What is XHTML and why O is it important?
XHTML is an authoring language that defines the structure and layout of a document so that it is displayed as a Web page and is compatible with most Web browsers.
Figure 2-7
3
• Click the Create button to create and display a new Untitled-1 document.
• If necessary, click View on the Application bar, point to Toolbars, and then click Standard to display the Standard toolbar (Figure 2-7).
Q&A
Is it a problem if my O new Web page is named Untitled-2?
No. Dreamweaver increments the number for untitled Web pages. You save the page with a more descriptive name in the next step.
Figure 2-8
4
• Click the Save button on the Standard toolbar to display the Save As dialog box.
• Type preserves in the File name text box to provide a descriptive name for the Web page (Figure 2-8).
Q&A
Do I need to specify O the path or folder for the new Web page?
No. Dreamweaver assumes you want to save the new Web page in the root local folder, which is parks for the preserves page.
Figure 2-9
5
• Click the Save button in the Save As dialog box to save the preserves page in the parks local folder (Figure 2-9).
Creating the Montana National Parks and Preserves Web Page
To create the Montana National Parks and Preserves Web page, you type its text in the Document window. Table 2-1 includes the text for the Montana National Parks and Preserves Web page. Press the ENTER key after typing each section as indicated in Table 2-1.
Table 2-1 Montana National Parks and Preserves Web Page Text
|
Section |
Text to Add |
|
Main heading |
Montana National Parks and Preserves < enter > |
|
Introduction |
Montana contains many parks, trails, sites, and monuments. Several of these attractions extend into other states. < enter > |
|
Part 1 |
Glacier National Park, one of the more well-known and visited parks, covers over one million acres or 16,000 square miles. This area was designated the tenth national park on May 11, 1910. Over seventy species of mammals including the grizzly bear, wolverine, gray wolf and lynx reside in the park. Over 260 species of birds also visit or live in the park.< enter > |
|
Part 2 |
Nez Perce National Historical Park extends into four states: Idaho, Montana, Oregon, and Washington. Lewis and Clark first encountered the Nez Perce Nation on September 20, 1805. Clark’s journal entry described them as follows: "They call themselves Cho Punnish or Pierced Noses; their dialect appears very different from the Flatheads, darker than the Flatheads, similar dress with more beads that are white and blue, brass and copper in different forms, shells and wear their hair in the same way…" < enter > |
|
Part 3 |
Bighorn Canyon National Recreation Area is another popular attraction. This recreation area straddles the northern Wyoming and southern Montana borders. A landscape of sheer cliffs towering 1,000 feet above a ribbon of blue water—Bighorn Lake—is one of the state’s main attractions. The lake extends approximately 70 miles through Montana and Wyoming. Bighorn Canyon is a place where imagination meets reality! < enter > |
|
Closing |
Home < ENTER > |
To Create the Montana National Parks and Preserves Web Page
The following steps show how to create the first new Web page.
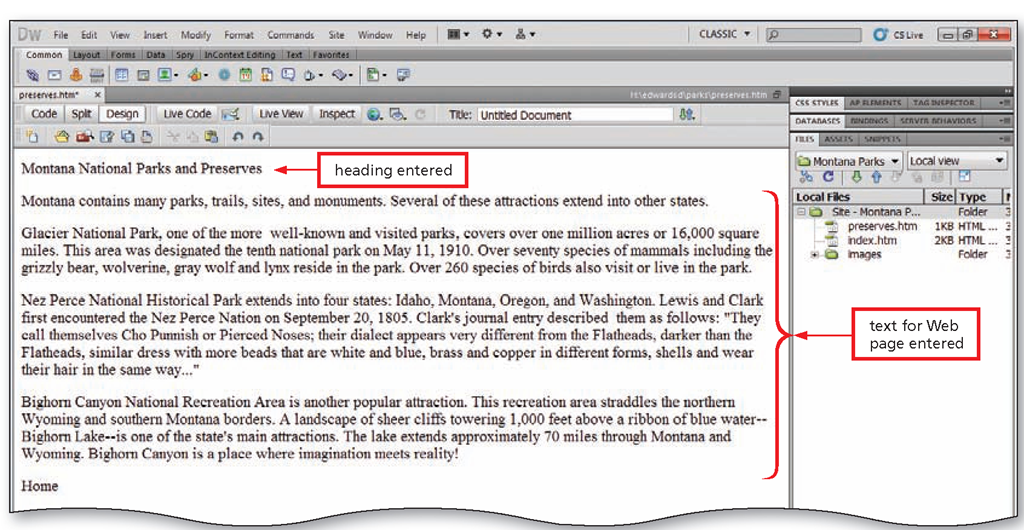
Figure 2-10
1
• Type the heading for the Montana National Parks and Preserves Web page as shown in Table 2-1. Press the ENTER key to create a new paragraph.
2
• Type the rest of the text as shown in Table 2-1. Press the ENTER key as indicated in the table to add blank lines between the paragraphs (Figure 2-10).
To Format the Montana National Parks and Preserves Web Page
The following steps show how to apply similar formatting to the Montana National Parks and Preserves page.
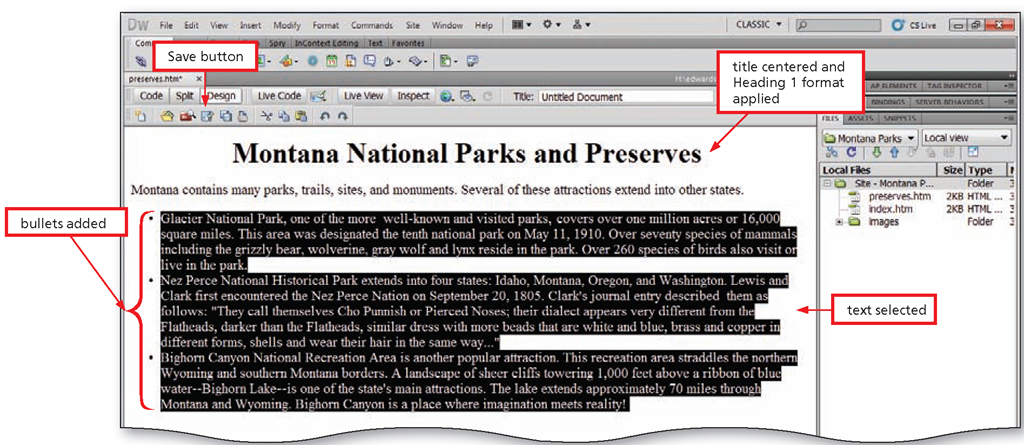
If necessary, scroll up to the top of the Web page, apply Heading 1 to the heading text, and then center the heading.
Select and then add bullets to the following three paragraphs that begin: Glacier National Park, Nez Perce National Historical Park, and Bighorn Canyon National Recreation Area (Figure 2-11).
Figure 2-11
Click anywhere on the page to deselect the bulleted items.
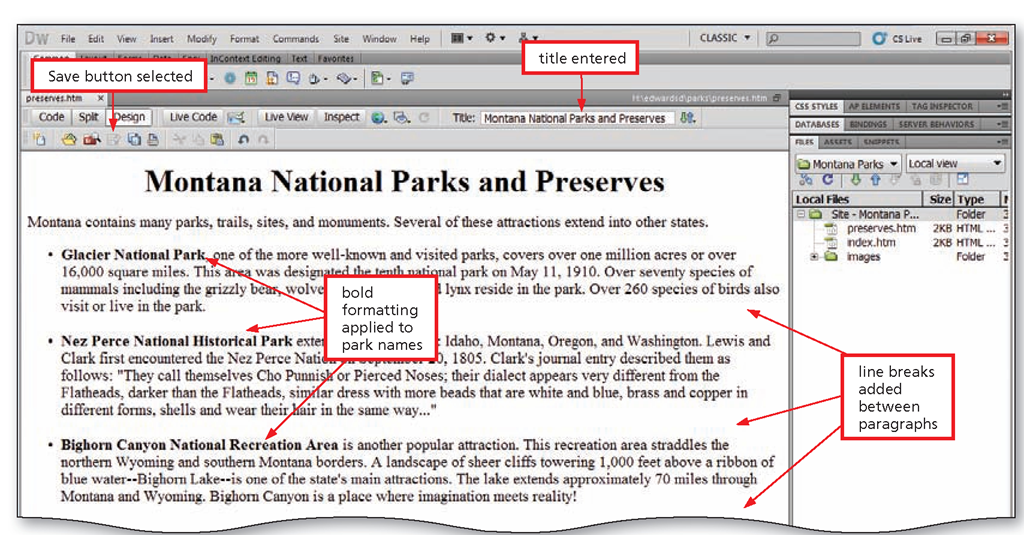
Bold the names of the parks and preserves at the beginning of each of the three paragraphs: Glacier National Park, Nez Perce National Historical Park, and Bighorn Canyon National Recreation Area.
Add two line breaks after each bullet paragraph describing the Glacier National Park, Nez Perce National Historical Park, and Bighorn Canyon National Recreation Area.
On the Document toolbar, select the text in the Title text box, type Montana National Parks and Preserves to enter a descriptive title for the page, and then press ENTER.
Click the Save button on the Standard toolbar to save your changes to the preserves.htm Web page (Figure 2-12).
Figure 2-12
Creating the Lewis and Clark National Historical Trail Web Page
You create the Lewis and Clark National Historical Trail Web page by entering text the same way you entered the text for the Montana National Parks and Preserves page. Start by opening a new Document window, add the text, and then format it.


