Game Development Reference
In-Depth Information
UV unwrapping is the process by which a model's geometry is taken apart and con-
verted into a 2D image so texture maps can be added. This process is analogous to cutting
a paper doll apart at certain seams and then laying the pieces flat for coloring. Even when
viewed in this simple way, however, UV unwrapping can be one of the most complex and
frustrating parts of the 3D art process. Some programs are plagued by systems that are
frustrating at best, inoperable at worst—all turning UV unwrapping into a chore. Luckily,
Blender is not one of those programs.
Blender's own system for UV unwrapping is among the most intuitive in the industry.
Whereas other programs feature convoluted systems that treat splitting a model into UVs
as something divorced from the modeling process, Blender makes unwrapping a natural
part of your workflow. In fact, you will use some of the same modeling tools you used in
the previous chapter to work with your UVs.
Drawing Seams
The UV unwrapping process begins with drawing seams onto your model geometry. To
utilize the “paper doll” analogy, seams are the places where you cut the mesh apart so
the resulting pieces can be laid flat for coloring. If you have ever unfolded a box, you have
some reference for how this works.
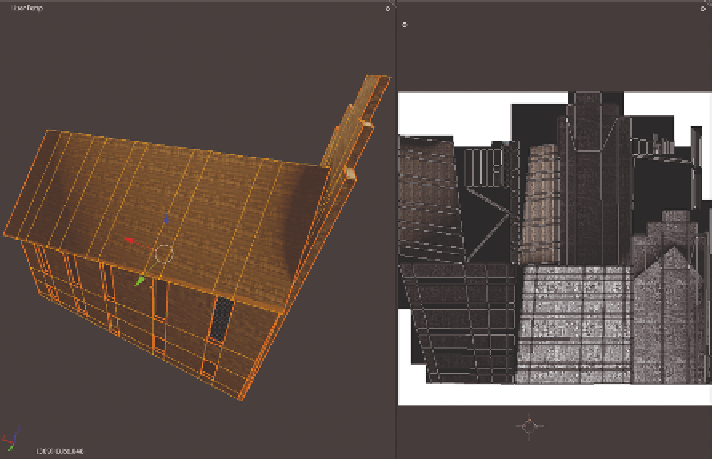
When drawing seams, you'll want to unwrap forms so they create a UV layout that you
can understand. You'll also want to keep polygons together as much as possible according
to their textures and forms. If you have a building with two major geometric pieces and a
roof, you'll most likely want to separate the roof from each element of the main building
mesh while keeping each form's own polygons together during unwrapping as much as
possible, as shown in Figure 4.3.
Figure 4.3
Unwrapped build-
ing showing key ele-
ments isolated from
one another
Search WWH ::

Custom Search