Graphics Programs Reference
In-Depth Information
If you want to show individual Titles or Captions for the photos, they need to be
entered in those corresponding metadata i elds i rst (in the Library module).
8
Once you've inserted a text overlay, you can click and drag to move and/or resize
it with the control handles. You can also use your keyboard arrow keys to nudge
overlays in small increments.
Also, when a text overlay (or identity plate) is active, you'll see a small square with
a straight line connecting it to the text overlay box (refer back to Figure 8-8).
h is is an
anchor point
to aid positioning the overlay precisely on the slide. If you
click the point and drag it around the slide, you will feel it “snap” to various key
positions such as the corners and centers of the slide edges and photos. As you
move it, also notice that it becomes attached to dif erent corners of the text overlay.
Once you've snapped the point to a location, you then snap the text overlay to the
point, using the straight line as a visual reference. h e benei t to this method is that
the point always remains snapped to the center or edges of the photo or the slide,
independent of the size or position of the text overlay itself. If you need to resize or
move a text overlay to a precise position, you'll i nd that this straight-line, snapping
behavior makes it very easy, without the need for rulers or math.
You can also rotate text overlays. With the desired overlay selected, click one of the
rotate buttons in the Toolbar.
When you've positioned your text overlay where you want it, use the Text Overlay
controls on the panel to change Color, Opacity, Font and Face for the overlay.
Continue making as many text overlays as
you need by clicking the ABC button or
using the shortcut. To delete an existing text
overlay, select it with your mouse and press
Delete.
⌘
+4 or Ctrl+4
Open/close the
Backdrop panel
Backdrop panel
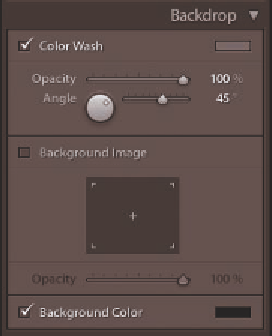
On the Backdrop panel you can customize
the background for the slides. For a solid
black background, simply uncheck all the
options. Otherwise, use the provided controls
(see Figure 8-11) to apply styling for the
following:
Figure 8-11
Color Wash:
this setting applies a gradient
across the background, which smoothly transitions from one color to another.


Search WWH ::

Custom Search