Graphics Reference
In-Depth Information
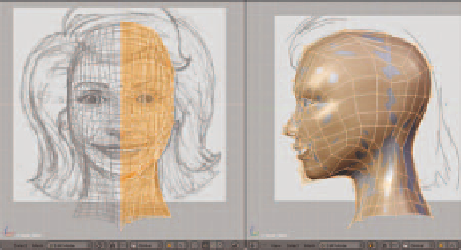
Now you begin switching back and forth in the different views, pulling the vertices to match the contours of
the references. It is usually easiest to start with the eyes. Of course, if you want to make things even easier, you
can simply select and delete half of the head mesh and enable a
Mirror
modifi er. The odds are slim that your
reference will be exactly symmetrical, but it should be close enough that you can begin to work this way.
Occasionally leave Edit mode (
Tab
key), and use
the
Z
key to toggle into and out of
Solid
mode to
see how your work is coming along. To enhance
the preview, add a
Subsurf
modifi er and use the
Set Smooth
command on the mesh from the
W
key specials menu.
Using this work fl ow, you can quickly get a model
with good mesh topology that looks reasonably like
your reference. To get closer to the reference, you
will have to apply both the subsurf and mirror mod-
ifi ers and begin working at a fi ner level of detail.
In the end, the amount of detail you add and how
closely you match your reference is up to you. However, when you're in 3D, don't let yourself be a slave to the
reference. If something looks good when you begin to model, and it still fi ts with the theme of the story and
how that applies to your character design, go with it, whether or not it exactly matches your original plan. Many
wonderful things can present themselves when you are in a creative groove, and it would be a shame to ignore
them.
Figure 5.32
A work in progress head, mirrored and using
subsurfacing
In addition to the face, the one other area of geometry that is crucial to good animation is the joints.
Anywhere that your character will bend and twist requires enough geometry to do so smoothly, while not so
much that it becomes diffi cult to deal with. Also, if
a joint is going to bend until a crease forms in the
skin, like the inner portion of an elbow joint, you
need to make sure that the geometry provides a
good line for the crease. The real trick to working
with joints lies in the rigging and skinning, which
we will cover in a later chapter, but like so many
other things, it helps to have the proper work in
place from the beginning.
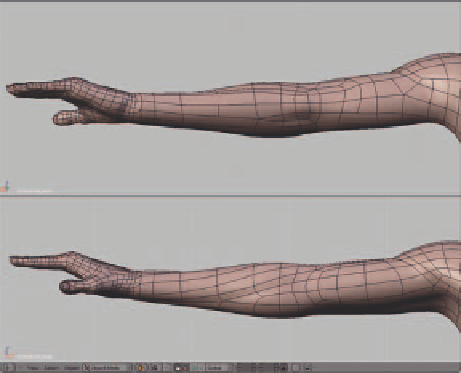
LOOP FOLLOWs
TENDONS
NICE EDGE
FOR CREASING
If you take a look at the excellent elbow joint
modeling (Figure 5.33) from the MakeHuman
project mentioned earlier, you can see both a nice
line of edges that will form the inner crease of a
bent arm on the bottom and an edge loop around
the outside portion of the elbow where the ten-
dons wrap under the skin at the top.
Figure 5.33
The MakeHuman elbow, with an edge line for the
inner crease

Search WWH ::

Custom Search