Graphics Reference
In-Depth Information
You select only these new keyframes (
B
key border selection works well here), and move them forward in
time until you actually want the motion to begin. In this case, that starting point is 12 frames before the
second pose. The overall effect of doing this is that your character holds the previous pose for the proper
amount of time, and then shifts into its new pose at the appropriate rate. The hold, though, isn't completely
stationary. This technique allows a little motion to occur during the hold, giving it a bit of life.
Use
Ctrl-left mouse button
on the OpenGL preview
button, then play the animation back to see the new
timing in place.
As you work on timing, just remember that the amount
of time between the key poses is not necessarily the
amount of time it should take to transition from one pose
to another. If you spend some time observing your own
regular motions and the motions of others, you will notice
that most motions you perform—grabbing something,
turning your head, leaning over—take only a second or
less. Obviously certain actions such as stretching or other
actions done in a deliberately slow fashion will take longer.
After the timing is adjusted so that the real-time preview
looks fairly natural, you can start on overlap, anticipation,
follow through, and secondary motion.
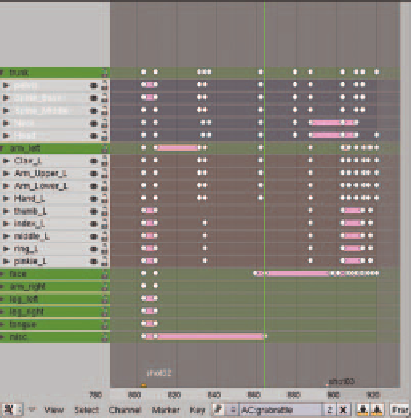
In Figure 11.28, the timing for the shot has been
adjusted. Notice that the keys now seem to come in sets
instead of single columns. The sets represent the actual
transition times between poses, while the longer gaps
between the sets represent times when there is only a
tiny bit of motion to keep things alive.
Figure 11.28
Timing for the shot has been adjusted
Overlap
When the Beast fi nally grabs at the rattle, it all happens at
once. Real life does not happen that way. The solution is to
introduce
overlap
into the shot. Through observation of the
actual motion (me on the fl oor again), I determined that the
arm and shoulder should start to actually reach out slightly
after the whole body motion begins, with the grab con-
tinuing for a short while past the end of the body motion.
With the timing keys set correctly, this is easy to accomplish.
Figure 11.29 shows the set of keys that represent the
beginning and ending of the overall motion. The keys for
the arm bones are selected. In Figure 11.30, the arm keys
Figure 11.29
All of the keys are in sync

Search WWH ::

Custom Search