Graphics Reference
In-Depth Information
Finding clips with the Timeline Index
As you add more clips during an edit and the length of the edited piece gets longer, locating a specific clip in
the Timeline can become a bit of a chore. That's where the Timeline Index comes in. The Timeline Index lists
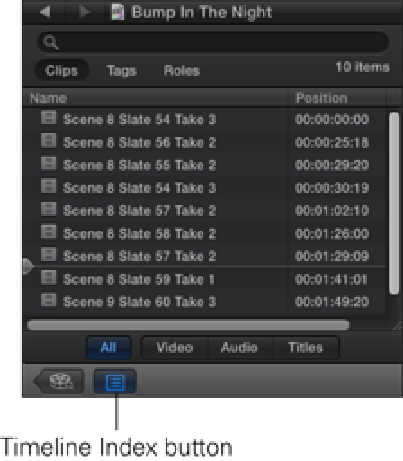
all the items used to build a sequence; you can use this list to quickly locate where they are on the Timeline.
The list can be viewed as Clips, Tags, or Roles by selecting the relevant tab at the top of the panel.
To show or hide the Timeline Index, click the Timeline Index button at the bottom left of the interface (see Fig-
ure 5.18), choose Window
⇒
Show/Hide Timeline Index, or just press Shift+ +2.
Figure 5.18
Opening the Timeline Index.
The Timeline Index also can be opened by making the Timeline window active and pressing +F.
With Clips selected, the index chronologically lists all the clips used in the Project. This can be quite long de-
pending on the number of clips that are in the Timeline. Entering the name of the clip that you're searching for
in the Search field filters the list to display only the clips containing the text that you've entered. You can limit
this even further by choosing to display Video, Audio, or Titles by selecting one of the tabs at the bottom of the
panel. After you've found the clip that you're looking for, clicking it in the Timeline Index moves the playhead
to the clip's location in the Timeline.
Selecting Tags from the top of the Timeline Index lists all the various markers, keywords, and to-do items re-
lated to the Timeline; you can locate these in the same way by clicking an item in the list. These also can be
limited to display only markers, keywords, analysis keywords, incomplete to-do's, or completed to-do's by se-
lecting the applicable tab at the bottom of the panel.
Viewing roles in the Timeline Index lists the media by the roles assigned to them and clicking an item in the list
highlights their thumbnails in the Timeline window. Identifying clips in the Timeline by their roles allows you
to concentrate on a specific category of media. An example of this would be to highlight just the dialogue, mu-
sic cues, and sound effects when you're working on the movie's soundtrack. You can single these out further by
reducing the vertical size of the clips assigned to the roles that you aren't interested in by using the minimize
button next to the role's name in the Timeline Index. A role can be disabled and grayed out in the Timeline by