Graphics Programs Reference
In-Depth Information
Subdivide before adding a Multires modifier.
If
you are working from a reasonably dense base
mesh, like the ones we created in Chapter 4,
you don't need to perform this step. However,
if you intend to start from a cube, add and apply
a Subsurf modifier before adding a Multires
modifier to speed up sculpting.
This works because, under the hood,
Blender looks at how much of the mesh it
needs to update based on how many faces of
the underlying base mesh were covered by the
brushstroke. For example, if your base mesh is
only six faces, most strokes will affect a large
percentage of faces in the base mesh (at least
one-sixth), making it slower for Blender to
update its shape. By subdividing first, each
stroke will affect a much smaller percentage
of faces in the base mesh, so there is less for
Blender to update on screen, speeding up you
sculpting experience.
image with the normals of your mesh. The MatCap
image used for many of the figures in this chapter is
shown in Figure 6-11. I'll cover creating materials in
Chapter 12, but I'll outline how to create a MatCap
material now.
Customizing the 3D Viewport
When sculpting, we generally want to see only what
we're working on, without distractions like lamps
and the grid floor. To turn off these distractions,
open the Properties region in the 3D Viewport
(
N
) and, in the Display panel, check
Only Render
to show only meshes and other objects at render
time. You can also turn off the grid floor and axes
guidelines from this panel so that they won't be vis-
ible even with Only Render turned off. With Only
Render turned on, the background color for the
3D view switches to the background color set in the
World Settings tab of the Properties editor. It can
be nice when sculpting to set this to a dark gray or
black, but use whatever you like.
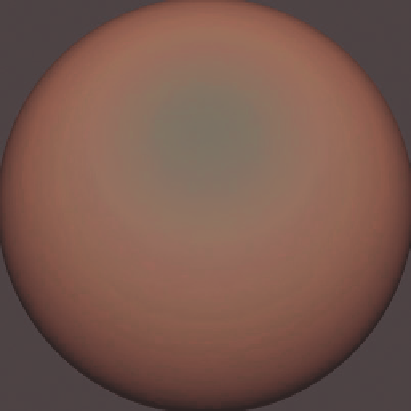
Figure 6-11: A MatCap image. Blender uses your
objects' normals to match the shading of your mesh
with the shading of the sphere.
Creating a MatCap Material
To create a MatCap material, do the following:
1.
Select the object you want to apply the
material to.
2.
In the Materials tab of the Properties editor,
add a new material by clicking the
+New
button.
This will create a new material with the default
settings.
3.
The only modification you need to make to this
is to turn on
Shadeless
in the Shading panel.
This stops the material from using lights in
GLSL mode and instead only uses color infor-
mation from the material's textures. (The rel-
evant settings are shown in Figure 6-12.)
MatCap Materials
While sculpting, you'll want the look of your mesh
in the 3D Viewport to give you as much information
as possible about the shape of the surface you are
working on. While Blender's open GL shaders do
a reasonable job of this (and can be improved for
sculpting, as outlined below), using a GLSL material
known as a
MatCap
(short for
Material Capture
) that
shades your mesh depending on its normals gives a
better and more aesthetically pleasing view of your
models.
MatCap images use a pre-rendered (or painted/
photographed) image of a sphere to shade your
whole object, matching the shading of the sphere
4.
In the Textures tab, add a new texture to this
image. Set its type to
Image or Movie
and then
load your MatCap image. By default, this will be
used to influence the color of your material, so
all you need to do is change the mapping coor-
dinates for the texture (in the Mapping tab) to
Normal
, which will then set your object's nor-
mals as texture coordinates.
Search WWH ::

Custom Search