Graphics Programs Reference
In-Depth Information
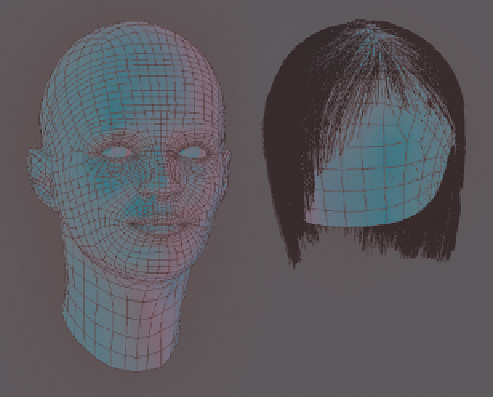
(see Figure 9-3). The particle system for the hair
can then be added to this object.
can “paint” hair placement in Weight Paint mode
and then assign the vertex group to the particle set-
tings to tell Blender to create particles only where
we want them.
Weight Painting
Blender offers two methods of editing vertex groups.
The first is to manually assign weights to a group
in Edit mode, using the buttons in the Object Data
tab of the Properties editor and the tools in the
Properties region of the 3D Viewport (press
N
to
bring this up). This method is useful for defin-
ing more precise groups, like the ones we used
in Chapters 4 and 6 to restrict the effect of the
Displace modifier.
But if your goal is to produce smoother, less
precise groups with more variation and random-
ness, Blender's Weight Paint mode tools (shown in
Figure 9-4) are a better option. Entering Weight
Paint mode (
ctrl
-
tab
, or use the mode drop-down
menu in the 3D Viewport header) allows you to
paint vertex weights using brushes.
The standard brush tools in Weight Paint mode
are as follows:
Figure 9-3: Creating a scalp to hold the particle system for a
character's hair. This allows you to keep modifying the model
for the head without disturbing the hair. Here, the two are
shown side by side, but generally they would be on top of
one another.
For the Bat Creature, I created a new mesh
to hold the particle system by duplicating my
sculpted high-resolution mesh and applying the
Multires modifier at level 1. To do this on a mesh
that has shape keys, use the Convert to Mesh opera-
tor (
alt
-C
4
Mesh from Curve/Meta/Text
). This
applies all modifiers and shape keys to the mesh.
Mix
Replaces the current weighting with the
weight specified by the brush. This is the stan-
dard brush for painting vertex groups.
Blur
Blurs vertex weights between neighboring ver-
tices and is useful for smoothing transitions.
Add
Adds to the vertices' weight.
Subtract
Subtracts from the vertices' weight. This
brush is useful as an eraser.
Vertex Groups for Hair
By default, particle systems emit particles from all
over the surface of an object. In order to restrict
hair to specific areas of a model and control the
length and behavior of the hair, we use vertex
groups. A
vertex group
is a subset of the vertices
in a mesh, like the legs of a character or a spe-
cific part of a wall. You can assign vertices to these
groups either in Edit mode or Weight Paint mode.
Vertices can also be partially assigned to a
group, with their weighting for the group (that
is, how strongly they belong to it) given any value
between 0 and 1. This allows for smooth gradients
and blending between vertices that are and are not
assigned to groups.
Once created, vertex groups can be used to
control the effects of modifiers, to make it easy to
quickly select vertices in Edit mode, and to influ-
ence particle systems. By using vertex groups, we
Multiply
Multiplies the vertices' current weight by
a particular value. Set the weight to 0 to use this
as an eraser; use higher values to reduce vertex
weights without completely removing vertices
from the current group.
Lighten
Replaces the vertices' current weight with
the weight you specify for the brush if the new
weight is greater.
Darken
Replaces the vertices' current weight with
the weight you specify for the brush if the new
weight is less.
Blender's default brushes work pretty well,
so you probably won't need to make your own,
though you can do so in much the same way as
described in Chapter 6.
Search WWH ::

Custom Search