Graphics Programs Reference
In-Depth Information
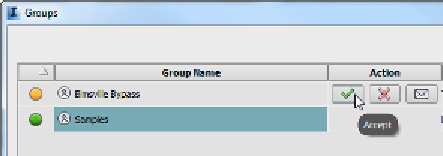
To accept the invitation, the user must click the notification and then click
the green check icon in the Groups dialog, as shown in Figure 8.6.
fIgure 8.6
Accepting an InfraWorks group invitation
exercise 8.1: Create a group
In this exercise you're going to create a new group that you can use to share
your Bimsville Bypass model. You will also invite a user to your newly created
group. You must have an Admin role in an InfraWorks 360 account to complete
this exercise. If you have subscribed to InfraWorks 360, you are entitled to this
role for your own account. You may just need to work with an Autodesk repre-
sentative to get it set up.
If a warning dialog
appears stating that
InfraWorks must
restart, click OK to
dismiss the warning
dialog.
1.
If it is not already open, launch InfraWorks 360.
2.
On the Start Page, if you see Sign In in the Collaborate section, click
Sign In To InfraWorks 360 and provide your credentials.
◀
3.
On the Start Page, click Administer Groups.
4.
In the Administer Groups dialog, click Add Group.
5.
Enter values for Name and Description to match what you saw in
Figure 8.2. Click OK.
You should now see the new group listed in the Administer Groups
dialog box.
◀
You should also receive
an e-mail informing
you that you have
invited yourself to your
own group.
6.
In the Administer Groups dialog, click the Users (0) button next to
the new group named Bimsville Bypass Proof of Concept.


Search WWH ::

Custom Search