Graphics Programs Reference
In-Depth Information
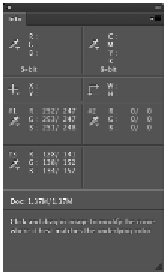
age had before any curves adjustments were made. The values after the backslash are the values based
on the changes you recently made: setting the highlight and shadow.
A third color sampler is added.
You will now make a manual adjustment on the curve to balance the image. Your values are likely dif-
ferent than the example shown in this topic, but you should still be able to follow along using your
own values.
2
In this example, you see that Red is a lower value than Green and Blue. Your values might vary, de-
pending upon where you clicked, but should be proportionally the same.
If your values are all different, look at the Info panel and locate the middle value for #3. Then fol-
low the next steps to adjust the other colors values up or down to meet that middle value. (In other
words, leave the middle value intact, and adjust the other two values to closely match it.)
3
Return to the Curves Properties panel, and from the RGB drop-down menu, select Red.
4
Click the Click and drag in image button ( ) in the upper-left area of the Curves Properties panel.
5
Position your cursor over the #3 sampler you placed on the sidewalk in the image; press and hold the
Alt (Windows) or Option (Mac OS) key and click. This adds an anchor point to your Red curve and
indicates where on the curve that value is located.
6
Click the newly created anchor point and drag straight up while watching the second set of values in
the Info panel. Drag up until the Red values are close to the Green values.
If your values are within 1-2 values, you do not have to make these steps to adjust them.