Graphics Programs Reference
In-Depth Information
you the option to choose the number and type of tracks you wish to add
or delete. You need to specify where these tracks are to appear in the
Timeline by clicking the button options.
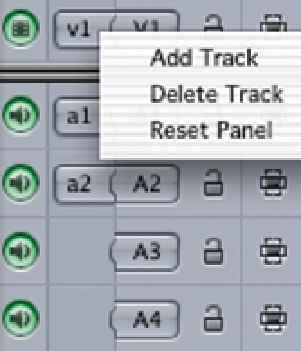
An alternative and easier method is to Control
click in the gray area to the left of any of the
tracks which already exist. A menu will open
giving you the choice to either add or delete a
track. You can Control click above, below or to
the left of the tracks in the Timeline to open
up the contextual menu which allows you to
add or delete tracks.
Essential Editing Tools
A very important part of the interface that we have not dealt with so far is the
Toolbar. With the layout I use this is positioned to the left of the Timeline.
However, it really doesn't matter where it sits on the screen providing you can
readily access it.
There are nine tools available, however, generally, I use only five of these
for most editing tasks. There are also other tools hidden in the submenus
within the Toolbar giving a total of 22 options in all.
Pointer (Select Item)
- I call this the
home tool - this is the tool I always
have selected during the editing process. The
Pointer is used for selecting and moving clips
around in the Timeline. If I need to access the
functions of the other tools I will choose
another tool, use it, and then click on the
Pointer again. By always having the Pointer
selected you know where you are at all times.
Pointer (Select Item)
Edit Selection
Arrow (Select Track)
Roll Edit
Slip Edit
Razorblade
Magnifier
Arrow (Select Track)
- this is used for
selecting individual or multiple tracks,
or the entire contents of the Timeline.
Crop
Pen Tool