Graphics Programs Reference
In-Depth Information
Better Define the
Target Area
You s p e nt a lot of t i me a t t a i n -
ing accurate selections in
Chapter 5, “Selection Tools and
Tech n iques” ( (if (if you sk ipped it ,
reviewing it now will help you
get the most out of this chapter).
For the best results, you'll want
to accurately select the area to
be filtered. Depending on what
you want to achieve, filters can
be run on the entire image, a
small portion of the image, or even a single channel. Also, it's not
a bad idea to test a filter first by running it on a small area.
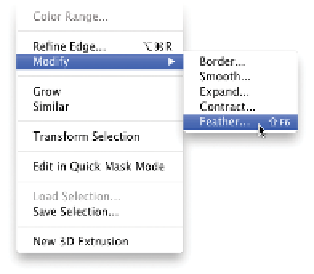
Smooth the Edges
A hard-edged selection creates a visible border where the filter
processed the image. It is absolutely essential to soften your selec-
tions. Two techniques work well (and can be combined):
•
Choose Select > Modify > Smooth to round out hard corners
in your selection.
•
Choose Select > Modify > Feather to create a gradual edge.
This is similar to the difference between a line drawn by a
ballpoint pen and a line drawn by a felt-tip pen.
•
Choose Select > Refine Edge to improve the overall selection
intuitively.
NoTe
Smart Fade?
The Fade command is not avail-
able for Smart Filters (for that
functionality, use the Blending
Options icon).
Fade and Blend
The Fade command is a little-known secret in Photoshop. It allows
you to further modify filters by harnessing the power of blending
modes. Use this command to access all 24 blend modes besides
Normal. It makes your filter collection 24 times larger.
You mu s t c ho o s e t he Fa de c om m a nd i m me d i a t ely a f t e r t he i lt e r
has run (even before you deselect the active selection). Let's try
it out:
video 101:
Oil Paint