Hardware Reference
In-Depth Information
$ su -c 'umount /mnt/raspi-boot'
$ su -c 'umount /mnt/raspi-root'
If the
umount
commands both return without any errors, it is now safe to remove your
SD card. Just put it back in your Raspberry Pi, power it on, and hope for the best.
Decode the LEDs
HACK 03
Each Raspberry Pi has a set of LEDs in one corner that give you clues
about what's happening (or not happening!) with the device. The Model
A had only two lights, but the Model B offers a lot more insight and val-
uable troubleshooting information.
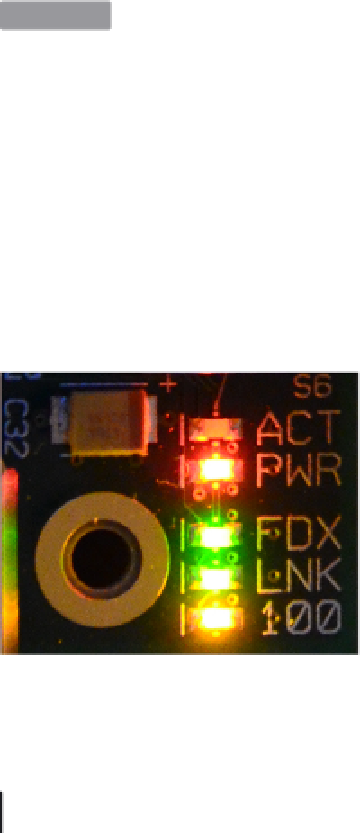
The Raspberry Pi Model B has five status LEDs (shown in
Figure 1-2
and described in
Table 1-1
) that will help you troubleshoot problems when it won't boot or other prob-
lems arise. Since the Pi has no BIOS, the screen won't show you anything at all until
the Pi successfully boots. That's where these little lights come in handy.
Figure 1-2.
Model B LEDs
Table 1-1. Status LEDs on the Raspberry Pi Model B
NUMBER
LABEL
COLOR
FUNCTION
D5
OK (Rev 1.0) ACT (Rev 2.0)
Green
SD card access, connected to GPIO 16
D6
PWR
Red
3.3 V Power, connected to 3.3 V
D7
FDX
Green
Full Duplex LAN
D8
LNK
Green
Link/Activity LAN
D9
10M (Rev 1.0) 100 (Rev 2.0)
Yellow
10/100Mbit LAN
The first two lights (D5 and D6) are the most important pair when you want to make
sure that your problem isn't as simple as “it's not plugged in.”
Table 1-2
describes the
most common indicators you'll see on these lights.