HTML and CSS Reference
In-Depth Information
Linking to an id
• To link to a specific location within the current file, use
<a href=”#
id
”>
content
</a>
where
id
is the id value of an element within the document.
• To link to a specific location in another file, use
<a href=”
reference
#
id
”>
content
</a>
where
reference
is a reference to an external file and
id
is the id value of an ele-
ment in that file.
On Gerry's home page, he wants to showcase a Photo of the Month, displaying a
photo that his readers might fi nd interesting or useful in their own work. Along with the
photo, he has included the digital camera settings used in taking the photo. Many of the
camera settings are described on the Glossary page. Gerry suggests that you create a link
between the setting name and the glossary entry. The fi ve entries he wants to link to are
F-stop, Exposure, Focal Length, Aperture, and Flash Mode. Your fi rst step is to mark these
entries in the glossary using the id attribute.
To mark the glossary entries:
◗
1.
Return to the
glossary.htm
file in your text editor.
◗
2.
Scroll through the file and locate the
Aperture
definition term.
◗
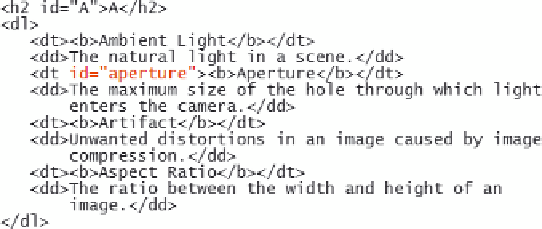
3.
As shown in Figure 2-25, within the opening
<dt>
tag, insert the following
attribute:
id=”aperture”
Figure 2-25
Adding the id attribute to the aperture defi nition
◗
4.
Scroll down the file and locate the
Exposure
definition term.
◗
5.
Within the opening
<dt>
tag, insert the following attribute:
id=”exposure”
◗
6.
Go to the F section of the glossary and mark the terms with the following ids (see
Figure 2-26):
F-stop
with the id
f-stop
Flash Mode
with the id
fl ash_mode
Focal Length
with the id
focal_length