Graphics Programs Reference
In-Depth Information
Step Three:
Clicking Open Object makes your image
open in Photoshop as a smart object
(you'll see the layer thumbnail has a little
page icon in the bottom-right corner).
Now we need a second version of this
image, because the sky looks way too
light in this version. In our second version
of this RAW file, we'll focus on just the
sky. If you were to duplicate the layer by
dragging it onto the Create a New Layer
icon, the double-processing wouldn't
work. That's because the duplicate layer
would be tied to the original layer, so
any changes you made to the duplicate
would also automatically be applied to
the original layer. We need to be able to
edit these two layers separately from
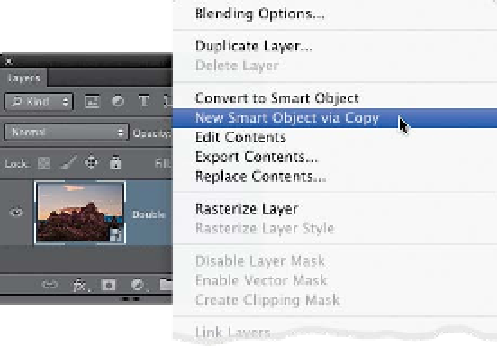
each other. Basically, we need to break
the link between the two layers. To do
that, go to the Layers panel, Right--
click on the layer, and from the pop-up
menu that appears, choose
New Smart
Object via Copy
. This gives you a dupli-
cate layer, but breaks the link to the origi-
nal layer.
Step Four:
Now, double-click directly on this dupli-
cate layer's thumbnail and it opens this
duplicate in Camera Raw. Here, you're
going to expose for the sky, without any
regard for how the foreground looks
(it will turn really dark, but who cares—
you've already got a version with it prop-
erly exposed on its own separate layer,
right?). So, drag the Exposure slider way
over to the left (I went to -0.85), and drag
the Highlights slider to -23 to help darken
the sky. I also dragged the Temperature
and Tint sliders a little to the right to
warm the color of the sky, and lastly,
I increased the Clarity to +35 (it made
the clouds look a little more interesting).
Once the sky looks good, click OK.
(Continued)