Graphics Programs Reference
In-Depth Information
3.
Press the A key to switch to the Direct Selection tool ( ). Move the tip of the
pointer over the right edge of the green frame that covers the page, and click when
the pointer appears with a small diagonal line ( ). This selects the path and re-
veals the four anchor points and the center point of the frame. Leave the path se-
lected.
4.
Press the P key to switch to the Pen tool ( ).
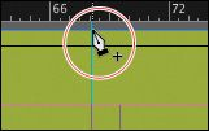
5.
Carefully position the pointer over the top edge of the frame path where it inter-
sects with the vertical ruler guide in the first column on page 3. When a plus sign
is displayed at the lower right of the pointer, click. A new anchor point is added.
The Pen tool automatically changes to the Add Anchor Point tool when it moves
over an existing path.
6.
Move the pointer to where the horizontal guide below the two-column text frame
intersects with the bleed guide. Using the Pen tool, click again to add another new
anchor point, and then choose Edit > Deselect All.
This point and the point you created in the previous step will form the corners of
the irregular shape you're creating. Repositioning the anchor point at the upper-
right corner of the green frame will complete the reshaping of the frame.
7.
Switch to the Direct Selection tool ( ). Click to select the upper-right corner
point of the green frame. Drag the point down and to the left. (Pause before you
drag so you can see the frame change as you drag.) When the anchor point snaps
into place at the intersection of the right edge of the first column and the first hori-
zontal guide from the top of the page (at 40p9 on the vertical ruler), release the
mouse button.