Graphics Reference
In-Depth Information
Masking in the Clip Editor
Masking is an important function of any compositing software, and now that Blender has entered the arena as
a high-powered VFX tool, it's more crucial than ever that quality masking tools be available. In Chapter 9 you
saw the old way to make masks. As I write this, the new Clip Editor masking functionality has been committed
to the Blender code trunk for less than a week and won't be out in an official build until Blender 2.64, which
is likely to be at least some months off, although it will probably be out by the time the topic goes to print.
Although there may still be times when the method of animating curves described in Chapter 9 will be useful,
the new method described here is without question the right way to do masking for compositing.
Bear in mind that this is bleeding-edge functionality that has been neither officially released nor officially
documentedatthetimeofthiswriting,andassuchitislikelytochangeinsomedetailsbythetimeitisreleased.
What you see on your screen may differ slightly from what you see on the pages of this topic. I'm including it
because it's important functionality and because I have confidence that if you've come as far as this chapter in
your Blender work, you can adapt to any small differences.
Editing the Mask
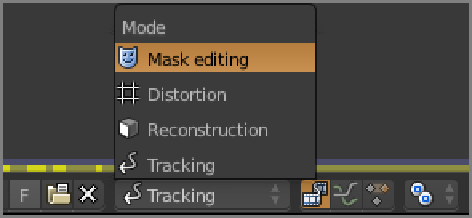
To create a mask in the Clip Editor, you need to switch to Mask Editing mode using the drop-down menu in the
header with the little face mask icon, as shown in
Figure 10-32
.
Figure 10-32
Entering Mask Editing mode
Onceyou'reinMaskEditingmode,theheaderwillhaveanewdrop-downmenuforMaskdatablocks,shown
in
Figure 10-33
. As in other cases in Blender, if no datablock exists you can click New to create one. You will
need to create a new Mask datablock now by clicking New.