Graphics Programs Reference
In-Depth Information
Lightroom Killer Tips
>
>
▼
Zooming In/Out on Pages
You can use Photoshop's keyboard
shortcuts for zooming in/out on your
pages: press
Command-+ (PC: Ctrl-+)
to zoom in tighter on your page, or
Com-
mand-- (PC: Ctrl--)
to zoom back out.
▼
Getting Larger Multi-Page Views
(zoomed in really tight), which is parti-
cularly handy when you need to quickly
check some caption text for a typo.
▼
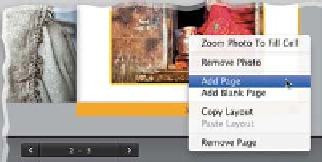
Adding Pages
▼
Zoom Multiple Photos
One thing a lot of folks miss when they're
in Multi-Page View mode (the mode
where you can see the two-page spreads
in your book) is that you can change the
size of your thumbnails, so you can either
see more pages in the same space, or
have a larger view of your spreads. You
do this on the far-right side of the toolbar
(right under the Preview area)—you'll
see a Thumbnails slider. This works
particularly well when you use the next
tip (pressing Shift-Tab before you enter
Multi-Page View mode).
If you click the Add Page button in the
Pages panel, it adds a new blank page
to the end of your book, but more likely
you're going to want to add a page at
the spot you're currently working on in
your book. To do that (add a page in
front of the page you're on, rather than
at the end), just Right-click on the page
and choose
Add Page
, and it adds it
right there.
If you're working with more than one
photo on a page, and you want to zoom
all those photos in tighter, just select
the first photo, press-and-hold the Shift
key, select any other photos you want
zoomed on the page, and then drag the
Zoom slider, and all the selected photos
will zoom at the same time.
▼
A Bigger View for Sorting Your
Pages in Multi-Page View
When you start to do your page sorting
(sorting the order of two-page spreads
in your book), try this: press
Shift-Tab
to
hide all your panels, which gives you a
much larger view of your book, and it's
easier to move spreads around when
you have more space like this.
▼
Why You Should Try
Auto Layout Before You
Put Your Photos in Order
▼
Lightroom Converts Your Book
to sRGB for Printing
Most photo labs ask that images sent
to their lab for printing be converted
to the sRGB format, but when printing
your book, you won't have to worry
about this because the images in your
book are automatically converted to
sRGB when the book is sent to Blurb.
▼
Four Keyboard Shortcuts
That Save a Lot of Time
One big benefit of letting Lightroom
do an Auto Layout of your book pages
with your photos in a random order is
that you'll generally find a couple of
two-page layouts that look fantastic
together, but they're photos that you
might never have put together yourself.
I find this happens every time I try this—
I come up with at least three or four
two-page layouts that look fantastic, just
out of sheer luck of the pairing. Try it
once and you'll see what I mean.
You don't have to learn a bunch of shor t-
cuts for making books, but these four
will make the process that much faster
for you: (1)
Command-E (PC: Ctrl-E)
switches you to the Multi-Page View;
(2)
Command-R (PC: Ctrl-R)
switches
you to the Spread View; (3)
Command-T
(PC: Ctrl-T)
switches you to Single Page
View; and (4)
Command-U (PC: Ctrl-U)
switches you to Zoomed Page View
▼
Tweaking an Image on a Page
If you're looking at an image in your book
and you feel like it needs to be lighter,
darker, more contrasty, etc., just click on
the image, then press the letter
D
to take
that image over to the Develop module.
Make your tweaks there, and then press
Command-Option-4 (PC: Ctrl-Alt-4)
to jump back to the Book module and
pick up right where you left off.


