Graphics Programs Reference
In-Depth Information
Step Nine:
Although I'm not a fan of the “helpful”
pixel Loupe, there is a feature that's a really
big help when you use the White Balance
Selector tool, and that's the Navigator
panel on the top of the left side Panels area.
What's cool about this is, as you hover the
White Balance Selector tool over different
parts of your photo, it gives you a live pre-
view of what the white balance would look
like if you clicked there. This is huge, and
saves you lots of clicks, and lots of time,
when finding a white balance that looks
good to you. For example, set the White
Balance to Auto, then hover the White
Balance Selector tool over the edge of her
head (as shown here), and then look at the
Navigator panel to see how the white bal-
ance would look if you clicked there. Pretty
sweet, eh? This live preview makes finding
a white balance you like pretty easy (and
you'll know if it looks wrong—look at the
three I did here just by moving the White
Balance tool around the photo).
Step 10:
A couple of last things you'll want to know
about when setting your white balance:
(1) In the toolbar, there's an Auto Dismiss
checkbox. With this on, after you click the
White Balance Selector tool once, it auto-
matically returns to its home in the Basic
panel. I leave this turned off, so I can easily
just click in a different area without hav-
ing to retrieve the tool each time. (2) If
you turn off the Auto Dismiss checkbox,
when you're finished using the tool, either
click it back where you got it from (that
round, dark gray circle in the Basic panel),
or click the Done button down in the
toolbar. (3) If you're in the Library module,
and you know you want to use the White
Balance Selector tool, you can press
W
,
which will switch you over to the De-
velop module and give you the tool. (4)
To return to the original A s Shot white bal-
ance, just choose
As Shot
from the White
Balance (WB) presets pop-up menu.
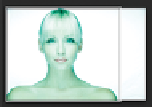
The original As Shot white balance
setting, which looks too red
and a little bluish overall
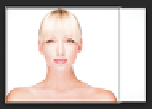
Here's the image after just one click
with the White Balance Selector tool
and her skin tone looks good