Graphics Programs Reference
In-Depth Information
5.
Select the Design-final document window. Choose Window a
Arrange a Float All In Windows if they are not already floating. Open
the Layers panel and drag the Design smart object into the Flag-
photo document window.
6.
In the Layers panel, decrease the opacity of layer Design to 80% to
make it blend better with the flag.
7.
Press Cmd+T to transform the Design smart object layer. Click the
Maintain Aspect Ratio icon on the options bar. Position the cursor
over the word
Width
on the options bar and drag to the left to reduce
the scale of the design until it fits on the flag. Move the cursor inside
the design and drag to reposition the design over the center of the flag.
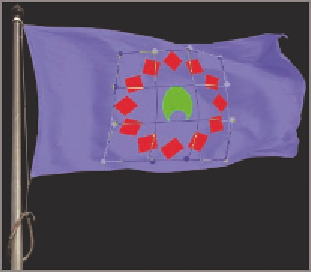
8.
Right-click in the canvas and select Warp from the shortcut menu.
A grid appears over the object with dots at each of the outer intersec-
tions. Drag some of these dots to warp the grid and thus deform the
contents of the smart object. Position the cursor inside the grid and
drag to bend the grid until you are satisfied that the design looks like
it belongs on the flag that is rippling in the wind (see Figure 10.20).
FIGURe 10.20
Warping the design
to look like it is part of the flag
9.
Double-click the Design layer thumbnail to open the contents of the
smart object in another window. In the
Shape 2.psb
document win-
dow, double-click the Shape 2 layer thumbnail and select an orange
color in the picker that appears; click OK. Double-click the Shape 1
the
.psb
filename
extension is auto-
matically used for
smart objects.