Graphics Programs Reference
In-Depth Information
not all file formats
support layers. Web
formats such as JpG
and pnG flatten all
layers to reduce
file size.
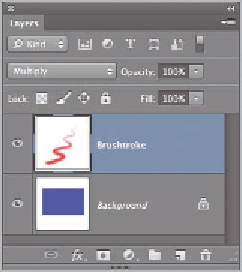
FIGURe 8.5
Changing a blend
mode to see through the white pixels
O
10.
To get rid of the white border, choose Image a Trim and click OK.
Save your work as
Layers.psd
.
Managing Layers
There is a lot more to layers than simply the order in which they are stacked in
the Layers panel. In the following steps. you will learn how to adjust layer prop-
erties and how to lock, duplicate, select, reorder, group, link, merge, and flatten
layers.
Certification
Objective
to change a layer's
color, right-click
an existing layer
and choose Layer
properties.
1.
Reopen the
Layers.psd
ile that you saved earlier or go to the topic's
to Chapter 8, and open the file with the same name.
O
2.
Choose Layer a New a Layer, type
Spiral
in the Name text box, and
select Red from the Color drop-down. You can optionally color-code
layers so they are easier to spot in the Layers panel.
Multiple layers can
be efficiently man-
aged by organizing
them into single
Layer Groups or
Smart Objects. You
can also nest up to
ten layers within a
parent layer.
3.
Click yellow in the Swatches panel to set the foreground color. Select
the Brush tool, and if you have a pressure-sensitive tablet, select Tablet
Pressure Controls Size on the options bar. Paint a spiral in the center
of the canvas, pressing harder as you spiral outward.
4.
Open the Layers panel menu and select Panel Options. Select the
medium thumbnail size and deselect Use Default Masks On Fill
Layers (see Figure 8.6). Click OK.
O