Graphics Programs Reference
In-Depth Information
is what makes the TIN model a true model. It can be sliced, be turned on its side,
have water poured on it, be excavated, and be filled in—all virtually, of course. The
capability of using surface models for these types of calculations and simulations
is what makes them so useful and puts them at the core of Civil 3D functionality.
Creating a Surface from Survey Data
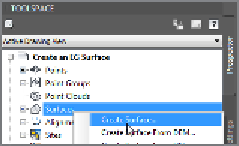
You create a surface in Prospector by simply right-clicking the Surfaces node of
the tree and selecting Create Surface, as shown in Figure 4.2. The newly created
surface appears in Prospector immediately, but it can't be seen in the drawing until
some data is added to it. The fundamental components of a surface are points and
lines. It's your job to supply the source of the points, and Civil 3D takes care of
drawing the lines. At this phase of the project, you'll be using survey points as the
initial source of surface-point data.
Certification
Objective
FiGuRE 4.2
Creating a
surface from within Prospector
Exercise 4.1: Create an Existing Ground Surface
In this exercise, you'll create a surface from survey data.
If you haven't already done so, go to the topic's web page at
www.sybex.com/
go/civil3d2015essentials
and download the files for Chapter 4. Unzip the files
to the correct location on your hard drive according to the instructions in the
introduction. Then, follow these steps:
1.
Open the drawing named
Create an EG Surface.dwg
located in the
Chapter 04
class data folder.
EG
stands for
existing
ground
.
2.
In Prospector, right-click Surfaces and select Create Surface.
◀
3.
In the Create Surface dialog box, enter
EG
in the Name field.
4.
For Style, select C-Existing Contours (1') (C-Existing Contours
(0.5m)). Click OK to dismiss the Create Surface dialog box.