Java Reference
In-Depth Information
Getting ready
Prior to continuing with the materials in this recipe, you must be familiar with the topic of
generating FXZ files covered in the recipes
Exporting
Adobe
Photoshop
graphics
to
JavaFX
,
Exporting
Adobe
Illustrator
graphics
to
JavaFX
, and
Exporting
Scalable
Vector
Graphics
(SVG)
to
JavaFX
. You will need an FXZ file generated using the methods discussed in these recipes.
Another requirement for this recipe is the use of the NetBeans IDE. The techniques covered
here use features available in that IDE. If you are not a NetBeans user, see the
There's
more
section to see how to craft your own code in order to load and programmatically manipulate
graphics objects from an FXZ file without NetBeans manually.
How to do it...
To use the embedded objects in the FXZ file, we are going to generate UI stubs using
NetBeans. Follow these steps:
1.
FXZ file
—make sure that your FXZ file is in a location accessible by your code. The
easiest location is to place the FXZ file in the same package (or sub-package) as the
class that will be using its graphics objects. For this recipe, we are going to use the
FXZ file
ch08/source-code/src/fxzdemo/SymbolsPS.fxz
to generate a UI
stub class.
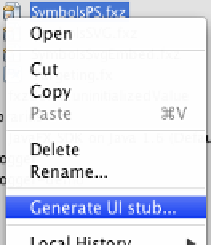
2.
Generate the UI stub class
—from NetBeans, right-click on the FZX file from which
you want to generate the UI stub, and select Generate UI stub, as shown in the
following screenshot:
This will bring up a dialog box for customization of the generated classes.
Specify the package location and the name of the generated UI class, as
shown in the next screenshot.