Graphics Programs Reference
In-Depth Information
You can rename the iMates in the Browser. When you have more
than one iMate, it can be very useful to sort out what is what. It's
critical to know that in order for iMates to work, all the names of the
iMates between the two components must be identical. In the case of
composite iMates, not only must they have the same name, but the
iMates within them must have the same names; and there must be
the same number of iMates in both parts.
13.
Expand the folded model in the Browser.
14.
Expand the
iMates
folder to see the two iMates you created.
15.
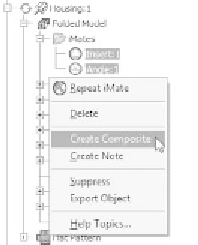
In the Browser, hold the Ctrl key, and pick both of the iMates you
created.
16.
Right-click, and select Create Composite from the context menu.
17.
This creates a composite iMate named
iComposite:1
under the
iMates
folder. Rename this item
Switch
.
18.
Save the part, and use the Return icon to go back to the assembly.
Now you've prepared the assembly to take advantage of the work
someone else has done in the switch part. Let's see what the results
are by placing the switch into your assembly.
19.
Start the Place tool, and select the
Switch.ipt
fi le in the
Parts
folder.
20.
At the bottom of the Place Component dialog, select the Automatically
Generate iMates on Place option, and click Open to place the switch
into the assembly.
The switch automatically locates itself in the assembly.
21.
Restore the assembly's home view, and save your work.
When you have components that are interchangeable in an assembly and that
are frequently substituted for one another, explore the capabilities of iMates. In


Search WWH ::

Custom Search