Graphics Reference
In-Depth Information
6
Press 'Ctrl
Alt
Shift
Y' to add a
Null Object.
7
Click on
Edit
Target . . .
, then
press 'OK' - the Null
is the only thing in the scene for the Tracker to use.
8
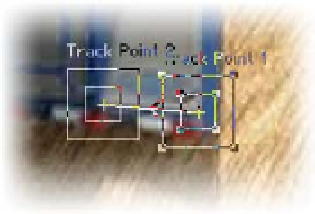
Align the Track Points to the lower
corners of the door nearest to the
oval logo - place Track Point 1 to
the right and Track Point 2 at left.
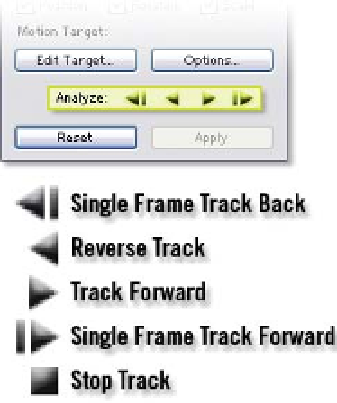
The Tracker Controls menu has four
buttons to activate your track: Single
Frame Track Back, Reverse Track, and
Single Frame Track Forward. Previously,
we've been using Track Forward, but
since we set up the Track Points within
the middle of our clip, this requires
reverse tracking.
9
Click on Reverse Track to run your
Track, but as the Track points
approach the screen's edge, click on the Stop Track button (the Play
becomes the Stop button).
10
Manually step the Tracker backward with Single Frame Track Back to
bring the Track Points center box as close to the screen edge as
possible.
11
Jump back to frame 40 (Ctrl
G) and resume your Track Forward, but
again stop the Track as it approaches the screen edge.
12
Manually step the Tracker forward with Single Frame Track Forward to
bring the Track Points center box as close to the screen edge as possible.