Graphics Reference
In-Depth Information
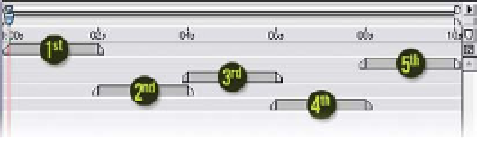
randomly select the layer
order (Ctrl
click). The
results should be similar to
the example pictured at
left.
Close the
Glimmer
-
Leave Precomp
Timeline/Comp Windows and return to
the Master Comp. Of the two Precomp method example layers, 'Move all
attributes . . .' converted the original
Reflections
layer into its
Move Precomp
,
thus extending the layer's duration to the entire length of the Master Comp.
The
Leave Precomp
would have maintained the source layer's original duration,
but when we made a Precomp of the 'Leave all attributes . . .' Precomp and
extended its duration, the adjusted duration shows up in the Master Comp as
the long gray bar extension to layer 5's Timeline Bar. The final Precomp needs
to be extended the full Master Comp's length. Select layer 5, then press 'End'
followed by 'Alt
]' to snap the layer's Out Point fully open, or drag the Out
Point's handle across to the end of the layer. To finish up this section, delete the
'Move all attributes . . .' layer (6) to prepare the WONK TV for the next section.
Collapse Transformations - Enhanced Nesting
The most powerful of After Effects' Precomposition functions is Collapse
Transformations. Unlike Standard Nesting, which only acts as a normal layer,
Collapse Transformations Precomps have
several unique abilities.
All Precomps are initially set in the Standard
Nesting mode when they are created in or
added to a Timeline. The Precomp icons are
displayed in the Switches column. When the
dotted circle is clicked it switches to solid,
indicating that the mode is now Collapse
Transformations.