Graphics Programs Reference
In-Depth Information
5.
Start the
HATCH
command by clicking the Hatch button found inside
the Home tab
➢
Draw panel.
The contextual Hatch Creation Ribbon tab, shown in Figure 11.1,
will load, and the command line will read
Pick internal point or
[Select objects/seTtings]:
. You'll use this same contextual Ribbon
tab to create and modify hatch entities in your drawing. Among the
choices to make using this Ribbon tab are which pattern to use, the pat-
tern's properties, and also the method for specifying the boundary of the
area to be hatched.
FiGuRE 11.1
The contextual Hatch Creation tab
6.
From the Pattern panel within the contextual Hatch Creation tab,
press the down arrow in the lower-right corner of the Ribbon panel.
A complete list of available hatch patterns appears in the extended
panel.
You can also start the
HATCH
command by
entering
H
↵
.
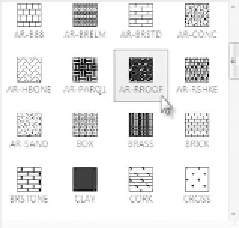
7.
Scroll down within the extended Pattern panel to find and select the
AR-ROOF pattern (see the left image in Figure 11.2).
The extended Pattern panel collapses to display the AR-ROOF pat-
tern with a blue background, as shown on the right in Figure 11.2.
FiGuRE 11.2
Selecting the AR-ROOF pattern from the expanded Pattern
panel on the contextual Hatch Creation tab (left), and the Pattern panel after
selecting the AR-ROOF pattern (right)


Search WWH ::

Custom Search