Graphics Programs Reference
In-Depth Information
Besides the simple ability to select a pattern, hatches provide you
many more options to control their display. Many of these options,
such as Scale and Angle, are found in the Properties panel on the con-
textual Hatch Creation tab. The default 0.00° pattern angle is fine, but
you need to adjust the Scale setting.
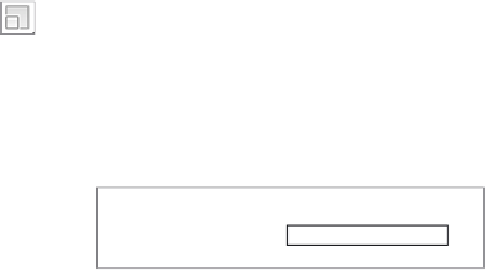
8.
The Hatch Pattern Scale textbox defaults to a scale of 1.0000. You can
manually enter virtually any number into this textbox, or you can
use the up and down arrows on the right side to increase or decrease
the scale.
Enter
6
into the Hatch Pattern Scale textbox to set the scale to 6,
and press
↵
as shown in Figure 11.3
FiGuRE 11.3
Setting the Hatch Pattern Scale within the contextual Hatch
Creation tab
9.
In the Options section on the right side of the contextual Hatch Creation
tab, verify that the Associative option is chosen.
You can tell if the Associative option is chosen by the blue back-
ground that appears behind the Ribbon tool when the option is enabled.
Associative hatches automatically update the areas they cover whenever
their boundaries change. If you delete any component of the boundary,
however, the hatch becomes nonassociative.
10.
Choose the Pick Points button on the far left of the contextual Hatch
Creation tab in the Boundaries panel.
11.
In the south elevation view, move your cursor somewhere near the
middle of the roof area.
A preview (Figure 11.4 top) of your hatch appears within the roof area.
With this preview correctly displaying the AR-ROOF pattern in the roof
area, click and then press
↵
to create the hatch (see Figure 11.4 bottom).
12.
Zoom into a view of just the south elevation. Notice how the appear-
ance of the hatch pattern gets more detailed as the roof gets larger on
the screen.


Search WWH ::

Custom Search