Graphics Programs Reference
In-Depth Information
Here you saw that a command called Stretch is issued by clicking a grip point. As you'll see
in these next steps, a handful of other hot-grip commands are also available:
1.
Notice that the grips are still active. Click the grip point that you moved before to make it
a hot grip again.
2.
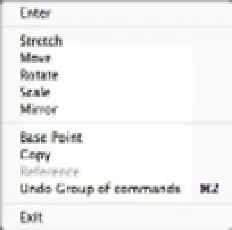
Right-click (or two-finger tap if you use a trackpad) to open a shortcut menu that contains
a list of grip edit options (see Figure 2.26).
FIGURE 2.26
A list of grip edit
options
When you click the joining grip point of two contiguous line segments, AutoCAD selects
the overlapping grips of two lines. When you stretch the corner away from its original
location, the endpoints of both lines follow.
3.
Choose Base Point from the list, and then click a point to the right of the hot grip. Now as
you move the cursor, the hot grip moves relative to the cursor.
4.
Right-click again, choose Copy from the shortcut menu, and enter
@1<-30
↵. (Metric users
should enter
@3<-30
↵.) Instead of the hot grip moving and the lines changing, copies of
the two lines are made with their endpoints 1 unit (or 3 units for metric users) below and
to the right of the first set of endpoints.
5.
Pick another point just below the last. More copies are made.
6.
Press ↵ or enter
X
↵ to exit Stretch mode. You can also right-click again and choose Exit
from the shortcut menu.
In this exercise, you saw that you can select a base point other than the hot grip. You also saw
how you can specify relative coordinates to move or copy a hot grip. Finally, you saw that with grips
selected on an object, right-clicking the mouse opens a shortcut menu that contains grip edit options.
Moving and Rotating with Grips
As you've just seen, the Grips feature is an alternative method for editing your drawings. You've
already seen how you can stretch endpoints, but you can do much more with grips. The next
exercise demonstrates some other options. You'll start by undoing the modifications you made
in the preceding exercise:
1.
Press F-Z or type
U
↵. The copies of the stretched lines disappear.
2.
Press ↵. The deformed door snaps back to its original form.
Pressing ↵ at the Command prompt causes AutoCAD to repeat the last command
entered—in this case, F-Z or U.