Graphics Programs Reference
In-Depth Information
4.
Click the grip on the back portion of the section plane, as shown in Figure 22.44, and drag
it toward the right so the jog looks similar to the third panel in the figure.
5.
Press the Esc key to get a clear view of the new section.
As you can see from this example, you can adjust the section using the grips on the section
plane line. You can use the Nearest osnap to select a point anywhere along the section line to a
jog. Click and drag the endpoint grips to rotate the section plane to an angle.
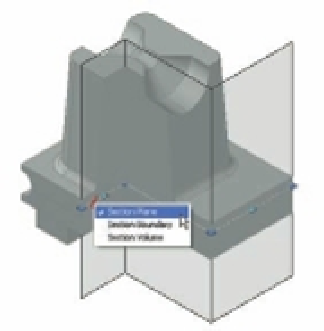
You may have also noticed another arrow in the section plane (Figure 22.45).
FIGURE 22.45
The arrow pre-
sents additional
options for the
section plane.
Click this arrow
to display the menu.
When you click the downward-pointing arrow, you see three options for visualizing the sec-
tion boundary: Section Plane, Section Boundary, and Section Volume.
By using these other settings, you can start to include sections through the sides, back, top,
or bottom of the solid. For example, if you click the Section Boundary option, another boundary
line appears with grips (Figure 22.46). To see it clearly, you may have to press Esc and then select
the section plane again. You can then manipulate these grips to show section cuts along those
boundaries.
FIGURE 22.46
Another boundary
line appears with
grips when you
click the Section
Boundary option.