Graphics Programs Reference
In-Depth Information
attributes are currently 0. The cone's RotateX attribute turns orange in the Channel
Box, meaning a driven key has been set.
6. Select the sphere, and raise it in
Y
to a height of 5. Select the cone, and rotate it in
X
to
1800 to make it spin properly. Click the Key button in the Set Driven Key window to
specify that when the sphere is at a height of 5, the cone's RotateX attribute is 1800
degrees. As the sphere's height increases from 0 to 5, the cone spins from 0 to 1800
in
X.
An Advanced Set Driven Key: The Hand
Automating some animations on a character is indispensable to an animator. This can't
be truer than when setting up an SDK for hand control. After you model and bind a hand
to a skeleton, you're ready for an SDK.
Open the scene
poly_hand_skeleton_v05.ma
from the Poly_Hand_Anim project on the
CD, or use your own file that has the hand and its skeleton and is bound (either smooth
or rigid) to the skin. Your file shouldn't have animation, though. Set your hand to the
bind pose before you begin.
Creating a new Attribute
First, you'll create a new attribute called index_pull to control a contracting finger:
1. Select the hand. (It's best to select the top node handTopNode instead of just the poly
mesh of the hand.) In the handTopNode tab of the Attribute Editor, click the Extra
Attributes section. For now, at least,
this section is empty.
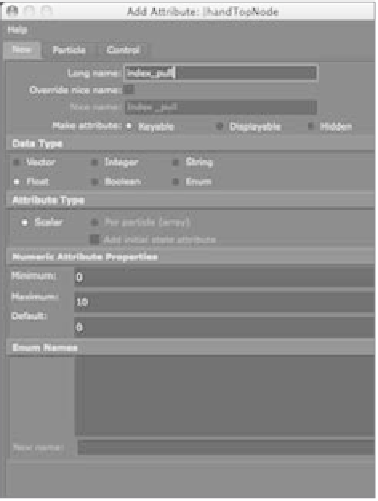
2. In the Attribute Editor menu, choose
Attributes
➔
Add Attributes to open
the Add Attribute window, which is
shown in Figure 9.60. In the Long
Name field, enter
index_pull
. Maya
will automatically display that attri-
bute as “Index Pull” in the UI. Make
sure the Make Attribute Keyable check
box is checked and that the Float
option is selected in the Data Type sec-
tion. In the Numeric Attribute Prop-
erties section, set Minimum to 0, set
Maximum to 10, and set Default to 0.
Click OK.
Figure 9.60
The Add Attribute window