Graphics Programs Reference
In-Depth Information
After you click OK, the Index_Pull slider appears in the Attribute Editor and the
Channel Box. This attribute alone will control the entire index finger.
Assigning the Set Driven Key
To set up the relationships with the SDK, follow these steps:
1. With the top hand node selected, open the Set Driven Key window (choose Animate
➔
Set Driven Key
➔
Set). Click Load Driver to specify that the hand should drive the
animation.
2. Because you're animating the index finger
pulling back, you want to drive the rota-
tions of the top three knuckles. Shift+click
all three knuckles on the index finger. Click
the Load Driven button. All three knuckles
appear on the bottom.
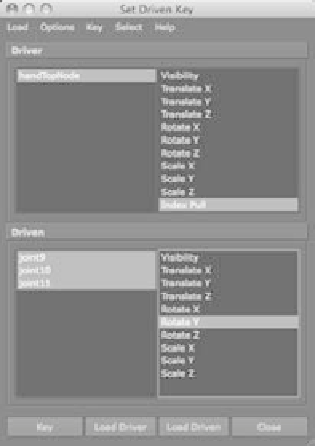
3. Select the hand's Index Pull attribute and the
three knuckles' RotateY attributes, as shown
in Figure 9.61.
4. With the rotations of the knuckles at 0 and
the index_pull attribute at 0 as well, click the
Key button to set the first relationship. When
index_pull is at 0, the finger is extended.
5. Select the top hand node, and set the index_
pull attribute to 5.
Figure 9.61
The Set Driven
Key window for
the hand
Figure 9.62
The bent index
finger
6. Select the fingertip's knuckle (joint11 in the CD file), and rotate it in
Y
to 20. Select
the next joint up the chain (the middle knuckle, joint10), and rotate it to 35 in the
Y-
axis. Select the final index knuckle (joint9), and
rotate it in the
Y-
axis to 5. Click the Key button. When
the index_pull attribute is at 5, the finger assumes this
bent position.
7. Select the top hand node, and set index_pull to 10.
8. Select each of the three knuckles. Set the tip to rotate
to 65 in Y. Set the middle knuckle to 60. Set the last
knuckle to 50. Click the Key button to see the result
shown in Figure 9.62.
Select the top hand node, and change the value of the
index_pull attribute to animate your finger. All you need
to do to pull the finger is to set keys on that attribute,